Monday, 23 January 2023

Programs to manipulate GPS Navigation files

 We have found a wonderful benefit of having our vessel navigation move into the digital age. Most electronic navigation systems produce collectable data in a variety of formats. While there can be an assortment of statistical and performance information collected from the different components of the on-board navigation system. I will focus on the data sets dealing with waypoints, tracks, routes and sonar logs. Most of the newer systems save the recorded data in a format called GPX. Sonar logs are the exception to this rule and does vary with model and brand of unit collecting the data.

GPX files have the ability to contain 1000's of waypoints and an enormous number of tracks and routes.

Data loggers are becoming popular
Keep in mind data loggers are becoming popular and cheaper by the day, most loggers store raw information in NMEA0183 format. Rather than scroll through the data looking for anomalies, the use of the listed programs that handle NMEA data will certainly make life easier. Whether you want to do conversions or analyse the information to see how your systems are performing.  

Saving Time
Most navigation systems, even the early models have been producing and storing data. Why bother doing anything with this data some may ask? Saving time would be our first response. We personally have found it is very time consuming creating the routes and waypoints while passage planning for an upcoming trip. Creating the electronic copy of waypoints from a cruising guide or notes can take up a significant amount of time before an outing. If we were to start from scratch it would take many hours to recreate and enter the coordinates and information for all the routes and waypoints we have created or collected over the years. So having a backup is important should we need to change navigation systems or even do a software upgrade or factory reset, restoring the waypoints and tracks is then very easy.  The other advantage of being able to store waypoints and track information is the ability to upload to a new, secondary, or clone several navigation systems or to share information with friends.  

Things can and do go wrong
Like any record, things can go wrong, there may be a spike or break in the track data that needs to be fixed. With the right software, editing routes, tracks and waypoints is straight forward. It could be things like removing spikes or perhaps totally removing the detour to your secret fishing spot before sharing the track to guests at next weekend’s BBQ at the club. There is also the ability to sort your waypoints or tracks and then group them into several areas so the file does not become too large. In a lot of cases it isn’t good having the chartplotter overflowing with waypoints routes and tracks in areas you’re not likely to either, visit again or you won’t be revisiting until next years vacation.  Also the amount of on-board storage capacity for collecting new waypoints and tracks is greatly reduced. 

Backup of the created data
Keep in mind most standalone navigation systems and chartplotters only have a set amount of data storage on board. Once this set limit is reached, information is overwritten and lost forever. So being able to store the data off the system, clearing up storage space can have benefits. Firstly, restoring performance when the system is no longer bogged down while keeping track of a large selection of storage files. Secondly, you now have a backup of the created data.  

Waypoints can have text information added to act as a memory jogger. For example, a reminder of the bottom type and the depth of an anchorage, or data about transiting through the area.  Additional waypoint data can also include the local tidal station or function we have started to make good use of is an active link function. This works well when the OpenCPN chartplotter is running on a PC\laptop. This link can be used to open a .PDF file on your computer hard drive, a great way to store additional information about what’s happening at the waypoints surrounding area. The link can also open a web address if formatted correctly. As an example, a file stored in the C:\ directory can be opened at the selected page number of a cruising guide. This link file:/C:\Matilda Cruising Guide.pdf#page=1 will open the file ‘Matilda Cruising Guide.pdf ‘at the selected page and in this example will be page 1. 

Programs to manipulate GPS files including .GPX (GPS Exchange Format). GPX the file extension of one of the most commonly used GPS file format. GPX, or GPS Exchange Format, is designed as a common GPS data format for software applications. It can be used to describe waypoints, tracks, and routes. The format is open and can be used without the need to pay a license fee. I will also mention some of the programs have the ability to look at and allow you to edit NMEA format files as well. Possibly not as popular as the other file types as this is usually the raw data from instruments and GPS/GNSS units. 

When passage planning another good reason for using some of these software tools is the ability to cross check your planned route on differing base maps or Google Earth. 

The waypoint tracks and routes can also be checked on Memory Map charts, these are a copy of the official Australian charts.  We find it saves drawing lines on the paper equivalent. Unfortunately unless you already have Memory Map charts then this tid bit if information won't be much help as they are no longer available.

However we use SASplanet to look over our planned routes now, and the main reason is due to being able to select a variety of different sources of satellite charts.

If you need to edit or manipulate GPX data files, older file types, or even NMEA data files there are several programs that should cover most formats. In no particular order, all but one of the programs were free downloads at the time of writing. As is usually the case when we first start to use this data, to create files or correct errors it can be confusing and time consuming. Although, with a little persistence once you start it doesn’t take long to become proficient.

Another post we have done is the way we navigate in the digital age. Read it here  also check out the tab on the home page "Technical & Help Articles, OpenCPN, OpenPlotter, Navigation, Raspberry Pi " for other hints and tricks we have picked up along the way. 

GPSbabel

I use this program to convert my Lowrance chartplotter tracks to GPX format, but this program has an enormous collection of formats from a wide variety of chart plotter brands to choose from.  

https://www.gpsbabel.org/download.html

EasyGPS 

EasyGPS is the fast and easy way to upload and download waypoints, routes, and tracks between your Windows computer and your Garmin, Magellan, or Lowrance GPS. Good for those into geo caches. The program is continually evolving and adding functions making it great for different users. 

https://www.easygps.com/download.asp

GPX Editor 

I have used and really like this program and know a couple of other cruisers who swear by it, one in particular has a hobby collecting others information and creating cruising/anchoring guides to share.  This program is great for changing the data in tracks to remove spikes, or even removing excess data. I like this program to view my GPS performance, it’s easy to keep an eye on a track to see how jittery or smooth the GPS positioning is. The routes tracks and waypoints can also be displayed on a world base map to give you an idea of their position. 

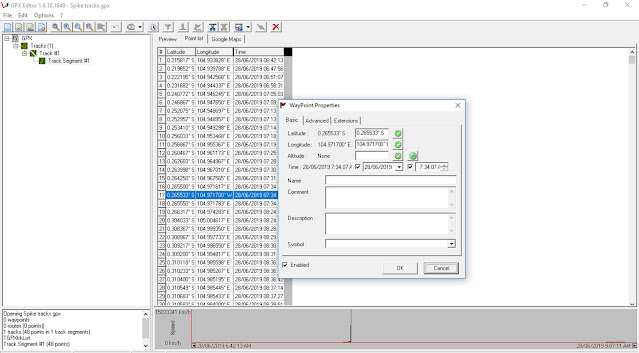
Editing a spike from a track record using the function in GPXeditor, the graph on the bottom has the scale overload due to the spike speed of traveling 30000Nm in the matter of a few seconds, once the waypoint is corrected and the file reloaded the scaling should then make sense and be informative data. 

GPXeditor used to check a track overlaid on an open source map

Inspection of a track into a Lagoon,  using the open source map, your probably not going to use this for navigation but at least you know it is in the right place even though it lacks detail
GPX editor the green box on the bottom of the screen showing smooth speed GPS fixes. The speed is not jumping around as it would be with poor fixs. This is a good way to inspect the performance and quality of your navigation positioning. Erratic speed can be an indicator of poor positioning, if on going it may be time to troubleshoot, how you ask?, for example is the GPS/GNSS antenna being blocked from time to time, or as another example, is it possible to have multi path (metal pole next to the antenna) or reflections from the sea surface or objects on board.  

GPXeditor blurb form the host site: Load, modify and save your GPX 1.1 files. Add and remove waypoints, edit track and routes, simplify tracks (reducing file's size), clean recorded data, add and edit GPX metadata, edit waypoint, route and track properties, all with real-time preview.

GPX See 

https://www.gpxsee.org/

A handy program to view GPX files. It also supports file formats like FIT, GPX, NMEA, LOC and JPEG that are geotagged. This program will also open for view, the popular .mbtiles and .kap files. These two file formats are the most popular used for making satellite photo charts for use with OpenCPN.  I find its a good way to check the created chart is clear and readable with out firing up OpenCPN and adding the files into the chart directory. 

 You are also able to check elevation temperature, heart rate and power if recorded. Great for those with FIT watches. This program will display your waypoints, tracks and routes on selectable base maps. Very handy as a crosscheck, as there is the possibility to graph different information contained in the file.

A satellite photo chart displayed in GPXSee, great way to view the chart rather than upload it to the navigation system

GPXSee used to check a track overlaid on an open source map

Inspection of a track into a Lagoon,  using the open source map not a lot of detail this time.


Garmin Mapsource   

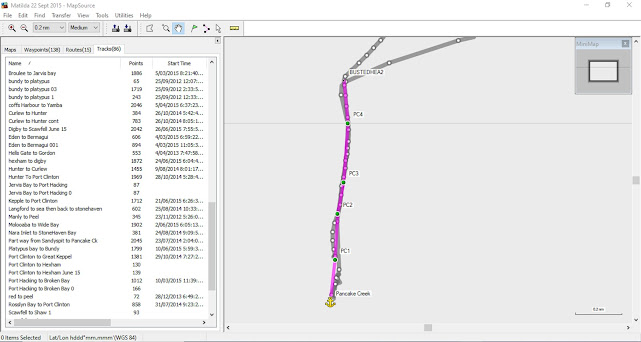
The Garmin Mapsource is used to up and download files from Garmin products, in our case we have Garmin GPS H72 and the later GPS 73 handheld units. I believe Mapsource will do the whole range of Garmin units, especially useful for the ones with a USB connection, I have been told it will also work seamlessly with the older serial units with Garmin format turned on. I don't have any problems manipulating and editing GPX files with this software. Map Source will also open and save in several formats: gdb, mps, gpx and loc.

I have used Mapsource and GPX Editor to edit waypoints. There is also a function to display the routes, tracks and waypoints on Google Earth which makes it extremely functional when passage planning.  To do this you need to have Google Earth Pro Ver 7.3.1.45 , this may take a bit of searching but is available from the Google Earthsite. https://support.google.com/earth/answer/168344#zippy=%2Cdownload-a-google-earth-pro-direct-installer   Select the correct one for your system from the list of direct installers.

The creation of waypoints and Routes is simple and the waypoints can also have web links embedded into the properties.  While it is possible to add a variety of icons to the waypoints they do not travel to other navigation programs and in most cases when opened will have the default icon of the system assigned.
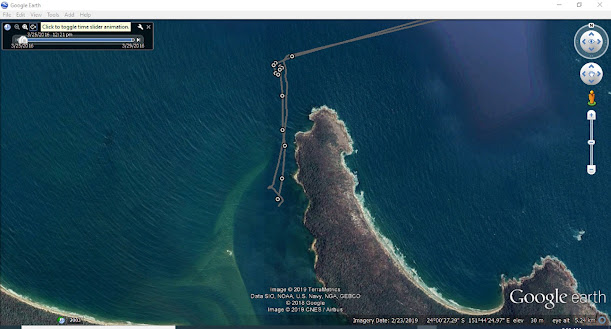
Tracks into Pancake Creek shown overlaid on Google Earth by the Mapsource Program.
Creating a route from a track is easy, then we check it out on a satellite chart to make sure we are in the clear. Some auto create route from track functions with other programs, while easy, can put you in trouble shortcutting through shallow bends or smoothing out course changes that were used to dodge an obstruction


Passage Planning, or sharing with others,  after creating a route from a track into a Pancake Creek entrance and then overlaying it on Google Earth using Mapsource.  

Recently I uploaded a large GPX file Cruising Guide (over 200 waypoints) to my Garmin GPS 73 using Mapsource, the waypoint icons are not the same but for a screen size of the handheld it doesn't really matter. The routes tracks and waypoints can be displayed on Google Earth to give you an idea of where you’re going or have been. 


Checking where we have been our track displayed on Google Earth using Mapsource. The same track into the lagoon as seen on the previous programs. 

While I have said its possible to display the information on Google Earth the right version of Google Earth needs to be installed, the newest versions don't connect with Mapsource but I know Google Earth Pro_7.3.1 works with MapSource Ok. The only thing to keep in mind is if you also use Chrome you will need to disable the option to automatically update Google software. If you don't the next time you want to use the GE program, if the PC has been on line its almost guaranteed Google Earth will have  upgraded without any input from you. 

Link to install the older version of Google Earth 

Once on the above page scroll down the page until you see Download Google Earth Pro for desktop
Then toggle the drop down:  Download a Google Earth Pro direct installer. to list the older versions of the program, Select the older version of Google Earth Pro Program for you PC from the list. 

I have on numerous occasions joined short breaks in tracks, or removed the odd position spike with the Mapsource program. While its not possible to edit the actual waypoint numbers you can remove it if it is causing a problem.  Some of the other programs GPXeditor and Wordpad can edit the numbers and signs in the coordinates.  

Data spike may have been caused by the navigation system missing the sign on the coordinate


Editing and viewing data spike, in this case using Mapsource I can really only remove the spike waypoint, there are options to actually fix the spike in other programs mentioned earlier. 

https://www8.garmin.com/support/download_details.jsp?id=209

Here is an easy way to install the program on a windows computer. Download MapSource software updater from Garmin. 

1. Unpack or extract the content of MapSource_6162.exe download using WinRAR. 
2. From the extracted files, run MAIN.msi or MSMAIN.msi. 
3 Then, run Setup.exe. 

Note: The sequence to execute Main.msi and then Setup.exe is important to avoid “Previous MapSource not found!” error. 

Garmin MapSource should now be installed. 

Reef Master Sonar Viewer

For those of us who have chartplotters that can save out the sonar file or log using .SL2 format there is only one program I found to be useful. Unfortunately it’s not free like the others listed above, however it does have a free trial period. The other drawback I see is that once you download your sonar file and overlay it on the small chart (world base map) there is no way to then save it as a chart usable by the chart plotter or OpenCPN for navigation (unless I am missing the point). 

It is easy to use and may be helpful if you’re trying to explore new territory with the tender before you take in the deeper draft vessel into. 

https://reefmaster.com.au/index.php/try-sonar-viewer


The Advanced Option:

A Text Editor that can recognize XML format files, which .GPX files are based on the likes of WordPad or Word to name two of several. I will say this is the advanced option because there are options to edit any part of the file. 

Below is some sample text from a .GPX file opened in a text editor. As can be seen it’s not for the faint at heart. One syntax error and the file may open correctly when returned to the chartplotter/GPS receiver.  Always make a back up before doing an edit, if you realize that the file has been corrupted in some way during the time you have it open, just close the program and dont save the file. The file can then be reopened to continue with the edit. 

That said I love to edit files with this option because I can change bulk information using the search and replace. I have on occasions changed all the waypoint icons or been a little more specific with what I was searching for and replaced ones that meet only certain criteria. The good part about the search and replace is I can change a thousand entry's in a number of seconds. The same process doing it one at time would take hours. 

The same can be done for editing individual waypoints. For a while my GPS receiver decided to toggle the east and west sign randomly resulting in large data spikes. Searching through the record is easy using the search function, if for example you are looking for a specific waypoint name, or coordinate, or for that matter waypoint icon. Using wordpad to edit the file, I could edit the way point in question and correct the sign of the Longitude easily.

Always make a backup of the file before editing, and when you have finished the edit push the save key/button, not the save as key. 

A page grab of a GPX file open, while it can look daunting as long as your careful then editing this way is quick and easy.  

Editing a waypoint to remove a data spike in a track record. I found this to be the easiest way to edit this type of error. I  use some of the other graphical programs to pinpoint where the error is then quickly find the fault and rectify it. 

When you have finished the edit push the save button as shown here, then to close the file X off the window.


OpenCPN 

OpenCPN can also be used to save off specific sets of waypoints, tracks and routes. Actually editing the track files by removing or modifying positional data is not possible. Adding data (links and information) to the waypoints is extremely easy as is assigning a variety of icons to identify the waypoint type. Routes can be modified and waypoint added or removed to dodge obstacles or give a better track to the destination. 

Another nice feature is the ability to include information including the local tide station, and at what scale you can have the waypoint disappear from the chart to reduce clutter. There are also hotkeys to hide other chart features, a quick link to hotkeys to reduce clutter here. 

Keep in mind all the nice waypoint symbols available in OpenCPN will be lost if you open and save the GPX files with any of the programs listed other than WordPad or OpenCPN.  However, you can open the waypoints and select the waypoint icon once uploaded into OpenCPN.


https://opencpn.org


Information stored in Waypoint information text box, easy access to additional information is just a double click away. Just double click the waypoint to access any information  if there is any about the waypoint. 

Creating a link to a cruising guide stored on the local PC to open at page 22 

A guide to creating your own links to a cruising guide or even a website (internet connection required) 

The finished link in the waypoint properties, tide station information and scale information can also be stored in a .GPX file created on OpenCPN. 

Another view of the information stored in Waypoint information text box


OpenCPN Track that has over 30 thousand miles caused by large data spikes that can be removed or repaired by some of the programs listed. 


The additional information available to be stored in the GPX file. As can be seen here the tide station and range rings can be displayed.  There is also a number of ways for the waypoint to be displayed including not being shown at all or being hidden once the chart is above a selected scale. 

Always make a backup of the file before editing
As a general rule no matter which program I use, I will always make a backup of the file before editing it just in case I somehow corrupt the structure or even remove too much data. After editing a file try and display the saved route, track or waypoint on the chart plotter or Google Earth looking for errors. It’s simple things that could cause problems later, like tracks or routes passing over sandbars, reefs or land. 


Sunday, 22 January 2023

Washing Machine on Board

 Washing Machine on Board Our Journey.  While reading a recent article in a Cruising magazine, I noticed that a lot of ladies settling into the cruising life had a common complaint, of not having a washing machine on board. I thought if we told our story it may help others and perhaps shed some light on the fact that it may not be as big a problem as it first appears. The reality is the more things that we can do to make life on the water easier the better it is so we can have more time to spend doing what we enjoy.

For a long time we didn’t have a washing machine on board, I wouldn’t come into the argument that it will save time and effort. However, looking back I think my main aversion to having a washing machine was due to not being able to get my head around where to store it. In my mind’s eye all I could see was domestic machines and I think that added to the problem of size. 

Besides, at the time we were in a marina securely fastened to the dock and were in a stone’s throw of the amenities block, and really it was all too easy to sweep the problem under the rug. Having full time employment we determined that the cost of the weeks washing wasn’t going to break the bank.  At the time we were allowed to hang the washing on the boat to dry. If we weren’t, no one said anything about the boat being full of clothes so we took that as an endorsement of the practice. Although, now we do know some marina managers are on to a line full of clothes quicker than a hungry kid eats a jam doughnut.

Wash day in a secluded bay, no problem having the wash hung out to dry. 

Once we went cruising full time, I quickly learnt that we had been living in a marina with very reasonably priced washers and dryers. In the first marina we visited after leaving our home base we found the price for a load of washing was double what we had been paying. To top it off, the marina managers expressly prohibited the drying of clothes on the vessel, so that meant more out lay of the cruising kitty to dry the clothes. Micro seconds after hanging the recently used damp towel over the rail one of his boys was knocking on the hull asking if we had read the six hundred marina rules and in particular rule five hundred and ten subsection B ‘thou shalt not dry clothes or towels in view’. 

We also came to realize we couldn’t continue to rely on being in marinas as we were going to be spending a lot of time at anchor to maximise the cruising budget.  When we dropped anchor in a new port we would have to work out where the local laundry was and washing day became an expedition similar to resupply day. We became quite efficient at finding our way there and back on public transport. Like resupply expeditions out and about we saw a lot things the people who stay full time in marinas miss.

 On the other side of the coin some of the things we did see could not be unseen if you know what I mean. We would have loved to have used the local port marina laundries.  But as we found out this is not allowed because we were not paying guests. I would have understood if the machines were free and installed only for the marina guests but mostly these machines were more expensive than the ones in town.  Price wise our out of pocket expenses would have broken even due to the transport costs. 

Heck one marina manager wanted to charge us to tie up the tender to buy fuel and gas (supplied through him) and use his washing machines. No other amenities were included in the price of tying up the tender at ½ the day rate of a berth for a thirteen metre yacht, we left feeling upset. It’s no wonder this marina has to give away seafood dinners to get people to stay.  In spite of the success of getting our clothes washed in town we decided that we needed a plan for when we travelled further afield. We didn’t want to be dependent on feeding coins into the laundry’s in town, so we had to work out a way to wash our clothes on board easily.

After reading glowing reviews about a camping washing machine we had a brain snap and in came the egg shaped clothes washer supported on a flimsy stand and powered by a hand crank. The unit’s advertised selling point said it was able to wash a 1kg load in minutes with a minimum amount of water.  Sounds great to me, so an internet search followed and the new washer was purchased on line, then shipped to the local post office. 

While I appear to give this machine a bad rap, used for small loads and rotated slowly as its meant to operate it would be ok, it just wasn't up to the task we had in mind

While our galley has reasonably good counter space the newly acquired machine didn’t really fit so we could use it easily, and the chart table was out of the question lest the lid fly off and drench the charts and instruments stored or mounted behind. So we would use it in the cockpit, but when this hand cranked machine was in use it was hard to keep it in one place as the centrifugal force would try to fling it off the seat or try and launch it into space. Then we slowed the crank speed down but it still didn’t work as we had envisaged. This portable, efficient and environmentally friendly washer didn’t really work for us, perhaps we overloaded it, but I don’t think so. The other reason for its down fall was that it took up more space than we had budgeted for (304 mm x 406 mm) and finding a counter top to use it on wasn’t easy. The stand that supported the twirling egg shaped drum really did leave a lot to be desired. At the next town we visited we left the hand cranked egg in a laundry after we used the facilities and put the whole episode down to experience. You know how it goes ‘Experience is that what you get when you didn't get what you wanted’.

After a nice season in the Whitsundays we headed to Sydney with plans to tour Tasmania. That all came to an end when I broke a couple of ribs in a fall.  We ended up in Eden while I recuperated and a couple of things came to light. Taking the weeks laundry into the town laundry wasn’t easy, the first part of the trip was getting the washing into the tender and with broken ribs that didn’t happen easily unless we did the transfer in small loads, of course getting it out at the jetty was just as tiresome.  

On a trip into town to get a gas bottle filled we found the local gas supplier also had a shop full of goodies. In amongst the displays of home brew kits and camping gear was two small washing machines. These machines looked like domestic machines just smaller. Or as we have become used to saying here while traversing Asia ‘same same but different’. Debs eyes widened and rather than take a jab to the ribs I quickly took down the details of the machines and when back on board we discussed the pros and cons of the two machines.  

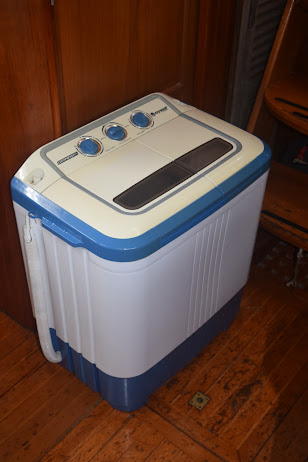
The new washing machine keeping it simple.  

Later that evening we called up a few of the long term cruising couples we know to find out if they had machines on board. As it turns out they all had washing machines and from the short conversations with them we certainly found far more reasons to have a machine than not.  One line hit home ‘couldn’t afford not to have one on board old boy’.  What we did find interesting was the group was evenly divided between a fully automatic machines and the older style twin tub. One couple had a full size front loader machine fitted into their modern cruising yacht, but they wished they had a smaller machine due to the space requirements and water usage. 

Washing machine stored and ready to go

Where to store the washing machine is a perplexing problem for more than one cruising skipper. I must admit it was one of the reasons I was so anti washing machine on our vessel. Now we know the smaller light weight units don’t need a dedicated cupboard space for storage/mounting. Being light weight we can easily move it around the cabin on wash day and when not in use it finds a place amongst the pleather of items in one of our back cabins or should that be store rooms. The machine is easily secured before a passage with a simple cargo strap connected to pad eyes. So the machine doesn’t need to take up large amounts of cupboard space like a domestic sized machine. Mounting was not an issue and the other thing that made the smaller machines attractive to us was that we didn’t need to plumb in water, power and overcome the complexities of drainage to remove the waste water. If we want we can take the machine on deck and do the washing there or in the cockpit.  

Our vessel is fitted with a pure sine wave inverter, and we have a reasonably large battery bank. The inverter is capable of supplying 2500 watts so this was one hurdle we didn’t need to jump. So if you are thinking about installing an inverter, while it may be slightly more expensive to start with, get a pure sine wave output. There are several reasons to get a pure sine rather than a modified sine. Running shore based/house hold appliances efficiently is one of them. The modified sine or quasi sine units do not operate house hold appliances efficiently, especially motor driven appliances (washing machines) these may break down, burn out prematurely or if they are electronically controlled they may not work at all.

A big inverter, a lot bigger than necessary to run a washing machine, it is however a pure sine wave inverter which is best for running electric motors. 

You don’t really need a generator when installing a washing machine if you get the right machine, of course you will still need to do your homework and make sure you don’t deplete the batteries or overload the inverter. On the subject of generators we know of two couples who have troubles with running their washing machine on the generator. It appears there is stray RF interference that causes problems with the controls (automatic machines). Of the two who have problems one of the vessels can use the machine once the batteries are nearly fully charged, so perhaps the battery charger is causing some form of interference. The other couple could not get their machine to work on the generator at all, but it would work fine on the inverter.  

Some of the white goods; (read) washing machines available at main stream white good retailers may not be suitable for a smaller boat. Some of the newer units can take over an hour on a quick wash, not sure how this works but this is also supposed to be environmentally friendly and consume less power. But I wonder if this overall power consumption is including all the power saved outside the house due to the small water usage. When running on an inverter or generator the best option is to have a washing machine that is efficient while also having as short a run time as possible. Do you need a dryer to go with the washer, well that would certainly need a generator due to the load on the electrical system to heat the dryer elements. I do know it is possible to run a dryer on an inverter, but the battery bank necessary to supply the required power for the time required to dry a load would mean the vessel battery bank would be enormous. 

A neat and tidy 12 Volt washing machine. However it does have a dark side, it will consume 78 litres per-load. If your water supply is good then go for it as its a fully automatic unit. I think it main market is RV campers in a park with connected water supply.  

Water usage can be a problem, while we have a water maker we found the best thing to do is every time we start the motor we run the water maker even if the water tanks are nearly full. The excess water is stored in a couple of jerry cans we keep for back up water supply. A good reason to keep a couple of jerry cans of water is so you don’t have to run the ships water pressure supply when filling the washing machine. Then with simple water management when doing washing loads we have found we don’t need a great deal of water for several days washing. Really our clothes just don’t get that dirty on the boat unless we have a breakdown or need to do some dirty work. When cruising in Australia and most of Asia we have found it is reasonably easy to get a couple of jerry cans filled up, so we can do a load or two of washing. 

Another fully automatic machine, not sure on the water use as its not listed in the spec sheet. There is no reason the rinse water couldn't be recycled to be used in the next wash load with a little thought.  

Plumbing, ok so this is where it gets tricky, or not. Our washing machine does not require water plumbed in to make it function. Some models do and it would not be a big job to supply water to the machine. If you’re handy a ‘T’ off the water supply with a ball valve and a domestic style connector will do, but there are lots of options.  Drainage, we put the waste water into a slump in the bilge and pump it over the side, bio degradable environmentally friendly washing powder is a must, but still don’t do the washing in a coral atoll. This slump and pump arrangement works well for us as we recycle water during the wash cycles but more on this later. 

Ok here are the specs of the two machine’s we were deciding on, there are other models now on the market. Different brands have different specs and load capacities, but the increased load capability usually also increases water usage. Both of the machines we short listed were Ezy Wash Portable washing machine and as you can see neither are very heavy to move around. The sizes are for the lid down so if fitted into a cupboard allowance will need to be made for the lid to open. Reading between the lines, neither machine will pump water out, the drainage is gravity feed. The automatic machine will dump not pump the water out when the cycle is finished. The Twin tub has a drain leaver that must be switched to facilitate emptying the machine. We know cruisers who have the automatic machine and love it, we didn’t go down that route due to not being able to control water usage and the need to plumb in the water to fill the machine. Neither machine are heavy on the power. The twin tub 240 Watt machine will suck just over 20 Amps from the batteries through the inverter when running normally and if you crank up the spin at the same time we usually see 32 Amp draw on the twelve volt battery bank for the short time the spin runs for. It’s hard to give a specific number due to the intermittent forward reverse function of the agitator. The final figures you see will vary and be dependent on the efficiency of your inverter. 


Portable Automatic Washing Machine

Features                 Specifications

Fully automatic with spin function Size: 640H x 420W x 410L mm

Electronic control system Overall Weight: 16 Kgs

Plated steel tub         Power: 220-240VAC / 50 Hz

Lint filter         Rated Power: 235 watts

Automatic draining Max Water Pressure: 0.6Mpa

Six washing programs Capacity: 2.5 Kgs

Water Inlet Hose: 1000 mm

Water Outlet Hose: 1400 mm

Max Water Use: 60Ltr (on high setting)


My what big bowls you have 

Portable Twin Tub Washing Machine

Features                        Specifications

Top loading twin tub with spinner         Rated Voltage: 240V AC/50Hz

2.0kg wash and spin capacity Rated Power: 240W - wash and (+) 120W - spin

Wash and spin cycle with timer Size: 650H x 560W x 362D mm

Two wash levels – normal and gentle Capacity: 2.0kg 

Quiet operation                 Overall Weight: 12.0kg

Bottom mounted agitator

Strong ABS plastic housing

Self-draining


Why did we get the twin tub, well KISS (keep it simple sailor), we had total control over the length of time the cycle runs either wash or spin. There were no fancy electronic controls to play up. The housing and bowls were plastic not coated steel, so this should alleviate any problems with rust in the marine environment. Water usage was also totally in our control. Now back to the recycling water that we do, when the rinsing of the first load is complete we use this water for the next wash load that is of course unless someone has just rinsed a new red towel. We have also found that the tub of wash (detergent) water is good for two loads, so is the rinse water, both are dependent on water colour and what is being washed or rinsed. The only tricky part to recycling water is to catch the water out of the clothes being spun, we simply catch it in a bucket and put it back into the machine.  Our water usage for four kilograms of washing will usually be about forty litres. It’s a little more work but easily accomplished in a morning, all without having to feed money into shore based machines or breaking the on board power or water budget. 

In conclusion, 

We have come across some frontloading compact washing machines, not as light or portable as the machines we had shortlisted for our vessel. These are worth a look if you’re contemplating a machine and have a dedicated room to mount/install a front loading washing machine. When making enquiries you will be looking for a Compact Washing Machine, these are not stocked in any of the main stream white goods retailers that we contacted.  Start with the RV/caravan accessory suppliers then once you start to make enquiries you can usually find a supplier in your area. Like us you will more than likely find one or two machines are rebranded and distributed and sold under different brands for widely varying prices, so shop around. One thing I would do is make sure the specifications they are supplying are for the machine you want to purchase, I have seen a wide variation for the same machine in the advertised specs.  Getting it in writing via email should be easy and that way if the truth has been stretched on water usage or power consumption you have recourse. 

The popular ones I have seen are capable of doing a 3 to 3.5 kg load. As I have already stated the weight of the machine may be a problem if you are thinking of moving it around on wash day.  The average weight of most is just under or over 50kg, most of which is a weight to help stop the unit being hurled into low earths orbit during the spin dry cycles.  Power consumption varies of course, some draw as little as 230 watts so this is something that shouldn’t break the power budget. However do your research on power consumption as we did find a wide variation between machines right up to 1700 watts for one machine when doing a hot water wash, by the sounds of that it’s heating the water.  Water consumption also varies between machines and some have specs that show excellent consumption, for example 19 litres on low setting and 45 litres on high setting. There isn’t a great deal of difference in the size of the compact machines or the one we have for that matter, the average sizes are 700mm(h)x510mm(w)x440mm (d) and being a front loader additional space above isn’t necessary like you would need for the top loaders.  

Front loader secured for passage

I was able to get a picture of one of our friend’s machine. It is fitted into the back cabin of their modern Jeanneau yacht, being a front loader the machine doesn’t need any overhead space for the lid to open. Their machine is a Candy Aquamatic 3.2kg machine they don’t move it around and it is all set up for use in place. When in use on the rapid cycle the machine will use <25 litres of water. They are very happy with the operation and performance of the machine. Securing is simple with the use of two cargo straps to keep it in place on passages. 


Fair winds and happy sailing

Friday, 20 January 2023

Bahasa - English Chart Text Cross Reference

 A simple cross reference, Bahasa to English for the most commonly used text descriptors when using charts in the local language. However in most cases the charts, either electronic or paper for Indonesia and Malaysia will use the Bahasa names to give detail to the chart. We printed it, laminated it, and kept it near the chart table/radio and also did one for the cockpit  chartplotter. 

Batu            (Br) Rock
Bukit          (B)        Hill
Gosang      (Gs) Bank, Shoal
Gunung      (G) Mountain
Kantangan         Mud Flat
Karang       (Kr) Reef
Palau          (P) Island
Puncak         Peak
Selat         Strait
Tanjung      (Tg) Point
Teluk         (Tk) Bay
Ujung       (Ug)      Point
Besar         Big
Kesil         Small
Laut         Sea

We also made really good use of the Google Translate App however you need a phone/internet connection to make it work. 

Wednesday, 18 January 2023

Cruising Spinnaker and How We Use Ours

Here is a post outlining how we set up and fly our cruising spinnaker, we have done a lot of miles under this very handy sail especially when we were getting into the equator regions. In those regions we would set the sail day after day to get where we were going. The funny (not funny ha ha) thing is a lot of cruisers wont go near one of these sails. We have even heard them called the widow makers, unfortunately the sail can get bad press  and we can see how if you don't have the right setup. We borrowed a sail and sock one time, and it was a terrible set up that caused nothing but confusion. The sail its self was ok but the ring thing, the best way to describe the sock arrangement was terrible to set the sail but worse to douse.  The reality is for hassle free set up and the all important, dousing, you need a good sock and a way to quickly de-power the sail. Keep it simple and remember that if your keeping a good eye  on the wind strength and pull it in when its on the rise, life will be a lot smoother for the captain and crew. Happy crew = a happy life. 

Here we are as we make way with our cruising spinnaker up  

On numerous occasions I have heard or read about people saying they have to motor consistently because the weather forecast got it wrong and the wind isn’t blowing or it’s not blowing the way it was forecast. Often the conversation will go along the lines of “we got up this morning and the forecast was for 10-12 Kn. (Knots) and when we were out at sea there wasn’t any wind”.

It’s a perception thing a lot of the time. The reality is the forecast was more than likely right and the wind was indeed blowing 10-12 Kn. With the boat speed (under motor) of 5 - 6 Kn. the apparent wind speed for sailing will look pretty low. If the wind was blowing 12 Kn. and you are moving along at 6 Kn. in the direction of the wind the apparent wind will only be 6 Kn. In some cases this isn’t enough to get the average cruising boat moving along very fast with the wind. Then throw in a little swell and before long the main and head sail will flap back and forth and make a terrible noise. Another reason to think the forecast wind direction wasn’t right is due to the apparent wind angles. This can take a bit to get your head around, the lighter the wind the easier it is to be tricked into thinking the wind is coming in forward of the beam when the true wind is actually blowing abaft the beam.

Looks like its perfect weather for the cruising spinnaker

The reality is the wind will never be blowing in the right direction if you don’t have the sail to make the most of the conditions. I must admit we did a lot of motoring when we first started to sail up and down the coast. Moving about in the trade winds would mean going with it. Those sunny days with glassy seas and a gentle 10 – 15 Knots did frustrate us. Even a poled out head sail didn’t help us attain the speed we required to reach the next anchorage before dark.

We talked to others and found a lot of cruisers have cruising spinnakers but don’t use them very often or at all. Most of the time the cruising spinnaker was inherited with the purchase of the boat. The new owners feel intimidated about setting and retrieving a light wind sail. This might be one of the reasons cruisers choose to forget they have this very handy sail. However if your set up correctly for a quick and easy deployment and retrieval there isn’t a great deal more effort in hoisting the cruising spinnaker then poling out the head sail.

Not much wind but we were still moving ahead and the motor was resting, as you can see by the 30 degree C water temp in the tropics, the cabin temp was all the better for it. 

What makes the cruising spinnaker particularly attractive is, that it is bigger than the conventional genoa and, secondly, it is effective over a wide range of wind directions and strengths. Unlike the standard spinnaker that is symmetrical on either side of its centreline, the cruising spinnaker has a definite luff and leech, with the luff being the longer of the two. Overall the sail is approximately 25% smaller in area than a conventional spinnaker, but it is about twice the surface area of a 150% genoa. The cruising spinnaker was designed specifically to enhance a boat’s downwind performance. Even when shorthanded it will make downwind sailing faster, safe and easy. So with this in mind why are there so many cruising spinnakers sitting in the sail locker or stuffed into the lazarette. From our experience the setup of the cruising spinnaker more than paid for its self in the first season just factoring in engine maintenance and fuel costs.

Cruising Spinnaker up. wind 9 Kn at less than 60 Degrees apparent and the Boat speed 5.1 Kn through the water. A lot of people don't believe this is possible but here it is and we did it on a regular basis. 

Cruising spinnakers are a great help to easily sailing in light to medium airs across the range from 60 degrees to about 155 apparent wind angle, depending on a few variables. The cruising spinnaker is often the difference between motoring all day in light to moderate air or being able to sail at the same speed or sometimes more than if you were motoring. However this is without the heat, noise, smell, and depletion of the cruising budget generated by the running the engine.


On days where the breeze was light and there was a little bit of a swell we would not put up the main, if it wasn't up it couldn't flap and carry on, we did however need extra care dousing the sail but that wasn't a problem. 

In very light air, under about 5-7 Knots true, the cruising spinnaker can be carried surprisingly close to the wind. We will often ghost along with the apparent wind forward of the beam. Occasionally upwards to 55 degrees apparent wind angle with a bit of attention to trim and steering. Sailing at 60 and 70 degrees is regularly obtainable with a little care trimming the sail. Of course swell is the enemy when trying to obtain tight angles of sail, as it will knock the wind out of your sail quicker than you can say Jack Robinson.

While the cruising spinnaker is basically marketed at being a down wind sail, here is a table that reflects a typical cruising spinnakers sailing angles.


Sailing Angles and Wind Speed


True Wind Speed

Apparent Wind Direction

5 - 10 Knots

55° - 155°

15 Knots

85° - 155°

18 Knots

120° - 155°

The table shows the direction and strength of apparent wind a cruising spinnaker can be effectively used, depending on fabric weight.


Some will say this cant be done, but here we are sailing along nicely. 

Not easy to photograph on board but here we are Wing on Wing.  Sail trim helps, its a learning curve but not a hard one. 

While there does not appear to be a great deal of talk about being able to carry a cruising spinnaker with the wind dead on the stern it can be done. It’s a case of slowly moving into a position where the boom can be moved out to the opposite side of where the spinnaker is set, wing on wing but no pole is involved. We have done this on several occasions, but the conditions do need to be right. If there isn’t enough wind, or the swell is at the wrong angle the main will not sit right. Any pitching or rolling movement can have the main sail flapping around like a flag. As an example, in the right conditions we have found that if we manoeuvre so the wind can be up to 160 on the port quarter and the main is to starboard it will usually sit nicely with the wind holding it in place. We use a boom brake as a preventer to control jibes, it appears that the wind spills off the main and into the spinnaker. The boat speeds up and quietens down and the sails are not flapping and complaining.

What do you need to fly a cruising spinnaker?

Many boats already have the deck gear in place to fly an asymmetrical spinnaker. If you don’t, setting up your boat from scratch is usually a fairly simple project.

Here's what you need to set up:

Halyard

While you can raise a spinnaker with a genoa/jib halyard, most cruising boats have a furling headsail, and a halyard isn’t available. You could use the spare headsail halyard if you have one. However a dedicated spinnaker halyard is the best choice, the block will be positioned above the head stay attachment and has better range of movement. This will minimize chafe no matter which direction the sail is pulling the halyard from. So if you don't already have one, I can highly recommend the addition of a dedicated spinnaker halyard with a swivelling block. We have 2 set up and find this is easier to use. If we fly the sail from the port we use the port halyard, then the same for the starboard, we use the starboard halyard. This saves having to swing the halyard over the furled head sail. I guess this last sentence does sound strange, but once you’re setting up to fly your sail you will see what I mean.

Tack

The tack of your spinnaker must attach to the bow of the boat and can be accomplished in a number of ways:

Remember that any fitting you use should be securely fastened under the deck by a generous backing plate. It is quite easy to use hardware that's part of the anchor roller assembly. If your bow roller frame that holds your anchor shank in the roller is of sturdy construction, this may be the go, but check the backing plate arrangement. If your bow roller frame isn’t that heavy duty you may have to add a pad eye to the bow. Be sure it doesn't cause problems with your furler, anchor, pulpit, or other gear. When we first got going we were simply using a line from a shackle at the bottom of the furler attachment bracket. While we didn’t realize it at the time when the sail was in use the stainless steel ring of the tack would rub on the pulpit and badly scored the top rail.

Close up of Tacker, this fits quickly around the furled headsail.Just remember to take it off before unfurling. From experience I can tell you it's not good when you forget. 

We now use what is known as a Tacker, this is a unit that fits over the furled head sail. The tack of the sail is attached to the Tacker by quick release shackle, and the height above the deck can be adjusted with the downhaul. The tacker fixed the problem of the sail tack ring and shackle damaging the top rail of the pulpit, and we didn’t have to add deck hardware.

Another bit of gear on the market is the removable bow sprit, a carbon fibre pole fixed to the anchor roller assembly and a deck fitting. This puts the tack out forward of the bow and in most cases away from the pulpit. There a few good advantages of using this set up, like bigger sail area through to moving the sail further forward and not back drafting the main. Like most boat hardware it won’t fit all vessels as anchor lockers and winch placement can be in the way.

Downhaul

A downhaul gives you additional control over your sail. It's a great option to get a bit more performance out of the sail. This performance is not all speed related its sailing angles, with minor adjustment better angles can be achieved. Attach the downhaul line to the tack ring of the spinnaker, then run the line through a turning block on the deck near the bow. Lead it aft to the cockpit, running it through small blocks or fairleads every 2 metres or where needed. Run the line through a rope clutch or to a cleat. Set the downhaul line so the tack will be about 1.5 metres above the deck when the sail is hoisted. This gives you added control to lift or lower the sail off the deck.

Our down haul is a simple arrangement, its simply a line connected to the tacker through a block attached deck fitting and we use the cleat at the anchor winch. Its a personal setup choice but we kept it simple and didn't run the line back to the cockpit. 

With our set up we have a block at the bottom of the furler attachment bracket, the downhaul line is then lead aft and cleated off on the anchor winch. Adjustments are done fairly easily but one of us needs to go forward to do it, and as we are not flying the sail in rough weather its been no problem. 

The other option is when cruising and shorthanded, play around and adjust the downhaul and find a happy medium, and just deploy a fixed length of line. We did this for more or less a year until we were really comfortable with the sail, and then we decided to see what we could do to improve performance.

Sheets or Sheet

You are likely to be told you need two sheets. With this arrangement the recommended sheet length will be 2 x length of your boat. The reasoning behind the two sheets is so you can gybe. Now while all this sounds fantastic have a think about how much sheet (line) will be in the cockpit at any given time. We tried it and didn’t like the bundle of line in the cockpit and the hauling in the sheet during the gybe. 

Being shorthanded we also ended up with all sorts of tangles, right down to almost ripping off the forward port navigation light. There was also friction burns with us, the sail, sheets and the cockpit combing. Setting up took longer having to run the sheets around the boat. KISS, (keep it simple sailor) we settled on one sheet slightly less than the length of the boat. If we do need to gybe, we can accomplish the manoeuvre quickly by dousing the sail in the sock and then redeploying it. We found it to be a whole lot less stressful and what’s five minutes out of a cruisers sailing day. We are not racing for cattle stations at the end of the day.

The sheet(s) are led outside the lifelines. Also keep in mind when using the two long sheets, the lazy sheet, the one that will be slack, must be run in front of your head stay. Both sheets should be led aft outside the lifelines to a turning block located near the stern of your boat. From there, the sheet is led forward to a winch. We use our head sail winch, we use a 13mm sheet and have found it works well so we didn’t need to splash out on a couple of additional winches.


Turning Block sheet forward to winch, just make sure you put the sheet to the sail on the right side of the life lines. This arrangement is simple and will be different on every boat.

Your turning blocks must be attached to a sturdy deck fitting. A toe rail is perfect. If you don't have a toe rail that will work for this purpose, install a pad eye or other strong hardware like a length of track, again with a generous sized backing plate(s).

You can attach line to sail and hardware with a bowline, shackles, or a combination of both. We use quick release shackles on the halyards and tack to make setup and dousing easier, the sheet is attached with a bowline.

Here’s what you need to make deployment and retrieval easier.

Dousing Sock

Without doubt the one piece of gear that makes this all possible for a shorthanded vessel to fly a cruising spinnaker safely and easily. It’s the dousing sock and the purpose of the sock is to contain the spinnaker in a bag during the hoisting and lowering process for safety and ease of handling. There are different brands and styles, we use an ATN Sock, and it has a large moulded throat and so far has given us great service. We have used other brands and found some don’t work very well. If the hoisting line(s) are in the sock with the sail, or there is more than one block at the head you are likely to have problems. The top of the bag with the halyard to sail attachment should have swivels to let any twist out of the halyard or sail. There also needs to be enough length on the sock head fitting to allow the bag to pull away from the sail for complete deployment.

The dousing sock compressed and at the top of the sail, The blue line and white line is for control of the sock, remember to keep a little room at the top for the sock when hoisting. 


Deck Bag

A deck bag to store the spinnaker removes the process of getting the sail out of the locker and then man handling it forward around the shrouds and onto to the front deck. With a good UV protected bag the sail can sit ready for action and with little effort it can be up and flying in minutes. The bag should be made to hold the sail snugly, we have seen bags that are big enough to hold 2 spinnakers and are too big to control easily. The bag will need to be securely attached to something on the deck so it doesn’t blow away when empty, or fall overboard when full. We have seen purpose made bag arrangements where the sail is set up ready for deployment at a moment’s notice with all lines attached. We don’t have the deck lay out to allow this. However having said that about the deployment bag, we can have our sail up in a couple of minutes.

 Cruising Spinnaker set up in the bag, lines rolled and neatly placed in the bag, makes it easy to set it up for a quick deployment. We made this bag ourselves out of sunbrella fabric, the bags the sail comes in when purchased does not offer any UV protection.


Lowering and raising the Cruising Spinnaker

Lowering the Spinnaker

Perhaps the old saying about "men put up spinnakers but gods take them down" has those new to cruising spinnakers unsettled about taking their sail down.

As usual there are a couple of options on how to proceed.

When it’s time to take the sail down, turn away on to a dead run (wind dead behind), if you have a boom brake (stopping accidental main jibe) apply it and keep the mainsail out. Don’t ease the spinnaker sheet. You want the main to blanket the spinnaker to make the sail collapse once the mainsail blankets whe wind.

Option one: pop the tack, yes pull the trigger on the quick release shackle and let the tack fly/hang free, the sail is effectively depowered and will usually hang limp. Now pull the sock down over the sail. Then I lower the halyard slowly piling the sail either on the deck or into the bag, this is weather dependant. The reason I like this method is in case the breeze swirls around the main or you need to change tack quickly the sail is depowered and wont want to reset. 

Option two: After the sail is blanketed, pull the sock down over the sail, then when the sail becomes tight across the foot have the crew ease the sheet. Then lower the halyard placing the sail in the bag or on the deck.

With no sock it becomes a two person operation, after the sail is blanketed by the main have one person ease the halyard while another pulls the sail down by pulling on the leech. Keep in mind whoever is pulling the sail down should be positioned on the leeward side of the boat just forward of the boom. This position will ensure that the spinnaker remains blanketed by the mainsail until it is completely lowered to the deck.

Hoisting

The deployment quickly in pictures, please read the text below it has some very important tips and lessons learnt for those new to this type sail. 

1. Tacker on the furled headsail, the down haul is connected and adjusted to what I think will be ok for the hoist, then I adjust it after its up. 

A close up of the Tacker quick release for the tack can be seen open. 

Get the spinnaker bag out on deck and place at the base of the mast. 

2. Spinnaker bag placed at the base of the mast. 


3. Attach the spinnaker sock control line to a hard point. This will stop the sail opening when it is hoisted, well that is, as its being hoisted, which can be an unpleasant experience, you can take my word for that,  or give it a go yourself, but remember the control line will more than likely be flying on the breeze out of reach, oh yeah fun times.
 

4. Clew  The sheet to be run outside of the life lines, leave the sheet attached in the bag


5. Dump the sail out of the bag on to the deck.


6. Find the tack and attach to the Tacker


Tack attached to the Tacker.


7. Hoist away keep an eye aloft to make sure the head isn't flapping around or trying to get on the wrong side of the spreaders, just a general look out. 

The sail deployed and flying, the sock has retracted and is sitting nicely on the top of the sail. Don't forget to tie off the tail of the control line on to a cleat or even the life line, you don't want that out of reach when you want to take the sail down.

Spinnaker up with the main and away we go.


When hoisting the spinnaker, it is inside the sock and should not fill until you are ready for it to do so. That’s the theory, however as I have found that can be a trap for the uninitiated. So read on 

The next thing I do before anything else is I the take the sock control line out of the bag and attach it to a deck fitting or cleat, something close to the mast. I run the sheet back to the cockpit outside of the life lines into the turning block back to the winch, then attach the tack allowing for it to fly about 1.5 metres above the deck. I then attach the halyard and hoist the sock encased spinnaker as far up as it will go. Now before going any further I have a good look up along the length of the sock. Keeping in mind most socks are manufactured in such a way there are seams joining the fabric running the full length of the sock. What I am looking for is the seams to be straight and not twisted around the sail. If it is twisted this is straightened out now, before trying to deploy the sock. So what’s the problem with this twisted sock? If the sock is twisted around the sail, the deployment will not be very fluid and in most cases the sail will bunch up in the sock. The flow on effect is friction as the sock and control lines untwist around the sail, we have seen enough friction created to burn holes in either the sock or in some cases the sail.

Once satisfied the sock is sitting nicely over the sail and the control lines are free of twists I raise the sock to the top by pulling the sock control line. Usually there isn’t much work needed to get the sock to the top, once the wind starts to fill the lower part of the sail the mouth of the sock slides to the top quickly. Just try and keep the tension on the line to stop it bunching in the sock, this can cause minor problem when dousing later on.

Why did I make a point of attaching the control line to something on deck? Early in our spinnaker deployment learning curve the sail in the sock was hauled three quarters of the way up. The wind angle was such that the sail started to deploy as the wind filled the bottom part of the sail forcing the sock mouth up the sail. So as you can imagine it wasn’t a good look the half hoisted sail was filling. The halyard wanted to lift me off the deck and the spinnaker sock control line was well out of reach up the now half hoisted but fully filled sail. As it turned out the best thing I did was to let go of the halyard, I had no choice really, and it was a case of drop it or be lifted up the mast. The sail fell into the water and I was able to drag it back on board starting from the tack. Lesson complete. Lesson learnt, tie off the sock control line so the sail could not deploy before it is fully hoisted and halyard cleated off.

Another method to stop this type of thing happening is you could turn away onto a dead run blanketing the sail with the main as you would if lowering. Hoist the sail in the sock and after raising the sock slowly head up to your desired course and pull in the sheet until the sail sets.

Cruising Spinnaker Trim

There are two basic adjustments to be made, the first is the height of the tack above the deck, and the second is the amount of sheet you should pull in or let out for any given point of sail.

As a general rule, on a close reach with the wind at about 60 degrees the tack should be pulled down tight so the luff of the sail is straight as possible, we pull our tacker down to just rest on top of the furler drum. On a broad reach 120-155 degrees, the tack should be eased off considerably, with our 13 metre boat we usually find 1.2 – 1.5 metres is about right. On this point of sail you should have the tack as high as possible, however it should not be so high that the sail starts to oscillate. This can make the sail and the flow on effect the boat unstable. On a beam reach, the tack height should be adjusted somewhere between the high and the low positions.

A cruising spinnaker should be trimmed just enough to stop the luff from curling. Adjust the tack height so the middle of the luff curls first when you head the boat up into the wind. If the upper part of the luff curls first, the tack is too high and must be lowered. On the other hand, if the lower part of the luff starts to curl first, the tack is too low, while this sounds technical once the sail is up and your going along you will easily see what I am saying. 

The sail up and as you can see the down haul is around the furler drum, this hasn't caused any problems.  


Things we learnt:

For downwind sailing in light wind with a cruising asymmetric spinnaker start by sailing on a beam reach to build up speed. As the boat speed comes up, the apparent wind moves forward, and you can steer deeper. If the boat slows down or the wind subsides, steer a little higher for more power to reclaim boat speed. If you keep your speed up, the apparent wind will stay forward enough that the spinnaker isn't blanketed by the mainsail, even if you are sailing as low as 155 degrees off the wind.

If there are storm clouds on the horizon or closer keep a very good weather eye on them. Be ready to drop the sail with increasing wind strength.

Stay away from areas that will give you fluky or catabolic winds. We would sail beside the sand hills of the islands in Moreton Bay, and got bullets from time to time. This is not a good look with coffee cups flying around the cockpit when the wind whips from 8Kn. to 18Kn. in the blink of an eye.  The same thing happened one time when we were sailing up the coast of Lombok.  Early in the day was fantastic but as we approached the north coast the winds coming over the mountains created some nasty wind bursts.

For ghosting along on days where the wind is below 10 Kn. we sometimes run without the main up when we are running square or near to it. We have had several day sails where we have covered distances that motoring would have covered in the same time. However you need to keep a good eye on the true wind speed and make the call when to pull the sock down and deploy the main should it be necessary. The main (no pun intended) reason to put up the main is to make it easier to take down the spinnaker with the increase in wind strength. 

We don’t fly the cruising spinnaker at night, we have done in the past and haven’t been caught but it was close. One evening after pulling the sail down, a squall hit us and we were totally un-aware there was even a squall headed our way. If it had hit just a couple of minutes earlier we could have been in all sorts of trouble.

The tack trim is fairly easy to guestimate once you have set the sail several times. You will have a reasonable idea of your wind direction when you are setting up so adjust it before deployment and fine tune later if you need too.

Leave the sheet attached to the sail, we store the sheet in the bag on the top of the pack.

Externally run spinnaker halyards should have the deck end tied through a cleat, should it be dropped it won’t take off up through the block

Look after your sail, dry it out if it becomes wet. We hang ours in the sock in the sun, and it doesn’t take long to dry.

When the sock has been pulled to the top tie off the control lines, it’s important to tie off the line so it’s not flying in the breeze out of reach when needed. However we found it was a good idea to tie the line too two points a couple of metres apart on deck so the lines will be apart. It doesn’t really matter what you tie them to but try and get them separated. We found if we just tied off to one point the lines would wrap together very tightly, making it difficult to separate quickly when it was time to douse the sail.

The luff length is the important measurement when choosing the right size Asymmetrical Spinnaker. This is the info the sail maker who made our sail gave us. For a reasonably accurate measurement, raise a tape measure up on the spinnaker halyard until it’s at the full hoist position and measure to where you would like the tack of the spinnaker to be. The luff length of the spinnaker should be the measurement taken earlier x 1.03 (giving or taking 300mm either way). For example, if your measurement is 16.00 Mtrs then the luff should be 16.00 x 1.03 = 16.42 +/- 0.30 or between 16.12 and 16.72. When ordering a sock you don’t require the full length 1 - 1.5 metres short of the Luff length is ok.


At anchor in time to meet the locals.


The view as we enjoy our sundowners after a days sail.