Showing posts with label sailing. Show all posts

Tuesday, 28 February 2023

LED SOLAS Lifebuoy Light Repair

I have four of these lifebuoy lights that stopped operating properly. The correct operation is that they are in standby when stored upside down. Unfortunately over time all of these units started to malfunction, I would find them turned on and operating when in storage mode. 


I was a little annoyed as they were past their limited warranty period and had a $59.95 replacement value each.  I don't know about you but $240 to replace the four lights wasn't some thing to be sneezed at. Overall the performance and operation was ok, it was just the shutdown function was no longer working. 

I knew that I could get a spst tilt switch from the local electronics component shop for $3 each. I decided it wouldn't take much to modify the lights. 

Tools and supplies: 
Glass encapsulated 125V 3 amp AC.SPST, size 18mm(L) x 5.5mm (dia)  Jaycar CAT NO SM1035
Soldering iron and solder (rosin core flux)
Heat shrink tubing and a hot gun or gas torch to shrink down the tube.
Clear acid free sealant 
111 silicone compound (grease) for the o'ring seal at reassembly


Open the light, take out the battery and then carefully remove the lens from the plastic body.

Lens removed from the body of the light, take it off slowly and carefully 


Disconnect the red connector, and carefully remove the wire from the board. I used the solder iron and applied some solder to the end of the wire where it comes through the board, when the solder is liquid pull the wire clear of the board.  Using this method the hole should be left clear. 


The red wire removed from the board, the tilt switch and shrink tube. 

Here I have bent the leg of the switch and doing a practice fit, once I was happy with the fit I removed the switch leg installed shrink tube and soldered it to the board. 
If the hole on the board wasn't open after removing the red wire, during reassembly the solder can be reheated and the leg of the switch inserted in to molten solder and a small amount of rosin core solder used to wet out the join. 

As can be seen there the switch with shrink tube has been soldered to the board, the second leg of the switch has been soldered to the red wire and the join insulated with shrink tube. To hold the glass tube of the switch in place I used acid free sealant, a cable tie was used to remove stress from the solder joints. The battery is inserted and the unit tested, if ok once the sealant is set reassemble the lense and give a final test. 

Lens attached and standing up right to test, battery installed.

A few seconds later the unit is operational, then the big test by turning the light upside down, the new switch shut off power to the light. 


Mission accomplished, lights working and for $13 and an hour of my time, I saved what would have cost me over $240 to replace the lights. 


Wednesday, 18 January 2023

Cruising Spinnaker and How We Use Ours

Here is a post outlining how we set up and fly our cruising spinnaker, we have done a lot of miles under this very handy sail especially when we were getting into the equator regions. In those regions we would set the sail day after day to get where we were going. The funny (not funny ha ha) thing is a lot of cruisers wont go near one of these sails. We have even heard them called the widow makers, unfortunately the sail can get bad press  and we can see how if you don't have the right setup. We borrowed a sail and sock one time, and it was a terrible set up that caused nothing but confusion. The sail its self was ok but the ring thing, the best way to describe the sock arrangement was terrible to set the sail but worse to douse.  The reality is for hassle free set up and the all important, dousing, you need a good sock and a way to quickly de-power the sail. Keep it simple and remember that if your keeping a good eye  on the wind strength and pull it in when its on the rise, life will be a lot smoother for the captain and crew. Happy crew = a happy life. 

Here we are as we make way with our cruising spinnaker up  

On numerous occasions I have heard or read about people saying they have to motor consistently because the weather forecast got it wrong and the wind isn’t blowing or it’s not blowing the way it was forecast. Often the conversation will go along the lines of “we got up this morning and the forecast was for 10-12 Kn. (Knots) and when we were out at sea there wasn’t any wind”.

It’s a perception thing a lot of the time. The reality is the forecast was more than likely right and the wind was indeed blowing 10-12 Kn. With the boat speed (under motor) of 5 - 6 Kn. the apparent wind speed for sailing will look pretty low. If the wind was blowing 12 Kn. and you are moving along at 6 Kn. in the direction of the wind the apparent wind will only be 6 Kn. In some cases this isn’t enough to get the average cruising boat moving along very fast with the wind. Then throw in a little swell and before long the main and head sail will flap back and forth and make a terrible noise. Another reason to think the forecast wind direction wasn’t right is due to the apparent wind angles. This can take a bit to get your head around, the lighter the wind the easier it is to be tricked into thinking the wind is coming in forward of the beam when the true wind is actually blowing abaft the beam.

Looks like its perfect weather for the cruising spinnaker

The reality is the wind will never be blowing in the right direction if you don’t have the sail to make the most of the conditions. I must admit we did a lot of motoring when we first started to sail up and down the coast. Moving about in the trade winds would mean going with it. Those sunny days with glassy seas and a gentle 10 – 15 Knots did frustrate us. Even a poled out head sail didn’t help us attain the speed we required to reach the next anchorage before dark.

We talked to others and found a lot of cruisers have cruising spinnakers but don’t use them very often or at all. Most of the time the cruising spinnaker was inherited with the purchase of the boat. The new owners feel intimidated about setting and retrieving a light wind sail. This might be one of the reasons cruisers choose to forget they have this very handy sail. However if your set up correctly for a quick and easy deployment and retrieval there isn’t a great deal more effort in hoisting the cruising spinnaker then poling out the head sail.

Not much wind but we were still moving ahead and the motor was resting, as you can see by the 30 degree C water temp in the tropics, the cabin temp was all the better for it. 

What makes the cruising spinnaker particularly attractive is, that it is bigger than the conventional genoa and, secondly, it is effective over a wide range of wind directions and strengths. Unlike the standard spinnaker that is symmetrical on either side of its centreline, the cruising spinnaker has a definite luff and leech, with the luff being the longer of the two. Overall the sail is approximately 25% smaller in area than a conventional spinnaker, but it is about twice the surface area of a 150% genoa. The cruising spinnaker was designed specifically to enhance a boat’s downwind performance. Even when shorthanded it will make downwind sailing faster, safe and easy. So with this in mind why are there so many cruising spinnakers sitting in the sail locker or stuffed into the lazarette. From our experience the setup of the cruising spinnaker more than paid for its self in the first season just factoring in engine maintenance and fuel costs.

Cruising Spinnaker up. wind 9 Kn at less than 60 Degrees apparent and the Boat speed 5.1 Kn through the water. A lot of people don't believe this is possible but here it is and we did it on a regular basis. 

Cruising spinnakers are a great help to easily sailing in light to medium airs across the range from 60 degrees to about 155 apparent wind angle, depending on a few variables. The cruising spinnaker is often the difference between motoring all day in light to moderate air or being able to sail at the same speed or sometimes more than if you were motoring. However this is without the heat, noise, smell, and depletion of the cruising budget generated by the running the engine.


On days where the breeze was light and there was a little bit of a swell we would not put up the main, if it wasn't up it couldn't flap and carry on, we did however need extra care dousing the sail but that wasn't a problem. 

In very light air, under about 5-7 Knots true, the cruising spinnaker can be carried surprisingly close to the wind. We will often ghost along with the apparent wind forward of the beam. Occasionally upwards to 55 degrees apparent wind angle with a bit of attention to trim and steering. Sailing at 60 and 70 degrees is regularly obtainable with a little care trimming the sail. Of course swell is the enemy when trying to obtain tight angles of sail, as it will knock the wind out of your sail quicker than you can say Jack Robinson.

While the cruising spinnaker is basically marketed at being a down wind sail, here is a table that reflects a typical cruising spinnakers sailing angles.


Sailing Angles and Wind Speed


True Wind Speed

Apparent Wind Direction

5 - 10 Knots

55° - 155°

15 Knots

85° - 155°

18 Knots

120° - 155°

The table shows the direction and strength of apparent wind a cruising spinnaker can be effectively used, depending on fabric weight.


Some will say this cant be done, but here we are sailing along nicely. 

Not easy to photograph on board but here we are Wing on Wing.  Sail trim helps, its a learning curve but not a hard one. 

While there does not appear to be a great deal of talk about being able to carry a cruising spinnaker with the wind dead on the stern it can be done. It’s a case of slowly moving into a position where the boom can be moved out to the opposite side of where the spinnaker is set, wing on wing but no pole is involved. We have done this on several occasions, but the conditions do need to be right. If there isn’t enough wind, or the swell is at the wrong angle the main will not sit right. Any pitching or rolling movement can have the main sail flapping around like a flag. As an example, in the right conditions we have found that if we manoeuvre so the wind can be up to 160 on the port quarter and the main is to starboard it will usually sit nicely with the wind holding it in place. We use a boom brake as a preventer to control jibes, it appears that the wind spills off the main and into the spinnaker. The boat speeds up and quietens down and the sails are not flapping and complaining.

What do you need to fly a cruising spinnaker?

Many boats already have the deck gear in place to fly an asymmetrical spinnaker. If you don’t, setting up your boat from scratch is usually a fairly simple project.

Here's what you need to set up:

Halyard

While you can raise a spinnaker with a genoa/jib halyard, most cruising boats have a furling headsail, and a halyard isn’t available. You could use the spare headsail halyard if you have one. However a dedicated spinnaker halyard is the best choice, the block will be positioned above the head stay attachment and has better range of movement. This will minimize chafe no matter which direction the sail is pulling the halyard from. So if you don't already have one, I can highly recommend the addition of a dedicated spinnaker halyard with a swivelling block. We have 2 set up and find this is easier to use. If we fly the sail from the port we use the port halyard, then the same for the starboard, we use the starboard halyard. This saves having to swing the halyard over the furled head sail. I guess this last sentence does sound strange, but once you’re setting up to fly your sail you will see what I mean.

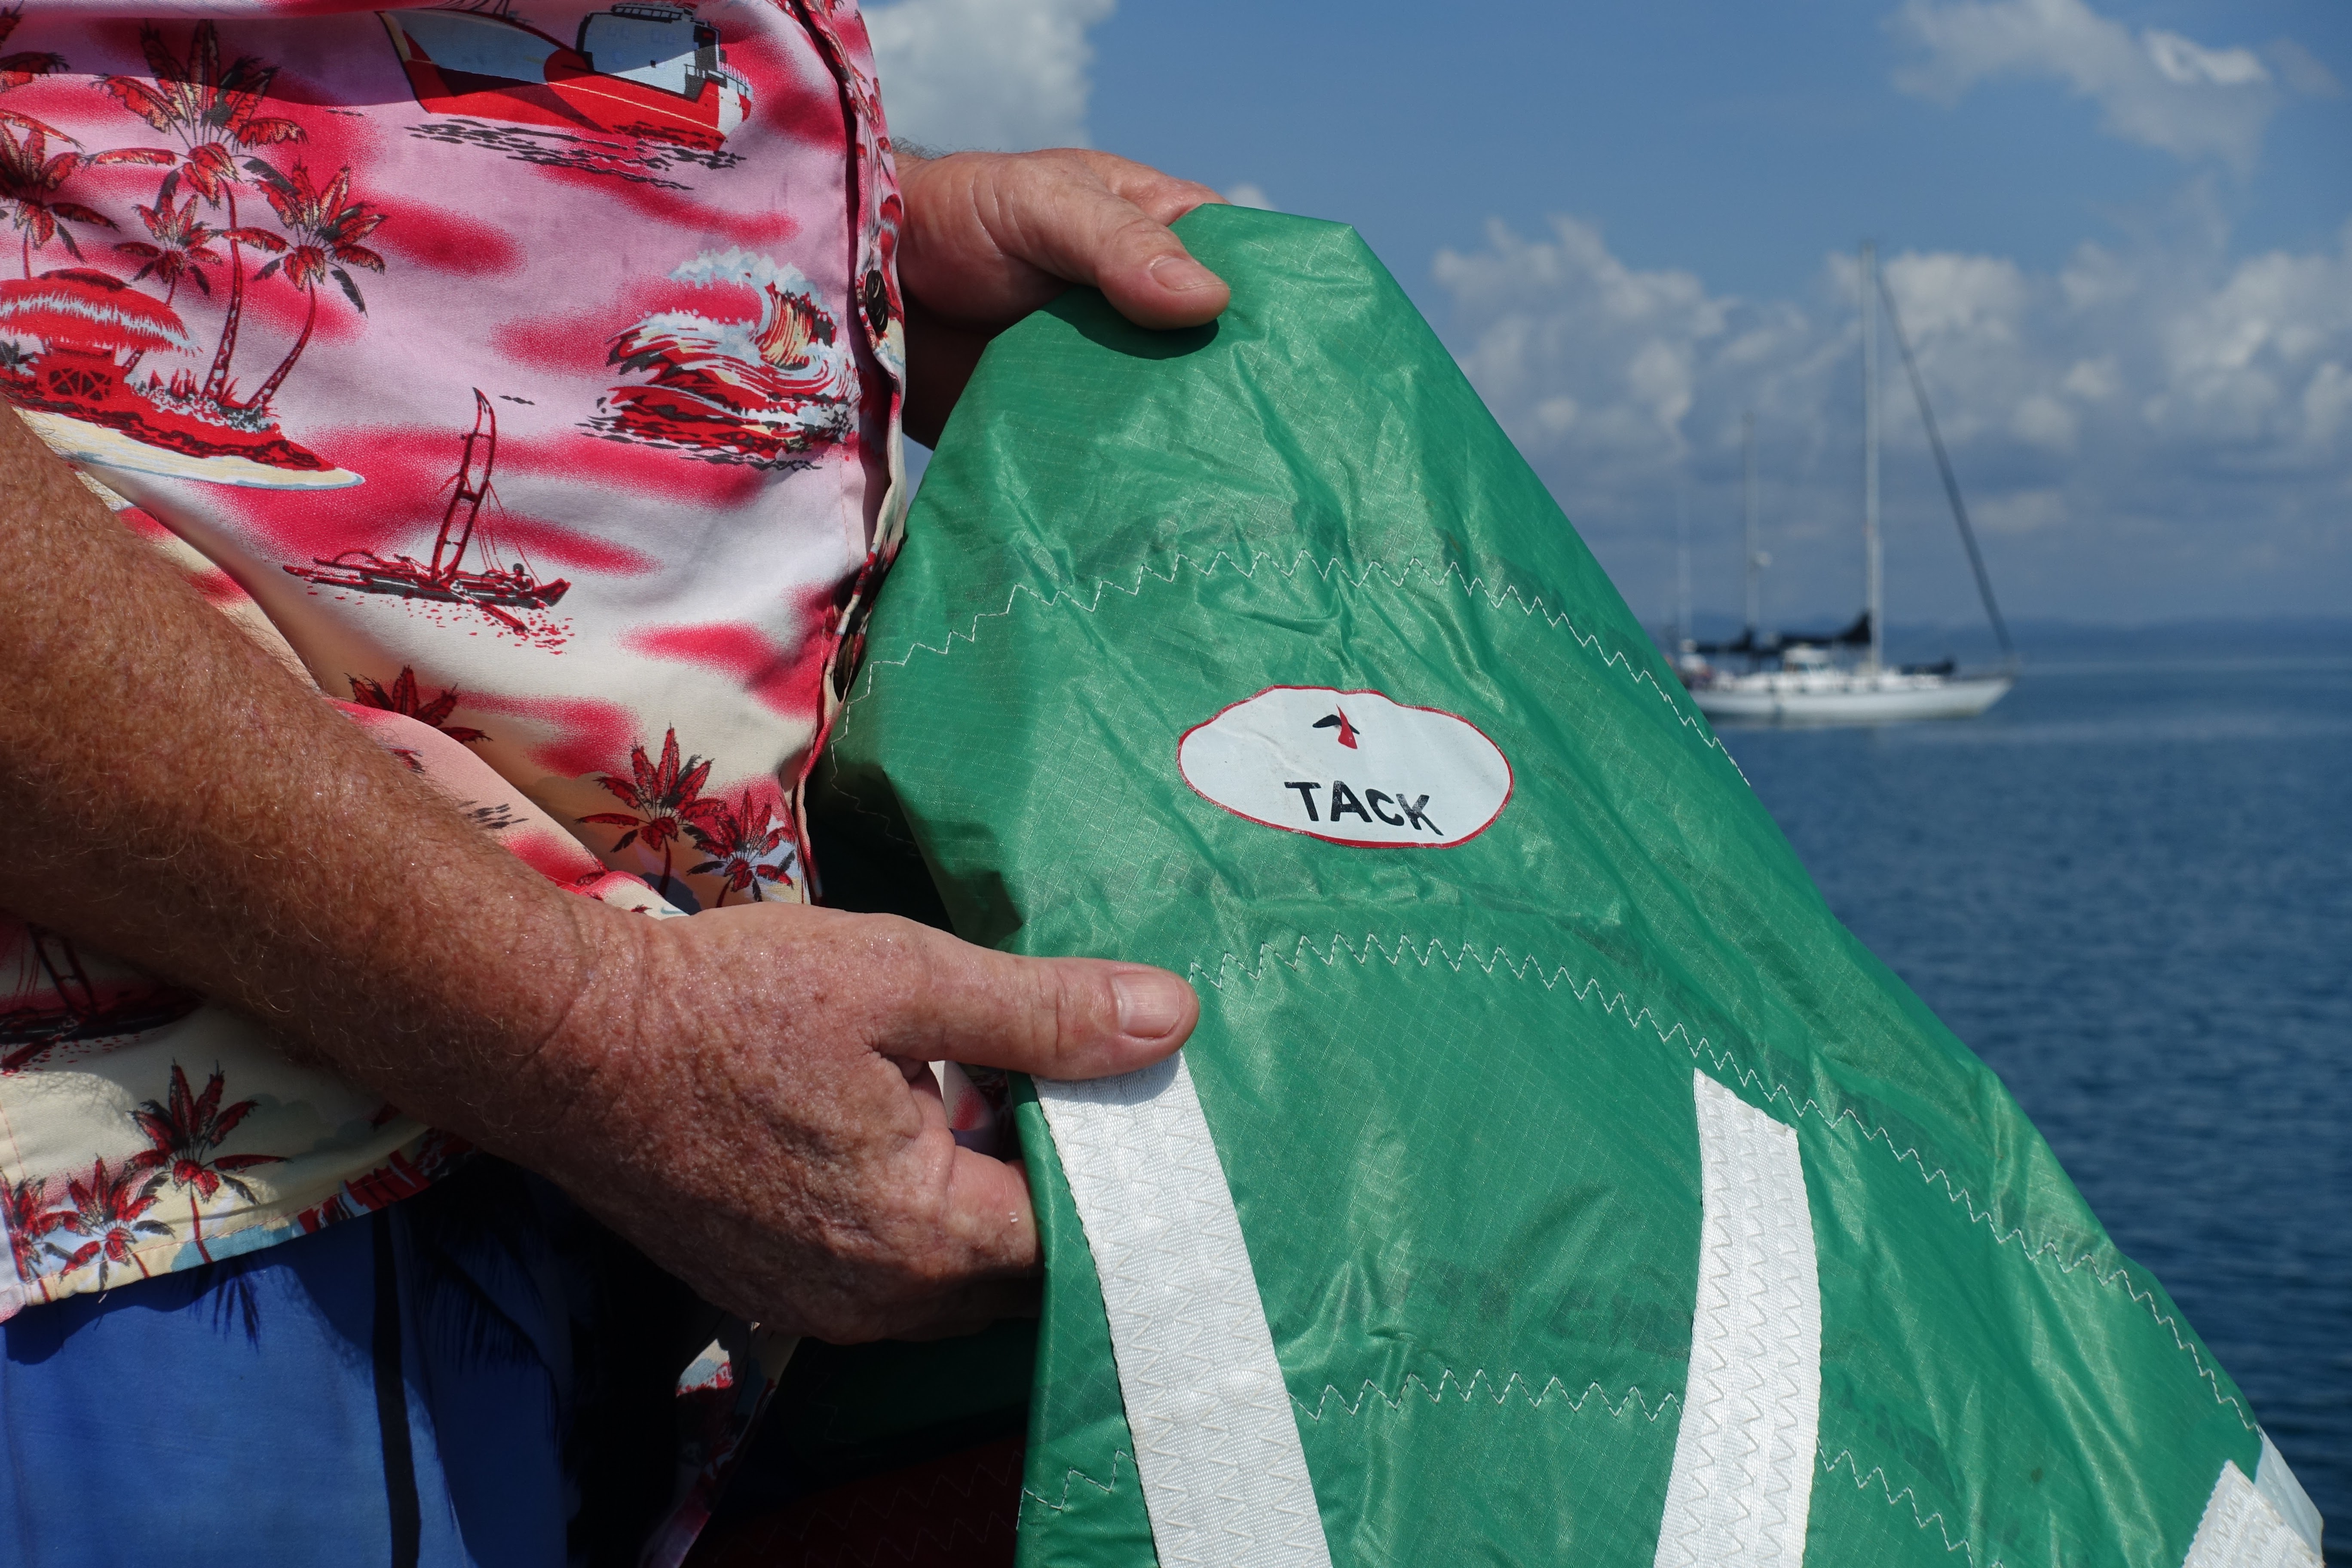
Tack

The tack of your spinnaker must attach to the bow of the boat and can be accomplished in a number of ways:

Remember that any fitting you use should be securely fastened under the deck by a generous backing plate. It is quite easy to use hardware that's part of the anchor roller assembly. If your bow roller frame that holds your anchor shank in the roller is of sturdy construction, this may be the go, but check the backing plate arrangement. If your bow roller frame isn’t that heavy duty you may have to add a pad eye to the bow. Be sure it doesn't cause problems with your furler, anchor, pulpit, or other gear. When we first got going we were simply using a line from a shackle at the bottom of the furler attachment bracket. While we didn’t realize it at the time when the sail was in use the stainless steel ring of the tack would rub on the pulpit and badly scored the top rail.

Close up of Tacker, this fits quickly around the furled headsail.Just remember to take it off before unfurling. From experience I can tell you it's not good when you forget. 

We now use what is known as a Tacker, this is a unit that fits over the furled head sail. The tack of the sail is attached to the Tacker by quick release shackle, and the height above the deck can be adjusted with the downhaul. The tacker fixed the problem of the sail tack ring and shackle damaging the top rail of the pulpit, and we didn’t have to add deck hardware.

Another bit of gear on the market is the removable bow sprit, a carbon fibre pole fixed to the anchor roller assembly and a deck fitting. This puts the tack out forward of the bow and in most cases away from the pulpit. There a few good advantages of using this set up, like bigger sail area through to moving the sail further forward and not back drafting the main. Like most boat hardware it won’t fit all vessels as anchor lockers and winch placement can be in the way.

Downhaul

A downhaul gives you additional control over your sail. It's a great option to get a bit more performance out of the sail. This performance is not all speed related its sailing angles, with minor adjustment better angles can be achieved. Attach the downhaul line to the tack ring of the spinnaker, then run the line through a turning block on the deck near the bow. Lead it aft to the cockpit, running it through small blocks or fairleads every 2 metres or where needed. Run the line through a rope clutch or to a cleat. Set the downhaul line so the tack will be about 1.5 metres above the deck when the sail is hoisted. This gives you added control to lift or lower the sail off the deck.

Our down haul is a simple arrangement, its simply a line connected to the tacker through a block attached deck fitting and we use the cleat at the anchor winch. Its a personal setup choice but we kept it simple and didn't run the line back to the cockpit. 

With our set up we have a block at the bottom of the furler attachment bracket, the downhaul line is then lead aft and cleated off on the anchor winch. Adjustments are done fairly easily but one of us needs to go forward to do it, and as we are not flying the sail in rough weather its been no problem. 

The other option is when cruising and shorthanded, play around and adjust the downhaul and find a happy medium, and just deploy a fixed length of line. We did this for more or less a year until we were really comfortable with the sail, and then we decided to see what we could do to improve performance.

Sheets or Sheet

You are likely to be told you need two sheets. With this arrangement the recommended sheet length will be 2 x length of your boat. The reasoning behind the two sheets is so you can gybe. Now while all this sounds fantastic have a think about how much sheet (line) will be in the cockpit at any given time. We tried it and didn’t like the bundle of line in the cockpit and the hauling in the sheet during the gybe. 

Being shorthanded we also ended up with all sorts of tangles, right down to almost ripping off the forward port navigation light. There was also friction burns with us, the sail, sheets and the cockpit combing. Setting up took longer having to run the sheets around the boat. KISS, (keep it simple sailor) we settled on one sheet slightly less than the length of the boat. If we do need to gybe, we can accomplish the manoeuvre quickly by dousing the sail in the sock and then redeploying it. We found it to be a whole lot less stressful and what’s five minutes out of a cruisers sailing day. We are not racing for cattle stations at the end of the day.

The sheet(s) are led outside the lifelines. Also keep in mind when using the two long sheets, the lazy sheet, the one that will be slack, must be run in front of your head stay. Both sheets should be led aft outside the lifelines to a turning block located near the stern of your boat. From there, the sheet is led forward to a winch. We use our head sail winch, we use a 13mm sheet and have found it works well so we didn’t need to splash out on a couple of additional winches.


Turning Block sheet forward to winch, just make sure you put the sheet to the sail on the right side of the life lines. This arrangement is simple and will be different on every boat.

Your turning blocks must be attached to a sturdy deck fitting. A toe rail is perfect. If you don't have a toe rail that will work for this purpose, install a pad eye or other strong hardware like a length of track, again with a generous sized backing plate(s).

You can attach line to sail and hardware with a bowline, shackles, or a combination of both. We use quick release shackles on the halyards and tack to make setup and dousing easier, the sheet is attached with a bowline.

Here’s what you need to make deployment and retrieval easier.

Dousing Sock

Without doubt the one piece of gear that makes this all possible for a shorthanded vessel to fly a cruising spinnaker safely and easily. It’s the dousing sock and the purpose of the sock is to contain the spinnaker in a bag during the hoisting and lowering process for safety and ease of handling. There are different brands and styles, we use an ATN Sock, and it has a large moulded throat and so far has given us great service. We have used other brands and found some don’t work very well. If the hoisting line(s) are in the sock with the sail, or there is more than one block at the head you are likely to have problems. The top of the bag with the halyard to sail attachment should have swivels to let any twist out of the halyard or sail. There also needs to be enough length on the sock head fitting to allow the bag to pull away from the sail for complete deployment.

The dousing sock compressed and at the top of the sail, The blue line and white line is for control of the sock, remember to keep a little room at the top for the sock when hoisting. 


Deck Bag

A deck bag to store the spinnaker removes the process of getting the sail out of the locker and then man handling it forward around the shrouds and onto to the front deck. With a good UV protected bag the sail can sit ready for action and with little effort it can be up and flying in minutes. The bag should be made to hold the sail snugly, we have seen bags that are big enough to hold 2 spinnakers and are too big to control easily. The bag will need to be securely attached to something on the deck so it doesn’t blow away when empty, or fall overboard when full. We have seen purpose made bag arrangements where the sail is set up ready for deployment at a moment’s notice with all lines attached. We don’t have the deck lay out to allow this. However having said that about the deployment bag, we can have our sail up in a couple of minutes.

 Cruising Spinnaker set up in the bag, lines rolled and neatly placed in the bag, makes it easy to set it up for a quick deployment. We made this bag ourselves out of sunbrella fabric, the bags the sail comes in when purchased does not offer any UV protection.


Lowering and raising the Cruising Spinnaker

Lowering the Spinnaker

Perhaps the old saying about "men put up spinnakers but gods take them down" has those new to cruising spinnakers unsettled about taking their sail down.

As usual there are a couple of options on how to proceed.

When it’s time to take the sail down, turn away on to a dead run (wind dead behind), if you have a boom brake (stopping accidental main jibe) apply it and keep the mainsail out. Don’t ease the spinnaker sheet. You want the main to blanket the spinnaker to make the sail collapse once the mainsail blankets whe wind.

Option one: pop the tack, yes pull the trigger on the quick release shackle and let the tack fly/hang free, the sail is effectively depowered and will usually hang limp. Now pull the sock down over the sail. Then I lower the halyard slowly piling the sail either on the deck or into the bag, this is weather dependant. The reason I like this method is in case the breeze swirls around the main or you need to change tack quickly the sail is depowered and wont want to reset. 

Option two: After the sail is blanketed, pull the sock down over the sail, then when the sail becomes tight across the foot have the crew ease the sheet. Then lower the halyard placing the sail in the bag or on the deck.

With no sock it becomes a two person operation, after the sail is blanketed by the main have one person ease the halyard while another pulls the sail down by pulling on the leech. Keep in mind whoever is pulling the sail down should be positioned on the leeward side of the boat just forward of the boom. This position will ensure that the spinnaker remains blanketed by the mainsail until it is completely lowered to the deck.

Hoisting

The deployment quickly in pictures, please read the text below it has some very important tips and lessons learnt for those new to this type sail. 

1. Tacker on the furled headsail, the down haul is connected and adjusted to what I think will be ok for the hoist, then I adjust it after its up. 

A close up of the Tacker quick release for the tack can be seen open. 

Get the spinnaker bag out on deck and place at the base of the mast. 

2. Spinnaker bag placed at the base of the mast. 


3. Attach the spinnaker sock control line to a hard point. This will stop the sail opening when it is hoisted, well that is, as its being hoisted, which can be an unpleasant experience, you can take my word for that,  or give it a go yourself, but remember the control line will more than likely be flying on the breeze out of reach, oh yeah fun times.
 

4. Clew  The sheet to be run outside of the life lines, leave the sheet attached in the bag


5. Dump the sail out of the bag on to the deck.


6. Find the tack and attach to the Tacker


Tack attached to the Tacker.


7. Hoist away keep an eye aloft to make sure the head isn't flapping around or trying to get on the wrong side of the spreaders, just a general look out. 

The sail deployed and flying, the sock has retracted and is sitting nicely on the top of the sail. Don't forget to tie off the tail of the control line on to a cleat or even the life line, you don't want that out of reach when you want to take the sail down.

Spinnaker up with the main and away we go.


When hoisting the spinnaker, it is inside the sock and should not fill until you are ready for it to do so. That’s the theory, however as I have found that can be a trap for the uninitiated. So read on 

The next thing I do before anything else is I the take the sock control line out of the bag and attach it to a deck fitting or cleat, something close to the mast. I run the sheet back to the cockpit outside of the life lines into the turning block back to the winch, then attach the tack allowing for it to fly about 1.5 metres above the deck. I then attach the halyard and hoist the sock encased spinnaker as far up as it will go. Now before going any further I have a good look up along the length of the sock. Keeping in mind most socks are manufactured in such a way there are seams joining the fabric running the full length of the sock. What I am looking for is the seams to be straight and not twisted around the sail. If it is twisted this is straightened out now, before trying to deploy the sock. So what’s the problem with this twisted sock? If the sock is twisted around the sail, the deployment will not be very fluid and in most cases the sail will bunch up in the sock. The flow on effect is friction as the sock and control lines untwist around the sail, we have seen enough friction created to burn holes in either the sock or in some cases the sail.

Once satisfied the sock is sitting nicely over the sail and the control lines are free of twists I raise the sock to the top by pulling the sock control line. Usually there isn’t much work needed to get the sock to the top, once the wind starts to fill the lower part of the sail the mouth of the sock slides to the top quickly. Just try and keep the tension on the line to stop it bunching in the sock, this can cause minor problem when dousing later on.

Why did I make a point of attaching the control line to something on deck? Early in our spinnaker deployment learning curve the sail in the sock was hauled three quarters of the way up. The wind angle was such that the sail started to deploy as the wind filled the bottom part of the sail forcing the sock mouth up the sail. So as you can imagine it wasn’t a good look the half hoisted sail was filling. The halyard wanted to lift me off the deck and the spinnaker sock control line was well out of reach up the now half hoisted but fully filled sail. As it turned out the best thing I did was to let go of the halyard, I had no choice really, and it was a case of drop it or be lifted up the mast. The sail fell into the water and I was able to drag it back on board starting from the tack. Lesson complete. Lesson learnt, tie off the sock control line so the sail could not deploy before it is fully hoisted and halyard cleated off.

Another method to stop this type of thing happening is you could turn away onto a dead run blanketing the sail with the main as you would if lowering. Hoist the sail in the sock and after raising the sock slowly head up to your desired course and pull in the sheet until the sail sets.

Cruising Spinnaker Trim

There are two basic adjustments to be made, the first is the height of the tack above the deck, and the second is the amount of sheet you should pull in or let out for any given point of sail.

As a general rule, on a close reach with the wind at about 60 degrees the tack should be pulled down tight so the luff of the sail is straight as possible, we pull our tacker down to just rest on top of the furler drum. On a broad reach 120-155 degrees, the tack should be eased off considerably, with our 13 metre boat we usually find 1.2 – 1.5 metres is about right. On this point of sail you should have the tack as high as possible, however it should not be so high that the sail starts to oscillate. This can make the sail and the flow on effect the boat unstable. On a beam reach, the tack height should be adjusted somewhere between the high and the low positions.

A cruising spinnaker should be trimmed just enough to stop the luff from curling. Adjust the tack height so the middle of the luff curls first when you head the boat up into the wind. If the upper part of the luff curls first, the tack is too high and must be lowered. On the other hand, if the lower part of the luff starts to curl first, the tack is too low, while this sounds technical once the sail is up and your going along you will easily see what I am saying. 

The sail up and as you can see the down haul is around the furler drum, this hasn't caused any problems.  


Things we learnt:

For downwind sailing in light wind with a cruising asymmetric spinnaker start by sailing on a beam reach to build up speed. As the boat speed comes up, the apparent wind moves forward, and you can steer deeper. If the boat slows down or the wind subsides, steer a little higher for more power to reclaim boat speed. If you keep your speed up, the apparent wind will stay forward enough that the spinnaker isn't blanketed by the mainsail, even if you are sailing as low as 155 degrees off the wind.

If there are storm clouds on the horizon or closer keep a very good weather eye on them. Be ready to drop the sail with increasing wind strength.

Stay away from areas that will give you fluky or catabolic winds. We would sail beside the sand hills of the islands in Moreton Bay, and got bullets from time to time. This is not a good look with coffee cups flying around the cockpit when the wind whips from 8Kn. to 18Kn. in the blink of an eye.  The same thing happened one time when we were sailing up the coast of Lombok.  Early in the day was fantastic but as we approached the north coast the winds coming over the mountains created some nasty wind bursts.

For ghosting along on days where the wind is below 10 Kn. we sometimes run without the main up when we are running square or near to it. We have had several day sails where we have covered distances that motoring would have covered in the same time. However you need to keep a good eye on the true wind speed and make the call when to pull the sock down and deploy the main should it be necessary. The main (no pun intended) reason to put up the main is to make it easier to take down the spinnaker with the increase in wind strength. 

We don’t fly the cruising spinnaker at night, we have done in the past and haven’t been caught but it was close. One evening after pulling the sail down, a squall hit us and we were totally un-aware there was even a squall headed our way. If it had hit just a couple of minutes earlier we could have been in all sorts of trouble.

The tack trim is fairly easy to guestimate once you have set the sail several times. You will have a reasonable idea of your wind direction when you are setting up so adjust it before deployment and fine tune later if you need too.

Leave the sheet attached to the sail, we store the sheet in the bag on the top of the pack.

Externally run spinnaker halyards should have the deck end tied through a cleat, should it be dropped it won’t take off up through the block

Look after your sail, dry it out if it becomes wet. We hang ours in the sock in the sun, and it doesn’t take long to dry.

When the sock has been pulled to the top tie off the control lines, it’s important to tie off the line so it’s not flying in the breeze out of reach when needed. However we found it was a good idea to tie the line too two points a couple of metres apart on deck so the lines will be apart. It doesn’t really matter what you tie them to but try and get them separated. We found if we just tied off to one point the lines would wrap together very tightly, making it difficult to separate quickly when it was time to douse the sail.

The luff length is the important measurement when choosing the right size Asymmetrical Spinnaker. This is the info the sail maker who made our sail gave us. For a reasonably accurate measurement, raise a tape measure up on the spinnaker halyard until it’s at the full hoist position and measure to where you would like the tack of the spinnaker to be. The luff length of the spinnaker should be the measurement taken earlier x 1.03 (giving or taking 300mm either way). For example, if your measurement is 16.00 Mtrs then the luff should be 16.00 x 1.03 = 16.42 +/- 0.30 or between 16.12 and 16.72. When ordering a sock you don’t require the full length 1 - 1.5 metres short of the Luff length is ok.


At anchor in time to meet the locals.


The view as we enjoy our sundowners after a days sail. 


Tuesday, 27 December 2022

Rough Guide to Monsoon Seasons, AU Top End & SE Asia

Weather, Almost everyone we talked to when we went into SE-Asia were a little confused when trying to work out the reasons for the two differing wind directions for the one monsoon season. The Intertropical Convergence Zone, or ITCZ, is the region that circles the Earth, near the equator, where the trade winds of the Northern and Southern Hemispheres come together. Sailing up in this area can be difficult at times, however if you can get a handle on the basics it really helps especially as some voyages will start in one hemisphere and end in another. 

Indonesia spans across the equator and you need to take this into account when you are reading about which weather patterns fall in which month. We didn't one time and as it turns out were not pleasantly surprised. Indonesia doesn't get a summer or winter its either the wet season or dry season the notation on the list below is more to denote the hemisphere season. Also of note is the dry/wet is not the whole of Indonesia in the same season.


Southern Hemisphere Indonesia                              Northern Hemisphere Indonesia
N-West monsoon Dec-Jan-Feb   (S Summer)          N-East monsoon Dec-Jan-Feb     (N Winter)
First transition Mar-Apr-May                                  First transition Mar-Apr-May
S-East monsoon Jun-Jul-Aug     (S Winter)             S-West monsoon Jun-Jul-Aug     (N Summer)
Second transition Sep-Oct-Nov                                 Second transition Sep-Oct-Nov


Bruce's rough guide to the monsoon seasons on both side of the equator. 

Winds change through the year.

During December and January, the Southern Hemisphere is heated more strongly by the Sun than the Northern Hemisphere, so the hottest air — the air that rises in the ITCZ — is found south of the equator. Winds from the Northern Hemisphere blow across the equator toward the ITCZ.

During June and July, the Northern Hemisphere is heated more strongly by the Sun, so the ITCZ and its rising hot air lie north of the equator and winds blow from the Southern Hemisphere across the equator to reach the ITCZ in the Northern Hemisphere.

As the ITCZ changes location through the year, the winds and rains and the location of monsoon wet weather changes, too.

-----

Remember that the Coriolis force changes direction on the equator: It turns winds toward the right in the Northern Hemisphere (so a SE in the Southern Hemisphere turn SW in the northern Hemisphere) Wind turns toward the left in the Southern Hemisphere (so a NE in the Northern Hemisphere becomes North West in the Southern Hemisphere).

So when air crosses the equator as it flows from the cold winter hemisphere toward the ITCZ in the summer hemisphere, it experiences a change in the Coriolis force. This causes the trade winds to reverse direction and blow toward the west in the winter hemisphere and to the east in the summer hemisphere.

This seasonal reversal of the winds was historically very important for trade between Africa and Asia. Ships would sail from Asia to Africa in winter and then undertake their return voyage when the summer monsoon changed the wind from westward to eastward.

Winds within a couple of degrees of the equator are generally “light and variable” all the time. Weather forecasts are rarely accurate in these areas. Make sure you have a cruising spinnaker and as a back up, an engine. Winds are spasmodic and currents are/can be quite strong depending where you are.

------------------------

SE / SW Monsoon Season
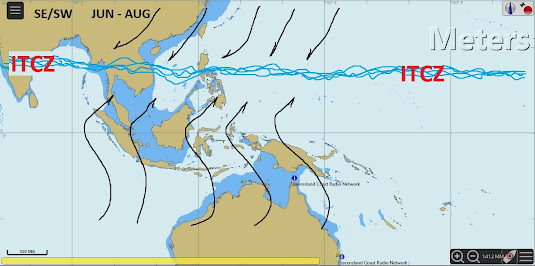
While the drawing I have done is a little rough I hope the fundamental idea makes sense. 

During the months of June-September dry season trade winds blow consistently from the SE and ESE throughout the Southern Islands of Indonesia. Trade winds are stronger in Eastern Indonesia and areas around Timor and the Arafura Sea than they are further to the West near Lombok, Bali, Java and Sumatra.

Further North as SE trade winds approach the equator they lose considerable strength and veer from SE to a very light S. Then, once across the equator and into the northern hemisphere, due to the Coriolis effect, these light S winds again veer from S to SW and slightly increase in strength. It is for this reason that we sometimes refer to this season as the SE/SW monsoon season.

Precipitation on both sides of the equator is at odds. While Bali and Java experience dry season trade winds out of the SE, the areas of northern Sumatra, Kalimantan, Sulawesi, Morotai and Thailand will be in their SW monsoon wet season.

NE / NW Monsoon Season


During the months of December-February NE winds blow in the northern hemisphere and across the top of Indonesia. As these NE winds approach the equator they lose strength and back to the N. Once across the equator, because of the Coriolis effect, winds back further and increase in strength to become the NW monsoon wet-season for much of Southern Indonesia. Southern Sumatra, Southern Sulawesi, Java, Bali, Flores, Timor, and Rote will all experience strong westerly winds and rainy conditions for much of this period with the height of the wet season falling in February.

Clear sky's and calms are often experienced in between passing storm systems.

Cyclones can develop in the Timor, Coral and Arafura Seas and this area should be monitored if passing near Timor and Rote Islands during the NE/NW monsoon season.

Transitional Seasons

Some nice cruising can be had during the changing of the seasons. Winds are often light to non-existent with only short duration squalls passing through. Some of the more exposed and windy areas of Indonesia are often calm and pleasant and open to exploration at this time. With the sun directly over the equator and calms likely, conditions can be very hot. The ITCZ can move by as much as a thousand miles overnight or not move at all and sometimes will appear in two places at once. With such changing conditions occasional late or early season weather does develop.

--------------------------------------------

We have found that neither the GFS nor the ECMWF do a good job of forecasting winds in Indonesia. Generally they get the direction right, but wind strength is hit and miss. Weather forecasts (GRIB files) in the Malacca Strait never seem to be right either, perhaps this is just our observation because, we possibly never got far enough off shore to get away from its effects.

Here is a reasonable explanation of the monsoon seasons:

https://www.abc.net.au/news/2019-01-18/monsoon-explaining-the-complex-weather-phenomenon/10722716

Malacca Strait

The weather description below is for the Malacca Strait (Selat Melaka), being a passage between Peninsular Malaysia and Indonesian Sumatra there are a couple of anomalies. When using any of the Island anchorages, be prepared to get underway at a moments notice. After being caught, we would work out an action plan to get to the other side quickly. If we were lucky, once the front passed there would be a calm for a couple of hours after the storm, before the wind returns to its original direction.

Northern Hemisphere Melaka Strait

Northeast Monsoon - November to March

This is the dry season. The winds are predominantly from the NE from 10 to 20 knots, with occasional winds up to 30 knots. There are frequent calms lasting from a few hours (often in the evenings and early morning) to whole days or a few days duration. Rain is very rare and the days are fine and relatively cool as the sun is at its furthest south at this time (in December the sun is only 60 degrees above the horizon at midday) - Very pleasant cruising weather and because the wind is coming straight off the Malaysian peninsular there is no swell and any seas that do come up during local strong winds drop quickly when the wind drops.

Transition period - April and May

This is the height of the transition period between the NE and SW monsoons and is marked by many calms, very light winds and flat seas. When there is wind it can come from any direction and vary in strength and direction, but is not common from the East through to South or from the North. There is the odd rain squall that can last from five minutes to an hour or two with winds sometimes up to 25 knots under them.

Very little chance of a "Sumatra" (see SW Monsoon). Hot, sultry weather.

Southwest monsoon - June to September (Some years into late October)

This is the wet season. Hot, sultry weather as the sun is in the North and the humidity is high. The winds are predominantly from the SW from.10 to 25 knots, with frequent calms and frequent rain squalls. The rain squalls last from a few minutes to a few hours but typically last for about 15 minutes with very heavy rain and either no wind or, more frequently, winds up to 25 knots. These winds change strength and direction depending on your position relative to the centre of the squall.

Once they have passed over, the skies clear and the wind returns to its condition before the squall arrived. A squall can usually be seen well before it arrives as an isolated large, dark, towering cloud and, should you be close to land or rocks, gives you plenty of time to either anchor or head for an open area before the heavy rain causes a complete whiteout.

This is the season for "Sumatra" winds.

"SUMATRA" winds are a different matter altogether. In the day they can easily be identified as a long rolling bank of very dark cloud extending roughly North and South from horizon to horizon and coming from the West from Sumatra, thus their name. At night, when they are most common, the first warning is when they hit. They are most common in the South Malacca Straits, but do occur occasionally around Penang ,and Langkawi, though they are rarer around Phuket. Typically there will be two to four during this season in Penang and one or Penang and one or two in Phuket. There is no avoiding the very strong (up to 60 knot)\ Westerly quarter wind that just precedes the cloud bank and very heavy rain. They can last for five or more hours, though more commonly last for from about 20 minutes to one hour and then end as quickly as they began.

Transition period - October

Same as the Transition period from April to May.

This is the height of the transition period between the SW and NE monsoons and is marked by many calms, very light winds and flat seas. When there is wind it can come from any direction and vary in strength and direction, but is not common from the East through to South or from the North. There is the odd rain squall that can last from five minutes to an hour or two with winds sometimes up to 25 knots under them.

Very little chance of a "Sumatra" (see SW Monsoon). Hot, sultry weather.

----------------------------------------------------------------

“Red sky at night sailors delight; red sky in the morning sailors take warning.”

There is a simple explanation for this. When the sun is on the horizon, its light, shining at an angle, must pass through more atmosphere.

Red is the colour of the spectrum with the longest wavelengths and can therefore reach all the way through to where water vapour and dust is denser. Here it reflects off the vapour and dust projecting a red light to our eye. In mid latitudes storms predominantly move from west to east.

“Red sky at night sailors delight" So when the sunset in the west reflects off particles of a low pressure in the east, creating the red lit sky, the weather has past making way for improved (delightful) conditions.

"Red sky in the morning sailors take warning" So then if the sunrise in the east reflects off particles of a low pressure in the west, making the red lit sky, we can assume that storms are approaching, sailors take warning the weather should worsen.