Friday 30 November 2018

November Newsletter 2018

News from the Crew of Matilda
November  2018
Indonesian warships: 332 & 357 side by side at the navy base dock Langkawi, Malaysia. 
Ships log: 
  • November 3 we left the anchorage at Pangkor and took Matilda to Pulau Talang, so she was position to jump off to Penang. We anchored at 04 24.97N, 100 34.61E in 6.6 mtrs at high tide on a muddy sandy bottom.
  • November 4 we took the 61.3 nautical miles to Penang, anchoring in the allocated spot between Jerejak & Penang. We dropped anchor at 05 18.59N, 100 18.12E in 7.9 mtrs at low tide.
  • November 8, moved Matilda to the channel for an early take off in the morning for Langkawi. From Jerejak we travelled 8.3nm's. Dropped anchor at 05 24.18N, 100 20.68E in 7 meters.
  • November 9 we motored for 12hrs covering 63.3 nm's to Langkawi dropping anchor at Bass Harbour - Kuah. 06 19.05N, 99 50.65E in 3.3mtrs right on low tide.
  • November 21, motored for 16.4nm's around to Telaga harbour providing a rolly evening despite our stern anchor. We dropped our anchor at 06 21.72N, 99 40.49E in 4 metres.
  • November 22 we mostly sailed the 27.6nm's to Thailand's Koh Lipe. Dropped anchor in 18metres at 06 29.40N, 99.17.58E on its north facing side.
  • November 25, we moved over the other side of the channel between Lipe and Adang as a NW'stly was forecast. The journey was only 45 minutes. We dropped anchor at 06 30.18N, 99 17.92E in 7.6 metres on sand.
  • November 26, went for an explore over to Koh Butang to do some snorkeling. Dropped anchor at 06 32.12N, 99 10.10E at high tide in 13.6mtrs. Journey was 8.1nm's.
  • November 28, returned to Koh Lipe, circumnavigating Butang for a look. We travelled 12.4nm's and dropped anchor back n the north side at 06 29.50N, 99 17.70E in 16.2 metres.
A local Malay fishing boat in Langkawi. We always love the way they paint their boats with so much colour.
Crew log:
The start of November saw us leave Pangkor and head for Penang to gain our Thai Visa's. On the way to the little island north of Pangkor - Talang we managed to pick up a plastic bag on our prop and then just as we passed under the bridge at Penang we hit a rope, heard the engine change pitch and noticed our steering wheel was all of a sudden very hard to move.Once anchored at the Jerejak anchorage Bruce jumped in the yuk water and managed to get a rope off our rudder stock - geez not a good start to the trip up to Thailand.


Bruce looking on in disbelief that 2 hours into our journey we clearly managed to snag a plastic bag around our prop.
After such a long day it is always lovely to reach Penang. The island is pretty from afar and only gets better as you approach and such a great city. Going under the bridge never seems to loose that 'omg will we clear it?' feeling - but we do, every time.


Here is something we hadn't seen before....a fishing net wrapped around beacon!

Below is a quick video of Matilda going under the 'second' bridge.


We obtained our Thai visa's while at Penang. It's a simple process for yachties and this is what we did.


The Royal Thai Consulate - General building.

You need:
  • 2 passport photos (current within 6 months is stated)
  • your passport
  • your boat papers (copies for each applicant)
  • a photo copy (we did b&w) of your identification page in your passport
  • RM150 per person
  • Your applicationn form which must state Penang on the header (if you download this form on line and it states either Bangkok or Kuala Lumpar in the header it will not be accepted). If your at Pangkor marina go grab the form off Ruz at the office, she has the correct form, which states Penang in the heading.
  • Dress code: there is a sign out the front which the guard will point to stating: no thongs, no ladies short skirts or shorts, men's shorts are not to expose the knee, no singlets or skimpy tops. 
The sand is to the right of the photo, the area is saturate with local fishing boats.
We anchored Matilda at the southern end of Jerejak known as the Seagate Anchorage. Apparently you can land your tender on a jetty here, we could not work out which one to use. A contact number for Mr. Black 0194701865 is correct however he doesn't speak or understand English very well - our conversation with him was difficult. He is not always available as a water taxi either. If you want to leave your tender on the beach here and you don't mind standing in filthy mud up to your knees (not joking) at mid to low tide, then yes you can leave your dingy on the beach amongst the fisherman's boats.
Fauzi Ikan Bakar, Seagate will appear on Google Maps.

For transport we used Grab. The image above is the address you need for the Grab to pick you up and then to the Royal Thai Consulate General address. At the time of travel the charge was RM28 to the door and back to the cafe. Excellent value.

The car park of Fauzi Ikan Bakar, Seagate.
As it turned out we were guided in by a chap from the above restaurant to leave our tender beside an unused fishing boat on a jetty (which is immediately north of the fishing boats), which we were grateful for. However, the jetty was in bad shape and was a hazard to walk on. 

Looking towards the jetty this is the entrance. You have to walk to the right on the planks of wood.

To enter the gate you have to step on this piece which is very unstable and as you step on it, all the cockroaches take off.

This bit was stable.

At low tide this is almost vertical and not stable.

Good luck!

Final approach is just shocking. Our tender is to the far left.
Our thoughts on anchorages around Penang for those who do not wish to use the marina are not terrific. Your choices are the Seagate Anchorage which we anchored at. You can walk to Queensbay Mall from here, we took about 45minutes and the path is excellent. You cant get water here.

Batu Uban Public Marina anchorage which is cheap, but not easy to get in to. You are allowed to anchor out the front with permission gained in advance from rosziyana@marine.gov.my, even then you have a 24hr restriction for anchoring. Why the restriction is anyones guess, what difference does it make. You can get water here which you pay for, dump rubbish and it is secure to leave our tender here.

Then you have the Fishermans Wharf, more commonly known as The Dump anchorage (because it is directly beside the towns dump complete with the city's sewage outlet pipe) which is out the front of McDonald's. The water is absolutely foul here, your tender line in the water will make you dry retch its that bad. However you do a have safe & secure place for you tender at the unused marina. You play a game however of being locked out if the fisherman go away and remember the gate is locked everyday from 5pm so no going out for dinner here. You can not get water here, but can dump rubbish. Its a very easy walk to the local shops which are great, including a very good doctor and coin laundry.

Next stop is the Clan Jetty anchorage. The local water taxi seems impossible to get a hold of (we know this because we yelled out to the taxi guy and he wouldn't even come near us), you can no longer leave your tender on any clan jetty and access is tidal even for the water taxi guy if you can get a hold of his phone number. No access here makes this anchorage only good for an overnight stop to or from Langkawi.

The anchorage out the front of Strait's Quay Marina is fraught with danger as its exposed to the north, north west. It is also shallow in close so us deep keelers must anchor way off, and there is a lot of land reclamation work going on here with huge machinery running floating pipes back to the shore. If your willing to risk the weather coming up, it is a very good anchorage. You can pay a nominal fee for a gate key at the marina which gives you access to showers/toilets. You can dump rubbish and get water here. Loads of cafes and free buses to town.

All of the above are negative comments and we hope in earnest that the government bodies understand that all yachties absolutely love Penang and just want/need to have a safe, secure, easy to go ashore anchorage with confidence that we are safe to do and that our tender will be there when we get back. We know many yachties are already bypassing Penang for the above reasons - what an absolute loss for a great place.

As a footnote details for the above can be obtained via the Facebook group: Ahoy Penang.

As we approached Langkawi the fisherman where heading out for the night.
Approaching Langkawi we loved seeing these old 'tall ships' which no doubt are used for charter. 

The Lili Marleen

The Puteri Mahsuri
Last time we approached Langkawi we saw one of Bruce's old work boats which had obviously been sold off to a local Malay university - the vessel is still in place and looking a bit weathered. 

It's still here.
Royal Langkawi Yacht Club, protected by its breakwater wall.


A charter boat in the makings. Love her low belly to the water line.
We enjoyed our stay anchored in Bass Harbour, Kuah - Malaysia. Its a terrific spot to resupply as everything is here. You can anchor in the harbour with good depths and shelter. Its easy to see why yachters who get here extend their stay. Our stay was mostly due to Bruce waiting on parcels to complete his Raspberry Pi (RPI) installs. He has done a good write up on why we choose the RPI here and about his set up here


Amongst all these parcles is our parcel.....


And a few days later Bruce has his final parcel....wooo hooo.

Each evening we enjoyed watching and listening to two eagles as they hunted. There was an unattended ketch beside us and the eagles used one of its masts to perch on. One would always land and then call and call until his/her mate arrived.

The one of the mast is calling out to the one behind. 
Back on his own, he never stopped keeping watch.
Thought we would share the sign at the fishermans wharf (not the blue jetty) but at the creek wharf.
Once the last package had arrived we went for a break over to Koh Lipe, Thailand. It was lovely to be in clean clear water to enjoy a few snorkels and we swam every day. Went and had a look at Koh Butang, it was very nice and its big neighbour Koh Rawi has a waterfall on it but we didn't get there this time.

We were treated to a beautiful sunrise each morning.
Walking Street on Koh Lipe is an interesting place.


While at anchor at Koh Butang we had the incredible advantage of watching the sunrise over Koh Lipe.


Matilda sat so flat I was close to being able to get a clear shot as the sun rose in full.

This shot has no filter on the camera for sunrise. The colors where just gorgeous.


While the sun rose I turned around and this is the shot away from the sun, incredible difference. The water around us was almost completly still.

Once we reached Langkawi we have had a been of time to our self this month We enjoyed just chillin, catching up on boat jobs, reading, relaxing, swimming, snorkeling and time ashore. 

Thanks to the local newspaper, this shot of four water spouts was captured. We missed the four but saw one of them - not a comforting sight.

To close we remembered during this trip to take some photos of the street art in Langkawi.


Saturday 24 November 2018

Setting up our Raspberry Pi with OpenPlotter


What we did to install OpenPlotter on a Raspberry Pi to have a OpenCPN chart plotter running. 


A quick note about the Raspberry PI. Top of the list is the latest model of RPI (Raspberry Pi) and that is the Raspberry Pi 3 Model B+, there are still B models out there for sale but I spent the extra couple of dollars and purchased the newer B+ unit. No sense starting off with an older/obsolete model.

Shop around, we saw B models costing more than the later B+ version. If possible see if there is a package deal. We purchased a package and it turned out to be a good deal after adding together the cost of the individual items. About the only thing we didn’t need was the AC power adapter that came in the package.  We just put that away into a locker as we very rarely use AC power once away from the dock, and we certainly wont be using AC to run a chart plotter.

Raspberry Pi box almost the same size as the mini mouse. As you can see from the box the model B+ is well marked.

For power we use a 3 amp DC-DC USB charger that plugs into a 12 volt cigarette lighter socket. We tracked down a heavy duty USB charge cable with micro connector to run the RPI. It took a little time to track down the 3 Amp output DC-DC USB charger. As usual there are traps for the uninitiated.  Before handing over your hard earned cash make sure the output of the power unit will supply 3 Amps to a single USB socket, there are some rated as 3 Amp but only supply 1 Amp to each of 3 sockets, or for 2 socket units, 2.1 Amps to one socket and .9 Amps to the other.

After booting up and running the unit, if you happen to see a small icon in the shape of a yellow lightning bolt in the top right hand of you screen your power supply likely isn’t supplying enough power (amps). Or perhaps the cable you have isn’t sufficiently heavy enough. When purchasing a power cord look for cords aimed at being designed for tablet charging, these are marked as being good for 3 amps continuous.

The RPI 3 B+ does have built in Wi-Fi on board. However to get the most out of the installation we also purchased a Wi-Fi USB Dongle. Why you may ask? To have 2 Wi-Fi units running on the OpenPlotter RPI. On board Matilda we have a 4G Huawei mobile Wi-Fi E5577 router which connects to the internet (that is when we are in range of the cell phone towers). The Wi-Fi USB Dongle plugged into the OpenPlotter RPI allows it to connect to the E5577 router (as a Client) so we (OpenPlotter RPI) have an internet connection. Of course you could hotspot your phone and connect to the internet that way. The built in Wi-Fi on board the RPI is then available as an access point (AP) so other computers, tablets and smart phones can log on to the OpenPlotter RPI (as clients). If you don't want to purchase the second WiFi dongle you could USB tether your phone. The main reason to get the RPI on line first up is to update the operating system and OpenPlotter software. After the initial update the internet connection is nice so you can get GRIB files and tide data from the internet.
E5577  4G Huawei mobile Wi-Fi  router

You will need at least these items and this is what we used to run the software.

Monitor option
    1 x Raspberry Pi 3 Model B+ (Prices start at AU$60)
    1 x 16GB or larger Micro SDXC card, ours was a 128GB  (A class 10 or better  100MB per second)
    1 x 5V 3A, Power Supply Adapter, we are using a cig lighter socket 3 amp USB tablet charging unit
    1 x Heat Sink Set (3 piece pack get the better quality copper heat sinks)
    1 x Casing with Fan
    1 x 1.5 Meter HDMI Cable (or length you need, short is better)

The monitor we are using is the vessels 12V LED TV which has 2 HDMI input ports.
Logitech MK240 Nano Wireless Keyboard and Mouse Combo
Wireless adapter (150Mbps WiFi USB Dongle)

Any laptop or desktop computer for the initial prep work, I have numbered the summary to match the work list.
Most of the bits we used, Keyboard and Mouse, Raspberry Pi board, heat sinks, SD Card, HDMI cable and WiFi dongle, not in the photo is a case and the 12V 3 amp USB charger. 

Summary
1. Get the software, NOOBS (New Out Of Box Software)
2. Format the micro SD card for use in the RPI (Raspberry Pi)
3. Extract the files from the NOOBS download on to the PC
4. Load the NOOBS software on the SD card
5. Get ready for the initial boot

1. Download the latest NOOBS installer version of OpenPlotter RPI, on to your PC. It’s a compressed 1GB file so it may take a while. The file is available here:
http://www.sailoog.com/blog-categories/openplotter-rpi/


Screen shot of the OpenPlotter download page, we downloaded the NOOBS

NOOBS zip file downloaded, the directory NOOBS_v2_8_1 is where the contents has been extracted to.

2. If you have a SD card 32GB and under visit the SD Association’s website and download SD Card Formatter 4.0 for either Windows or Mac. https://www.sdcard.org/downloads/formatter_4/index.html/

Screen Shot of the SD associations SD card formatter

Or if you have a Micro SD Card over 32GB like we did with our 128GB SD card, follow the instructions at https://www.raspberrypi.org/documentation/installation/sdxc_formatting.md/

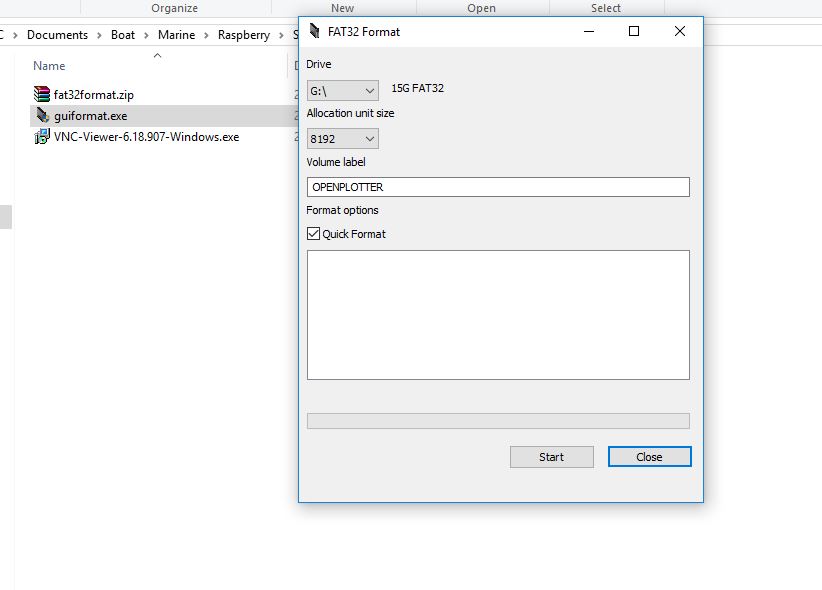
Software to format a SD card of more than 32GB running on a Windows is here. http://www.ridgecrop.demon.co.uk/index.htm?guiformat.htm/

Screen shot of the guiformat FAT32 SD card formatter from Ridgecrop


For Windows (32GB cards and under)
      i. Download the SD Formatting Tool
      ii. Install and run the Formatting Tool on your machine
      iii. Check that the SD card you inserted matches the one selected by the Tool
      iv. Click the "Format" button

For a Mac (32GB cards and under)
      i. Download the SD Association's Formatting Tool   
      ii. Install and run the Formatting Tool on your machine
      iii. Select "Overwrite Format"
      iv. Check that the SD card you inserted matches the one selected by the Tool
      v. Click the "Format" button

For Linux
      i. Its recommend to use gparted (or the command line version parted)
      ii. Format the entire disk as FAT32

Once the initial prep work is done on the SD Card and you have downloaded the NOOBS zip file.

3. Extract the files in the NOOBS zip file into a directory on your PC.

Contents of the extracted NOOBS zip file
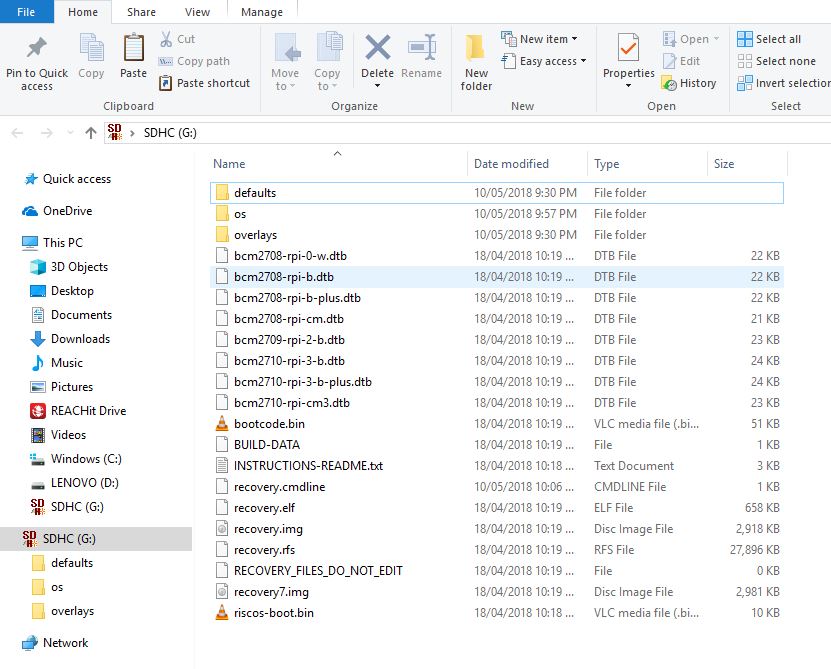
4. Copy the extracted files onto the SD card that you just formatted so that this file is in the root directory of the SD card. Please note that the files have been extracted into a folder. Open the folder and copy across the files from inside the folder into the root of the SD card rather than copy over the folder itself.


For those not accustomed to the term root directory, as an example the files would look like the screen capture. Showing the folders and files copied on to the SD card G:\

5. Fit the heat sinks as per the attached diagrams.

Heat sink placement is straight forward, peel the backing of the adhesive and apply in the place as marked above

Heat sink placement is straight forward, peel the backing of the adhesive and apply in the places as marked above

Insert the SD card into your RPI, attach the HDMI cable, and insert the Keyboard and Wi-Fi dongle into the USB ports, now connect the micro USB power supply cable and plug it into the power.

Left to right, SD card in, power cord connected, WiFi, Keyboard and Mouse dongles in the USB slots

Raspberry Pi is installed into its case ready to go


After applying power your Pi will now boot into NOOBS


First boot screen, software is being installed on the SD card.

The screen after the install OpenPlotter is all set to go

 Now is the time to set up the network, change the passwords for the system and network. Then it will be time to add the GPS data dongle or data cable.

Documentation  from the OpenPlotter web site will help guide you through the set up process. https://docs.sailoog.com/openplotter-v1-x-x/

OpenPlotter Network Configuration Page

We are running OpenPlotter on a RPI B+ so we pick RPI3+ from the drop down menu, we can also connect with a network cable so the bridge eth0 is also selected. The picture shows our setup with network dongle (Client), cable connectivity(bridge eth0) and the RPI running as an Access Point (AP). Change the password here or forever be reminded during boot up you need a new password.


Before configuration of the network, hover over the network connection arrows, only onboard WiFi active , (this could also mean the 4G Huawei mobile Wi-Fi E5577 router is not on)

Top right: Network configured the network arrows have been replaced with the WiFi symbol. Both onboard (AP) and WiFi dongle (Client) are working.

Serial connection page

Added the serial data input, we have AIS and a GPS both running at 38400 baud. The setup is easy with the system selecting the correct port and data rate, plug in a cable and press auto, once correct you will be asked to press apply to save. 


USB To RS485 USB-485 Converter Adapter


We purchased Arduino brand USB To RS485 USB-485 Converter Adapter to connect our serial data. Our data is differential NMEA0183.   Ours were purchased on Lazada as we are in Malaysia, but a quick search on Ebay (USB To RS485 USB-485 Converter Adapter) turns up lots of them starting at about $2.99 each plus postage. Warning the polarity marked on the board connectors is wrong. connect the A+ wire to B- terminal and the B- wire to A+ terminal. It only took me about 6 hours to sort this one out. I see these units are for sale all over the web and I think most of them are coming from the same supplier

OpenCPN running on the RPI as part of the OpenPlotter Package

Using the remote desktop on the phone or tablet over the WiFi access to the chartplotter/Openplotter functions is available anywhere on the vessel.
VNC server is part of the OpenPlotter package and is used to run the remote desktop. To get the OpenPlotter desk top on the remote device download the VNC app from here: https://www.realvnc.com/en/connect/download/viewer/ the app store or iTunes.

Helpful links
OpenPlotter Web Site, the list of  features are not active links, this had me confused first visit. Scroll to the bottom of the page for links to documentation, donations, support, shop. 
http://www.sailoog.com/openplotter

Documentation  from the OpenPlotter web site.
https://docs.sailoog.com/openplotter-v1-x-x/

Support web site, sign up to view diagrams and pictures.
http://forum.openmarine.net/

This concludes our install and initial startup. Follow our journey as we set up layers, add charts, instruments, GPS and  some very cool sensors.

We set up the Tide function with tcdata files that have world wide tide stations in OpenCPN here

Transferring files from your PC to OpenPlotter is very quick  and easy here is how we do it here

Setting up the layers directory so OpenCPN doesn't get bogged down with lots of routes tracks and waypoints here

Initial testing of the fresh install, GPS and AIS connected, comparison with our trusty laptop. Looking very good.