
Setting up Layers in OpenCPN on a Raspberry Pi to display routes, tracks and waypoints.
What are Layers?
Layers are one or more routes, tracks or waypoints that have been saved together into a single .gpx file. The GPX file is used to transfer GPS related information and is referred to the as GPS Exchange format.
Why set up Layers?
A layer is protected from changes. For example waypoints in a .gpx file can be imported either as “waypoints” or as a layer. The difference is that when imported as a layer it cannot be changed or deleted. Importing the lot as “waypoints”can also make your Raspberry Pi sluggish. The Raspberry Pi can be bogged down reading and keeping tab of all the additional waypoint information in an area you may not even be in or interested in. The flow on effect of being able to turn off layers is better usage of the Raspberry Pi resources including processor speed, memory usage and flow on effect power consumption.
On the other hand what happens when an updated set of waypoints comes along? The only way to change a group of imported “waypoints” is to delete the old ones usually one by one. Of course you could leave the old ones but the whole thing then becomes messy. With layers you can turn the old off and be running on the new set in minutes. When several single waypoints or a large group are imported as one Layer they can quickly be hidden from view when not in use to stop screen clutter.
We have lost count of the number of times we have accidentally moved a waypoint. If you catch it straight away you can use the undo move waypoint button, however if you don't you will have to get the info from the last backup. Having a protected set of routes, tracks or waypoints makes a lot of sense.
The OpenCPN manual is good but recently I have had to help several cruisers get the layers folder set up and running. The manual is written by people who know their way around a Raspberry Pi, however if you’re not tech savy it can test your limits. Here is the link to the online OpenCPN manual for Layers.
The following will show you how to set up to run “Permanent Layers”. These are Layers (GPX files) that are saved in a folder called “layers” and are automatically loaded on start of OpenCPN.
Important bit of information is that the layer directory name must be done in lower case, don't capitalise the first letter.
Usually the first hurdle is finding the place to put the new folder in the first place, this will require you to create the folder: /home/pi/.opencpn/layers
I want to show how to:
Find the folder to create the layers folder in.
Create and set up the layers folder.
Copy a known GPX file into the Layers folder (downloaded from Terrys web site)
Testing the Layers GPX file has been read
First thing to do is make sure OpenCPN is not running, you may even want to restart OpenPlotter.
The following screen captures were done on a laptop using the VNC remote desk top. See setting up VNC in the file transfer entry here.
 |
| Open the file manager using the File Manager button |
 |
| The file manager opens in the /home/pi folder (directory) |
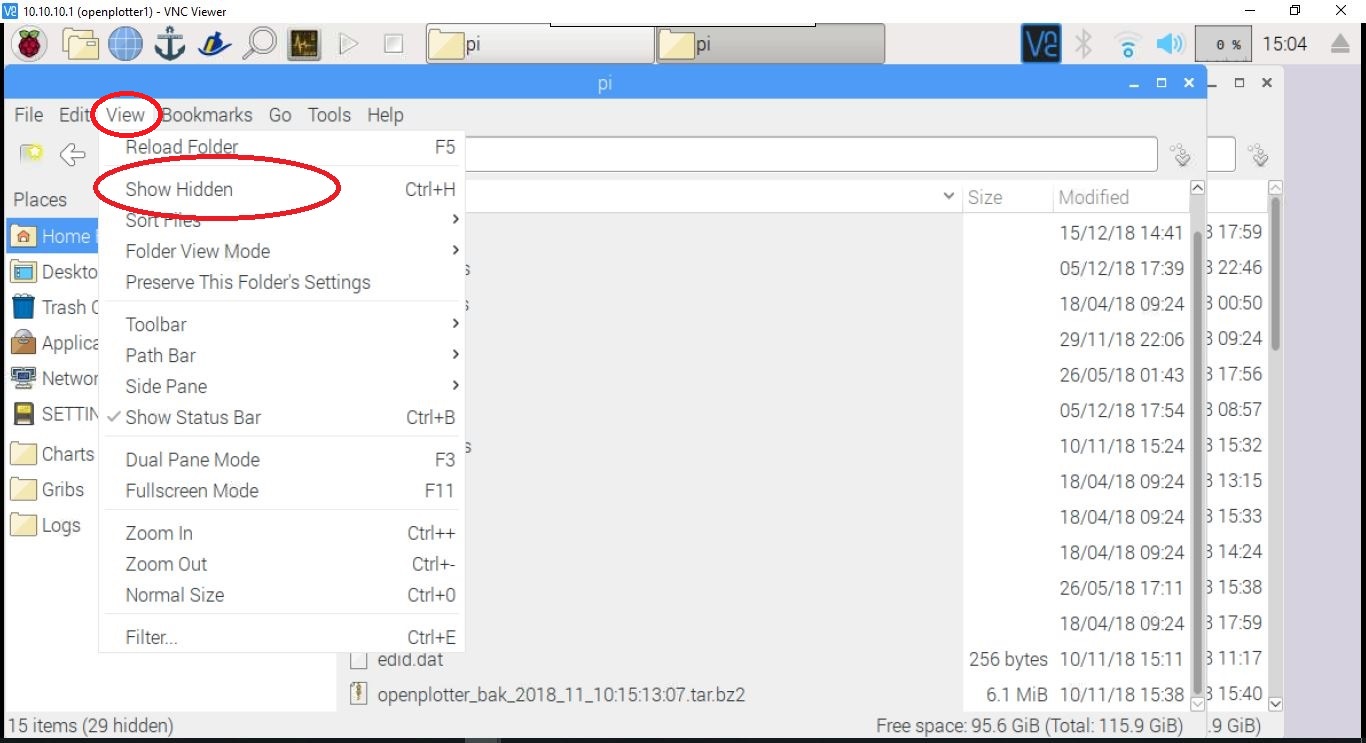 |
| Click on the View button in the tool bar, look for Show Hidden button |
 |
| Select the Show Hidden button, as seen here the tick indicates the hidden files will now be seen |
 |
| Scroll up and you now should start to see file names beginning with a . (full stop) look for .opencpn and open it |
 |
| By clicking into the white section of the open folder right click the mouse and create a new Folder called layers |
 |
| As seen here is the freshly created folder called layers (Remember it needs to be all lower case letters) |
 |
| Copy files to the Raspberry Pi, we use VNC and transfer the files over the Wi-Fi quick and easy. The files are placed on the desktop (as seen here) to be copied into the destination folder. |
 |
| Open the file manager and then .opencpn (/home/pi/.opencpn folder) |
 |
| Cut the transferred file from the desktop. Picture showing layers folder open and some previously transfered GPX files copied into the layers folder. |
 |
| Paste the file into the open layer directory. |
 |
| All done the GPX file copied to the layers directory |
 |
| I now un-tick the show hidden button, while its not necessary for the operation it safe guards accidental moving or erasing the system files. |
 |
| To check layers work open the Route and Mark Manager. |
 |
| As can be seen here the files copied to layers folder are ready to use. The eye symbol on the left side of the open window indicates the file will display the routes tracks and way-points on to the OpenCPN chart. |
 |
| Its simple to turn off a layer, just simply click the eye symbol. As seen here the eyes with the red cross will not be displayed. |
 |
| The anchorages and tracks displayed here are part of the visible Thailand layers |
 |
| Testing the Layers GPX file has been read, open a waypoint to check the properties, as you can see in the properties box "This waypoint is part of a layer and can't be edited" |
No comments:
Post a Comment