Sunday 24 March 2024

Conserving Cooking Fuel

 Conserving cooking fuel

Galley tips,

Keep in mind it doesn't need to be just LPG it could be any cooking fuel.

Liquefied petroleum gas (LPG) is mostly a liquefied gas of propane, however some times it may be a combination of propane and butane.

After cruising extensively in the tropics we found than in addition to conserving cooking fuel, the following tips should also help keep cooking heat out of the boat. While the tips here are geared to galley usage, they can help you conserve energy in any kitchen.

I have thought about arranging the tips in what I believe is an order of impact on your cooking. However we all use our stoves differently and cook a wide variety of foods, and each has their own little idiosyncrasies. The best thing is, most of these tips and tricks don’t cost a thing, and once you have incorporated what works for you into your galley cooking then your likely to not even notice your doing them after a while.

1. Stove Burners. Do your gas stove burners run clean, make sure the flame is colourless or blue. Yellow flames are an indication that incomplete burning is taking place. Before you start addressing the list we found the best thing to start with is to clean the stove burners. We removed the jets and using a jet cleaner removed the carbon build up in the jet. Doing this made the burner more efficient, the flow on effect was that we needing less cook time as it didn’t take as much time to bring what ever we were cooking up to boil.

2. Gas Leaks. Check the regulator, pipes, burner for leaks and also ensure that regulator is switched off after cooking to eliminate any chance of wastage due to small leaks. Check bottle fittings for leaks after any bottle change and regularly check fittings in the supply to ensure there are no small leaks. We keep a spray bottle with dish washing detergent/water mix and spray fittings on a monthly basis. We carry a spare regulator, pipe, pipe nipples and nuts, and importantly the flexible hose that allows the stove to gimbal, just in case repairs need to be done in out of the way places.

3. Cover Pans. Using lids is one of the most efficient ways to conserve fuel. Covering a pan, whether its a frying pan or a sauce pan helps retains far more heat and you can generally cook at a lower setting. Normally we don’t like glass aboard due to the potential for breakage, pan lids are the exception to the rule. With a glass lid, I can see what’s happening in the pan and don’t have to take the lid off to check. Most glass lids are fairly thick treated glass and we haven’t yet had one break even though one or two have made unscheduled flights across the galley.

If you don’t have a lid for a pan you’re using, you can use a plate or even a piece of aluminium foil as a lid. You will need to check your plate is heatproof before you use it on top of the pan, yep plastic or melamine isn't going to work without melting or causing a fire.

For a more permanent solution, buy a stepped universal pan lid. There are a variety of universal pot lids on the market, some employ a stepped rubber ring on the outer lip, the problem here is heat coming around the side of the pot can make the ring very hot or give off bad burning smell. There is glass and rubber or glass and metal combination to chose from, and as products change I cannot really comment of how robust they will be. In some situations it could be a better option to get new pots/pans.

4. Measure Water. Whenever you’re heating water, whether its for tea, coffee or use in a recipe, know how much you’ll need and measure it into the pan or kettle so you don’t waste fuel heating water that isn’t needed.

5. Whistling Kettle. Use a whistling kettle whenever you’re boiling water, that way you will know as soon as it begins to boil and you can turn it off so you won’t waste gas. With out the whistle you almost need to be standing by watching and waiting for it to boil. We also found kettles have different tones and some don't whistle very loud at all, more like a deep hum, so see if you can test it out before purchase, we actually returned one for refund because out side the galley it was not heard.

6. Use a Timer. We have a couple of timers and use them regularly. Electronic timers are cheap, and we buy ours from Ebay not kitchen shops for a better deal. We can also use our phone timer if we need too, so we can carry it where ever we are. We use one timer to set the over all cook time, then when adjusting the flame, set the second timer as a reminder in a few minutes to check the pot is not simmering wildly or not at all. With out a timer (reminder) it’s very easy to forget whats on the stove and let it cook longer than intended, even cooking something one minute longer than it needs, wastes fuel. Simple maths if I only need to boil some thing for 9 minutes and I let it go for 10 then I have wasted 10% of the cook time fuel, do this enough times and it will add up.

7. Plan Ahead. If your food prep has you removing produce from the fridge/freezer and straight into the pot, then your increasing cook time. Cooking time can be reduced by preparing then letting the produce coming to room temperature before its cooked. Another thing to think about is doing all your prep before starting to cook, yep cut it all up and measure it all out, this can save cooking time by not needing to wait for you to prep the next ingredient before going into the pot.

8. Plan Ahead 2. We try and plan our menu by what needs cooking first, however with that in mind we also look at the next days meals and see if the cook time for different meals can be combined. For example, if we are having pasta for dinner and want a pasta salad for lunch the next day, we cook the pasta for both at the one time. Seeing as the pasta to make the salad is going to need to be cold, then cooking it the evening before is a good idea. Even with more pasta the cook time is the same, what does change is of course the time to heat the water initially. If in the morning we are making tea/coffee, oatmeal and perhaps putting yoghurt in the maker we measure out and boil all the water at once to save fuel. As the old Boy Scout saying goes Be Prepared..

9. Use Less Water When Boiling Food. If you’re boiling something such as eggs, pasta or vegetables, you can usually use less water than you think. Most foods cook just as well when they are only barely covered with water as when they are covered by several inches, this is especially true if you keep the lid on during the cook. Every extra bit of water takes just that much more fuel to heat.

Vegetables, breads can easily be steamed in basket in a fraction of the water necessary to boil them in. Steaming is very efficient and can save fuel, water, time, if done right, keep in mind steam is a lot hotter than the boiling water so be careful lifting the lid.

10. Cooking Pasta. Directions for most types of pasta call for cooking in lots of water in an uncovered pan. I can’t tell any difference when I use about half the recommended water and partly cover the pan. Not only does this use less fuel, it also conserves water and significantly reduces the humidity inside the boat.

I have heard through other cruisers that the way they cook pasta is to use half the water called for on the package and salt to taste as you normally would. Here is the instructions: Cover pan and bring to a boil. Add pasta, cover and boil for 3 minutes. Turn heat off and let sit covered for 10 more minutes. Drain or serve straight form the pot if desired.

While I have tried this, with the lid on I cannot stop the pot bubbling up and spilling over once the pasta starts to cook. I have let it boil partly covered for 4 minutes then turn it off and replace the lid fully to let it rest for 10 more minutes, this seems to work for us. However it does depend on the brand, shape or style of pasta, and I have to say some do need a different cook/rest ratio.

11. Turn the Stove Off Before Food is Fully Cooked. Pans and the food in them retain heat and continue to cook for quite a while after you turn a burner off. You can use this heat to finish cooking many items. Rolled oats/Oatmeal as an example, instead of simmering it for 5 minutes, bring it to a boil in a covered pan then turn the burner off, it will be fully cooked ready to serve in 5 minutes. Most other dishes can be turned off 5 to 10 minutes before they’re done, but make sure you keep the pan lid on.

Rice can certainly be cooked using this method. We have been using the absorption method, and found we can certainly reduce cook time. Due to this style of cooking we are not heating so much water, then we turn the flame off after just a few minutes of boil time. I cannot give you a definitive time due to the individual styles of rice or even variations with in various brands of the same rice taking different amounts of time to cook. However most brands/types of rice have an absorption water/ rice measurement on the pack and are usually a good guide, I know that basmati rice uses more water than a plain white rice. This will require experimentation to find the magic number (water and time) when you first start to use this method. We have also found setting the pan up with the measured rice and water an hour or more before cooking can reduce the cook time even more, the only problem we have encountered with pre soaking is sometimes there is almost too much absorption and warming up the rice then isn't easy. Another reason we like the absorption method is due to not needing to rinse the rice after cooking, saving water as well.

Brown rice doesn’t work with this method, however soaking for 24 hours does help slightly. Better still for brown rice when away from civilisation we buy the precooked vac packed brown rice available now. It works a treat and we just warm it up in a pot with a steaming basket (in the bag corner cut off), this way the amount of water is minimal and the steam is super hot making warm up quick and easy.

12. Keep Hot Water in a Vacuum Flask. If you’re boiling water and know you’ll need more in a short while, like when friends who like a cupper or two drop in, boil it all at once and keep the extra in a good vacuum flask. You will have to shop around for a good vacuum flask as the quality varies greatly these days. If you don’t use it all and you need it freshly boiling later, it won’t take nearly as long if it starts out hot from the flask.

13. Oven Tips. Don’t preheat for things that don’t need it, such as most pasta bakes, potato bakes, casseroles. For items that require a preheated oven don’t preheat the oven any longer than you have to, do your prep and try to time it coming to the right temperature as you’re ready to put food in. Keep in mind most baked goods biscuits, muffins, cakes, brownies always need a preheated oven (unless the recipe states otherwise).

If you’re baking in a small dish for part of a meal and there is room in the oven for something else, think about whether a desert a snack or treat could be cooked in the oven at the same time. Or you could throw in a couple of potatoes and make potato salad, or use less fuel as you warm them up for a meal the next day.

Many casserole type dishes or even items wrapped in foil (fish, sweet potatoes etc) or pizza can be cooked in a skillet/frying pan on the stove instead of in the oven. Though this is not always the case as the skillet type does come into play and having a heavy metal lid is certainly better. Cooking on the stove top generally makes more efficient use of the heat. We could make pizza on the stove top and as long as you didn’t know the method most people don't know it didn't come from an oven.

14. Pressure Cooker. Pressure cookers can cut cooking time in half, some times a lot more, and can use less fuel in the process. They are for things that would otherwise simmer for lengthy periods such as stews, corned beef, large portions of meat, soups and tough cuts of meat. Cruisers either love them or hate them, those who love them tend to use them frequently the others rarely if ever. Modern pressure cookers have proven to be safe when used correctly, and are available in a wide variety of sizes from 1-1/2 Litres up to size huge, more than likely too big for the most boat galley’s. If you do go down this route get a good cook book recommending cooking times, as its very easy to over cook different foods. I also know a couple of cruisers who don't have an oven, they use a pressure cooker with out the rubber sealing ring as a stove top oven to bake bread.

15. Thermal Cooking. Stews, soups, large portions of meat and other dishes that require long slow cooking can be slow cooked in a Thermal cooker. For details on the technique, you will need a cook book or adapt slow cooker recipes to suit. You’ll use a lot less fuel and keep a lot of heat out of the boat. We had one and did use it, but not as often as we should have, unfortunately we were not good at getting the anchor up and underway as well as cooking to get the food into the pot early enough during the morning. On those days we did get it together, we could arrive at anchor in the evening and not have too cook just serve up the hot meal. Too easy

16. Size the Burner to Suit Your Pans. Keep the smaller burners for the smaller pans, its amazing how easy it is to forget this simple rule. We have seen and even done it our selves, putting a small pan on the big burner, most of the flame will be just wrapping around the sides of the pan. If the same pan was put onto a smaller burner there would be a lot more bottom surface of pan in contact with the flame, the excess flame will still wrap around the side however there will be a lot less heat lost making for quicker heating and in the process cooking time. Most of the time we only use the big burner for the griddle/fry pan.

17. Prep Small Sized Pieces. Cutting food into smaller sized pieces will reduce cooking time, regardless of the cooking method: baking, boiling or steaming. Don’t cut them too small, until you get used to the quicker cook time or you may end up with a mushy mess. A lot of the time you will need to experiment working out the best size of each component so they all are finished cooking at the same time.

One inch (25mm) cubes are about the smallest you should make pieces if you want various foods – potatoes, meat to still be a reasonable size once cooked, remember the meat will shrink as it cooks. Carrots are fairly robust and 4-6 mm slice will preserve shape. For things like mashed potatoes, you can generally cut the potatoes into ½ (12mm) inch cubes, but watch them so they don’t fall apart.

If you are interested in a pressure cooker, read the cook book for the pressure cooker cook times, the small number of times we used a pressure cooker we learnt vegetable cook time is very very fast and ended up with a soup/mush type constancy on several occasions.

18. Do Dishes in Cold Water. This is if you don’t have an onboard water heater. In Asia we were able to source good solid strong dish soap that didn’t require hot water to clean the dishes. With most good quality liquid detergent you can clean your dishes perfectly in cold water. Greasy items can some times be an exception to the rule however, we have found a little detergent used straight up can cut through the grease. It may take a little more elbow grease to get a baked on mess off, but you can do it. If we use detergent straight we usually rinse in salt and then fresh water rinse.

19. Do Dishes in Hot Water. If you cannot stand the thought of using cold water to wash dishes the best thing is reduce the amount of water you need to heat up. Get a small container that will fit in your sink and wash the dishes in it. In a lot of cases this will reduce the amount of water needed to fill the container rather than the sink, sometimes by half. We also found a solar shower would work exceptionally well to heat water for wash up. However we would need to collect the very hot water into vacuum flasks in the early afternoon because once the sun started to go down the solar bag lost heat really quickly.

20. Use Other Cooking Methods. If you’re really running short on stove fuel, you may be able to stretch it by using an electric equivalent, we have seen portable single plate induction cooker, 12 volt electric kettle or low wattage toasters. (yes, they all need electric power but it may be easier to find diesel than LPG). Also of note are small kerosene burners stoves with a large wick, great care needs to be taken with these but they have been around for years. Of course for emergency what about a stash of hiking stoves with gas cylinder (these cylinders need proper storage however).

-------------------------->

I think most hints will work even with an induction cook top, as there is still some residual heat in the cook top surface. The advertising states you can pull a pot off the cook top and place your hand on the area the pot came from. Hello from the real world, not the warped advertising world. Here’s the warning, do not put your hand on the place where the boiling pot/pan came off. I have used this type of stove quite a lot and I can tell you first hand if I did this I would have 3rd degree burns on my hand. If I turned the plate on then removed the pan before it had a chance to heat up there would be no heat on the surface, however once the pan has been heated the ceramic glass top of the stove will come up to the same temperature as the pot that was cooking the food in.

Thursday 21 March 2024

Gas Cylinder Markings

Gas cylinder markings for most US marketed cylinders


WC: The water capacity is how much water the cylinder will hold in pounds. The "WC" stamped on the bottle followed by a number such as "23.8" means the bottle will hold 23.8 pounds of water.

Multiply by 0.42 to convert the water weight to LPG weight  23.8 x 0.42 = 9.996 pounds.  Divide, pounds by 2.2 to convert pounds to kilograms.   9.996 / 2.2 convert to KG = 4.54 KG so a 4.5Kg cylinder

So using the same formular a WC marking of "47.6" converts to a 9.08KG cylinder.  47.6 x 0.42 = 19.992. lb, convert to Kg 19.992 / 2.2 = 9.08 Kg

As a side note , WC is used to measure cylinder capacity because water is not compressible its the best medium to use, whereas LP gas or even air is. Thus WC is a reliable and repeatable measure of capacity. I have read where some people talk about the capacity of the gas can vary due to pressure, in this case there is no room for the variables. 

TW: Tare weight of empty cylinder, in pounds (US cylinders), so if you have a set of scales its possible to weigh the full cylinder and then subtract the TW (Tare Weight) to check if the fill weight is OK. 

DT: Is the length of the dip tube, which is where the bleeder value opening inside of the cylinder is located. This determines how full the tank will get before liquid starts coming out of the bleeder valve, when open. Generally as discussed earlier a WC of 47.6 lbs can be filled with 20 lbs  (9.08 Kg) of LP gas. 

A replacement LPG cylinder valve, the thin tube with the bulb is the dip tube 


____________________________________
Gas cylinder markings for most Australian marketed cylinders

WC: Water Capacity. It is the internal volume at test. This is also the volume of LPG it contains when full. This can be used to work how many kgs of LPG it can hold. In this case due to the markings being in metric, find the "W.C." marking on the bottle, for a 9 kg bottle, the WC is 22.0 Kg. However this is not always the case, this 22.0kg is a generalisation and I have seen a variety of values around this value plus or minus. The normal propane or propane/butane mix at the specified pressure will weigh approximately 41% of the water capacity. Doing the math 41% of 22kg = 9kg  or simply put 22 x .41 = 9.02 

TW: (occasionally TM) is short for Tare Weight, it is the weight of the empty cylinder with no valve. (lets not discuss mass and weight difference)

EW: Is not always there. It is the TW (Tare Weight) plus the valve weight. i.e. the weight of empty cylinder (EW = Empty Weight) before filling, keep in mind the change over of cylinder valve types from POL to LCC27 is under way and could mean the value of the EW of an older cylinder may not be 100% correct but should still be close. 

TP: Is the Test Pressure. You also find the test date and the testers registered number. Usually valid for 10 years.

______________________
OK how to work out the number of kgs of LPG is in the cylinder or the cylinder can hold  ? 

A really rough and ready way to calculate capacity. Half the WC and then round down to the closest size cylinder to get the Kg capacity of LPG. So a WC of 22 calculates to 11 Kgs of LPG  the closest size bottle to this is 9 Kg so its more than likely the cylinder you have is 9 Kg  a rough and ready calculation
A better way is get out your phone calculator and multiply the WC value by .41, As an example a WC value of twenty two.  22 x .41 = 9.02 so the cylinder can hold 9 Kg or a WC of eleven, 11 x .41 = 4.5 so a 4.5 Kg capacity cylinder. 

Got a partly used cylinder and want to know how much LPG is left.
The simplest way to check the contents of your cylinder is to weigh it. Weigh the bottle with a set of bathroom scales is normally the easiest, how ever we have found hand held luggage measuring scales work a treat. (doing it on a moving boat underway or at anchor isn't very accurate)

As an example if your partly used 9 Kg bottle weighs in at 11 Kg. 
Take the EW (empty weight) in this case 8.1 Kg away from the of the value of the partly used bottle (11 Kg) as measured by your scales. 
E.g. 11kg – 8.1kg = 3.9kg.   You have 3.9kg of gas remaining from your 9kg capacity cylinder = 43%

_______________________
This bit will is like throwing a cat amongst the pidgions. I say this because it may take some getting your head around. 
Storing LPG in cylinders allows it to be transported in a smaller physical volume than would be required if the gas was distributed in its natural state. Gas cylinders have internal pressures that are higher than atmospheric pressure. LPG must have a boiling point below 20 degrees Celsius in order to be considered a gas.

When using the actual WC (water capacity) figures stamped into your cylinder to work out your cylinder storage the DT (length of Dip Tube) also plays into the final calculation. The cylinder will usually only be filled 80% of the full volume as there needs to be an area for the gas to form in the cylinder. So any calculations using the WC marking should take into account a full cylinder is 20% less volume. (hence the multiply the WC value by .41)

So doing the calculation a different way, (keep in mind this isnt an exact science due to several variables)
WC = 22      20% of 22 =  4.4        22 - 4.4 = 17.6  so the volume for a fill will be 17.6L.   So the weight of the fill will roughly be 8.979591836734694Kg  I would round this up to 9Kg   

Gas volume can be calculated in litres with some basic mathematics.
For LPG (propane) 1kg = 1.96L. Therefore, 14.2kg = 27.832L
For LPG (butane) 1kg = 1.724L. Therefore, 14.2kg = 24.48L
For a 75:25 butane/propane mix, 1kg = 1.783L.
Unlike water, 1kg of LPG doesn’t equal 1L of LPG. This is because the density of LPG is less than the density of water. In Australia, where LPG is propane, 1kg of LPG has a volume of 1.96L.
Conversely, 1L of LPG weighs 0.51kg.

--------------------------------------
 If the valve is being replaced trim the dip tube to match valve being replaced, this should then mean the stamped info remains current.


Swap & Go 

As mentioned earlier the filling of cylinders isn't an exact science due to several variables, so to keep legal (weights and measures) the Swap and Go people have reduced the volume of the fill to take account of the fact not all cylinders are created equal and have reduced the amount of gas they fill the cylinders with. This doesn't reduce the cost of course but you know you get a the fill weight they are advertising it is.  

The 9kg gas cylinder is the larger cylinder and is filled with 8.5kg of LPG. The smaller 4kg gas cylinder is filled with 3.7kg of LPG. So what sucks for me is I have a 4.5 Kg cylinder so I always look for a refill station, and unfortunately they are getting fewer every day.

Tuesday 27 June 2023

Things We Learnt

  "Things We Learnt" and I hope to add to them as we go along, they are in no particular order.

Things break.

Is it wise to have things that serve a dual purpose, if it breaks then you loose two or more systems

Spare parts, stock up wisely the best thing to do prior to a voyage is to ask around, see if you can get an idea on what your type of vessel has had fail. Every one will have a tale to tell and what was important to them. 

Invert cans of antifoul, his sounds like a good idea however all the heavy metal still falls to the bottom of the can once stood the right way up. I think the real message should be, stir cans of antifoul vigorously before use, and then again and again before decanting into roller trays or spray equipment.

Clear flush the water tank fill hose prior to topping up the tanks. Pre taste and inspect water before filling tanks, use a charcoal pre filter

Check the operation of a gas detector by holding an unlit lighter under the sensor and pressing the lighter’s valve.

Citrus hand cleaner with pumice grit, (fast orange etc) to clean power cords tenders and fenders

While electronic navigation plays a central role on most boats today, paper charts should have their place at the sensible sailor’s navigation station. No Chart Plotter can match the “ overall picture” offered by paper charts, or the backup benefit in an electronics failure no matter how it was caused. 

Chart Plotters, dont become a satellite aided grounding statistic.  If you only have one chartplotter, keep it zoomed in. You really want to see the detail, there has been the loss of several vessels due to the chart plotter being zoomed out to see the destination miles away. Zooming out to this scale removes important details like reefs and rocks.

 Saving night vision: We have red floor lights in the cabin and throughout the vessel; these do help to keep night vision when we need to go below or before coming on shift. Once we have worked out our passage plan and entered all the problems and marked all the clearing bearings on the paper charts and into the chart plotter we make sure we don’t mark any areas of interest with pink or red lines, we want to make sure they are visible under red light. Another trick I have learnt is instead of only using the night dimming function of the chart plotter I have a square of red acrylic that I can Velcro to the face of the chart plotter. We have found that we can still see the detail of the chart and save our night vision at the same time. If your instruments are too bright, squares of red acrylic can be cut to fit the face of your instrumentation.  

The previous owner decided to take the brand plaque from the steering compass flip it over and have it engraved with the vessels name. While this looked pretty he screwed it back on to the compass housing using plated steel screws. It wasn’t long after taking possession of the vessel, I was getting concerned with the steering compass performance and was about to head out to do some checks. Then as I was getting a closer look at the compass and had removed the outer cover I noticed rust bubbles on the chrome screws. The compass took off and changed about ten degrees when I removed the screws and it hasn’t worked better. So it is well worth your while when doing work around the compass to check the compass reading prior to starting work then again after, while this isn’t a definitive test at least you will have some idea that what you have done has either changed the magnetic field of your vessel or not and it will need to be sorted out before heading too far afield. It is always a good idea to swing the compass after any work, or after being tied up at the dock for some time.

Wind generators and exploding blades, it does happen. Our last set of blades lasted 9 years of use through all sorts of weather without mishap. With a little human intervention you can minimize the risk of the blades letting go. To keep the wind generator from going into free wheel and over revving keep a load on the generator. If you are in strong winds and the batteries are getting close to fully charged it’s time to put the brakes on for a while. I did some investigation and found when the battery levels are low and can take all the wind generator can output, the generator doesn’t easily get to the high speed spin. I found that when the generator is loaded it will walk on the blades, similar to prop walk and will slow before starting again, the process continues time and time again until the batteries start to become fully charged. The load reduces when the batteries are reaching the fully charged state and the prop walk doesn’t happen as much, and without load before you know it the generator is going into over speed even though it’s not supposed to due to inbuilt electronic braking. Other things you can do to reduce the risk? If a storm or high winds are headed your way turn the brakes on or tie the generator off so it won’t run. Don’t run you wind generator when tied up at the dock and you are charging the batteries with shore power at the same time, Its bloody annoying for your neighbors and even the quite generators can get on your nerves after a while, secondly your batteries will be topped up and not load the generator.  

 Pickling the water maker, if you need to have your water maker pickled when you are not going to be using it for a while make sure you use the chemicals supplied by the manufacturer. We had an expensive rebuild on our pump when we sent it for a service, it looks like our water maker had previously been pickled with the wrong solution not the manufactures recommended product. The problem here is that the use of incorrect chemicals can damage the plastics commonly used in systems. So in our case instead of a rebuild we required a complete new pump at 3 times the price. By paying slightly more for the pickling solution from the manufacture can mean a better total cost of ownership. The next best bit of advice I can say about a water maker is to flush it with fresh water when you have finished, they are like any other piece of equipment, wash the salt off or out from inside will prolong their life. And what ever you do if you have a Spectra system never use sodium metabisulphite to pickle it, there those who have no idea and will recommend it because that's what they use in their brand of watermaker. Do not follow their advice or you will ruin the plastics in the system.  

We have experienced times when ships ( large <900’ ships) are anything up to a mile ahead of the plotted AIS position, the position isn’t static but moving at the same speed as the vessel being recorded by radar. Beware of relying on AIS positions as being 100% accurate, while I am sure we have seen them advertised as radar, these units are not radar. When working well and all the local traffic is transmitting trouble free they do seem able to place vessels on the display very close to their actual position. Unfortunately there is room for error due to a multitude of reasons, everything from propagation delays, outside interference, transmitter equipment faults, receiver errors, and the list goes on and I won’t go into these here as it’s not in the scope of the article. Only ships of 300 gross tonnage and upwards are required to have it and often it is the fishing boats and smaller vessels that are a bigger risk near the coast due to the sheer number of them. So radar is still the best at seeing what is around you. If you want radar buy radar, if you want a tool for gaining information of ships in and around your area of operation then get AIS as well. We use it a lot as another tool to make it safer out on the water, gives us a ship name to call by radio. But just don’t rely upon it for safely finding all targets and placing them on the plotter where they really are.

 Wire crimps need to be put on correctly to be of any use

Same goes for swaged rigging fittings, they need to be put on correctly so they dont break loose.

Something we learnt early on is to read sealant tube instructions and especially check the list of non acid sealant contents or look at the cleanup on the back. Acid based silicone can be a problem if used on metal.

We have found the product CLR has a multitude of uses on board. I use it to remove rust stains from gel coat and painted surfaces. Removing calcium from around fresh water fittings. 

If you like to spray a boat wash which has phosphoric acid as an ingredient be aware that some sealants for bedding deck fittings can become either soft or actually start to crumble if left exposed to the acid for some time.  

 To help keep crew on and have a good handle when moving along the deck we have replaced the top wire of the lifelines with stainless steel tube, this makes for a better hand hold and is better to fall against in a sea way. It’s not for everyone but it is an option that has worked well for us.  


Monday 15 May 2023

Exploding Propeller Rope Cutter

An expensive day out. Just how did a plastic shopping bag cause the destruction of $800.00 rope cutter designed to chop through large ropes.


While all the advertising lets you know how good these are at chopping large rope, it was the $0.001 plastic bag that brought it undone. 

We seem to have a very good idea how it was destroyed, and it could happen to any choppy choppy spinney spinney moving blade style rope cutter. When we pulled the boat out of the water for annual maintenance we found the blade broken off our very expensive rope cutter. On further examination something blue was in the bearing area and could be seen in the hole left where the blade had broken free from. As it turned out, this blue material was what we now believe was the remains of a shopping bag. There was a couple of metres of it and it took some time unwinding to get it free of the shaft, we could have cut it but where’s the fun in that. We and others we have talked to all seem to come to the same conclusion. The bag material was fine enough to fit between the blades as they rotated and one blade caught the bag and it was drawn into the fine gap between the rotating blades and filled the bearing area until enough plastic was wound in and not being able to compress any more caused the case to break off.

The old rope cutter in happier days almost ready to go back in the water

Before returning the boat to the water we changed style of rope cutter, while we believe the choppy choppy spinney blade rope cutter unit was OK for rope, we had seen enough plastic in the water to feel we would likely be throwing good money away if we replaced it with the same type. Besides it was a bit too expensive for our budget if we had to pay postage then get it through customs.

The new type rope cutter we fitted, simple shaft driven rope cutter, no choppy choppy moving parts, and no bearings to replace annually, and as long as you sharpen it when out of the water it can cut through thick ropes in the blink of the eye. 

All ready to go, if using this type of rope cutter you need to make sure that the diameter of the propeller hub isn't so big that it stops the blade from being able to get purchase to cut through the tangled rope. 

I don't know if it was fate or not but our maiden voyage after we went back into the water after fitting the new rope cutter we ran over a partly submerged fishing float and line. The 25 mm (1”) rope cut through so quickly we didn’t even notice a change in the pitch of the engine. We do know it was 25mm because we heard the float bounce under the boat and we turned around and went back to pick it up.

Rope we picked up after the rope cutter did its job.


We travelled through Asia for a couple of years and found it was a very important safety device, but I don't think all submerged, or floating ropes and plastic bags are only found in Asia, where ever you are it could be worthwhile getting a rope cutter put on.


Our friends boat prop, this was picked up when at anchor and got wrapped up on the prop when they tried to pick up the anchor in the middle of the night when a storm was rolling in. They didn't have any type of rope cutter fitted, and this mess didn't allow them to get under way.


Saturday 6 May 2023

Deep Water Anchoring

If your headed to Indonesia then this post should be of interest. 

We rarely anchored in deep water before we went cruising full time and headed off to distant shores. When we cruised the East Coast we thought ten metres was deep water and tried to avoid anchoring in any thing much deeper than five or six metres. There was a couple of times we did anchor in ten metres but it wasn't often. We would easily and often anchor in five, this depth would allow the tide to run out two metres and still leave us with a meter under the keel at low tide.


Not how you want to begin the day. 
When we were getting ready to head off to SE Asia we were bombarded by different views on how to anchor in the deeper water. One couple that had done several trips into Asia would give out advice to anyone who would listen. After talking with them briefly about anchoring we started to doubt our preparation, we began to think we didn’t have enough rode or for that matter how could we actually carry enough. We really don't know how this couple anchored exactly, what we do know is they carried an extremely long length of chain.  We later found out this chain was smaller in diameter than our own, and they had an old generation anchor on the end of it. We can only assume they carried extra length of smaller chain and tried to maintain the scope mantra often repeated in online forums, training courses and yacht club bars.

Fortunately we ran into other couples who had done several trips in SE Asia and they explained that one hundred metres of chain is more than enough and we shouldn’t worry at all. They went on to explain that in the deeper water we can start to rethink the ratios we are consistently told work and start to properly use the catenary effect of the chain. Anchoring in deeper water really calls for a different approach to the rode, depth, scope ratio’s we have all heard so much about. One of the couples had anchored in thirty metres regularly when they explored the eastern islands of the Indonesian archipelago.

For us anchoring in shallower water had been the norm, we had been using snubbers for some time and had worked out an easy to use system. We had been in some serious storms at anchor and could see the chain pulled taught while the snubber absorbed the energy generated by the snatch loads this reduced the chance of damaging the vessel, breaking the chain or dislodging the anchor. We saw time and time again that when anchoring in shallower water it didn’t take much of a storm or increase in wind strength to pull the anchor chain straight and taught. This is mainly due to the lack of depth not allowing enough length of chain to hang into deep water to develop and maintain the required curve for the catenary effect absorbing the shock loads on the anchor.

To anchor in deeper water was not going to be as tricky as we first thought. However it is a whole anchoring system not just the anchor and chain.

Now I have said that, the first thing I am going to discuss is the Anchors.

Anchors

Size does matter! and the bigger the anchor you can fit on the bow of your vessel the better. Look at the selection chart for the anchor you have and compare it to the other manufactures charts. You are likely to find most anchor manufactures will recommend anchors that are too light for the size of the vessel. I am lead to believe this is a marketing ploy to stay competitive with other manufactures who also under size the recommended anchors. If a recommended size anchor is cheaper for a given size of vessel, they are more than likely to sell more anchors, and the way I think it works is when boat builders fit out new yachts, they are looking to reduce costs. They will purchase the size recommended by the anchor manufacturer, not the size recommended by the cruising community, who know from experience the recommended anchors are too small for anything other than a picnic stop for lunch on a calm day.

I could go on and explain the benefits of the new generation anchors, giving a break down of brands and types but I won’t as I have found it causes to much friction, people have a habit of defending even their worst purchase choices. 

What I do know from experience is, the new generation anchors work better. We should also know from extensive testing by yachting magazines, private individuals and even company sponsored anchor testing the new generation anchors out perform the older generation anchors on just about all points of the tests. Yes I know every now or then one of the old generation anchors does come up and surprises all the testers, however it's rarely consistently repeated. 

So the best thing to say is when purchasing an anchor, get one of the new generation anchors. Look carefully at the sizing guides to get an average weight for an anchor to suit your vessel. Discard any guides that recommend remarkably lightweight anchors through the range then go up 2 sizes and you should have an anchor that allows you to stay put when the wind comes up in the middle of the night. Another thing to look for in the test data is a common thread, if an anchors holding power is low → medium more times than it is high (even though it's advertised as "Lloyd's listed as High Holding")I would give it a miss. 

Reality check: High holding is ok however in the cold of night an anchor with super high holding rating certainly helps soothe the nerves when the wind comes up.

Snubber’s

We have found a snubber is a vital component of the anchoring system if you use all chain rode. A snubber is a length of strong but stretchy rope (nylon) anything from 5 to 15 meters long, one end attaches to the anchor chain as the last of the chain is deployed and the other end tied round the bow mooring cleat. We have seen all manor of snubber’s in our travels and unfortunately a lot would not do what they are supposed to do.

Snubber's are best made of nylon because it stretches and is strong, it has good UV protection, will work wet, is easy on the hands when handling and is easily spliced. To have an idea how big a diameter you need requires experimentation. Start by looking at what wind strength your anchor chain starts to become straight, (every vessel is different) its at this wind speed you want the snubber to be adsorbing the energy from the vessel movements. On our vessel we use a long snubber that is two millimetres smaller than the recommended anchor rope diameter. There is no magic bullet with one size fits all when it comes to snubber’s, there are so many variables and a decision must be arrived at for the individual vessel. Things that will ultimately decide the length and diameter will include vessel windage, displacement, chain size (weight) and anchoring points. I recently read in an online forum where there are some who use mooring micro snubber’s and mooring lines, unfortunately for them nothing good can come from these setups. Mooring lines and equipment isn't made for anchoring and has the potential to be disastrous.

The amount of stretch is directly proportional to length.

• A 8m long snubber can stretch twice as much as a 4m long snubber.

Or inversely proportional to the square of the diameter.

• A 10mm diameter snubber can stretch twice as much as a 14mm diameter snubber.

As an example a 12mm diameter nylon snubber when new (breaking strain 3000kg) has about the same breaking strength as 8mm Grade L chain (3272kg breaking strain)


Testing a new snubber @30 Knots in shallow anchorage the chain has straightened out

A smaller diameter nylon snubber is strong enough to add the required stretch in the system, however a large diameter snubber or a snubber made of the wrong material totally defeats its intended purpose. I have heard catamaran owners happily telling others they have an oversized or ruggedly constructed bridle for anchoring. While this sounds great in theory, in practice this will only add to the grief of having problems when anchoring. Without incorporating a springer into the bridle there will certainly not be enough energy absorbed due to the boat moving when the weather comes up.  If the ruggedly constructed bridle has limited stretch the only thing that's going to happen is the anchor will be slowly dislodged one little shock load at a time. 


We attach our snubber to our anchor chain with a Dyneema loop, makes it easy quick and light weight. The best thing is its easy to go through the bow roller and doesn't fall off when you need it most as the boat starts to move about. 

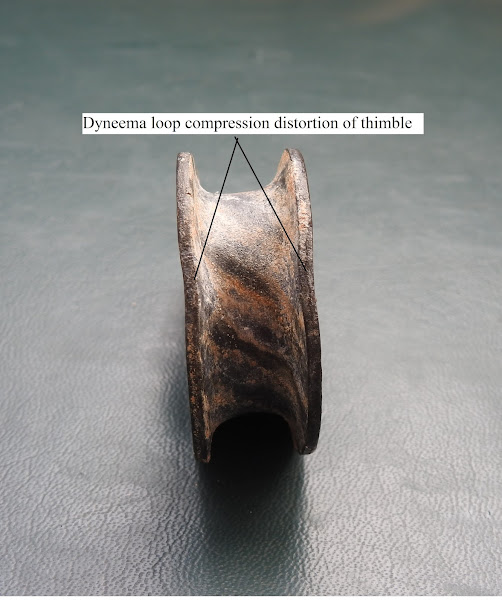
Use better solid thimbles in the snubber (top), the standard thimbles can distort badly and fail under high storm loads (as we found out)

Snubber to chain connection, only takes as long to attach as doing up a button and doesn't fall off, and can be made onboard if you have the raw materials, Dyneema cord and 5 minutes of time. 

Galvanised Anchor Chain

Selecting the right type of chain can be very confusing due to different grading systems. There are a variety of link sizes and the best thing to do is take your chain capstan with you when you do make the final decision on the chain supplier. Make sure the chain is a perfect fit into the capstan and does not bind when the chain rotated through it.

Is it better to have a long length of high strength light chain or a shorter or same length of lower strength heavy chain? Both have energy absorption, so there is not much point in using high strength chain as it corrodes quicker and can actually be brittle, which can cause handling problems. When its all said and done it is certainly best to use a long length of heavy chain!

We get by with 110m of chain, and I don't remember there is any time we thought we needed any more. We do however keep a 100m coil of nylon and 30m of chain as back up in the locker, but have only used some of the rope when it was time to cut off several metres for various jobs.

Anchor Chain Storage

In a lot of anchorages the bottom is sand, broken coral, mud (some times putrid) and or a deep layer of the ever present plastic bag so have a pressure saltwater wash down hose, you may have real problems if you rely on a bucket on a string. We know of one cruiser who ended up with several kilograms of putrid mud in the anchor locker due to blocked drains that required him to deploy all his chain, clear the drains while washing out the mud. What we found is that plastic bags or pieces come up in the mud from the chain or anchor and it doesn't take much for a piece to block the locker drain.

Anchoring In Deep Water

You can pretty much throw out the old scope ratios we have all read about in the sacred texts that were written by the ancient mariners. So for example if we were to go with the standard 5:1 that is used in shallower water. Enough chain to obtain the 5:1 chain to depth ratio in 25 metres of water is going to require 125 metres of chain, and if sticking to the convention even more if the weather is coming up.

So now on to something we used successfully. This will really only work if you can anchor successfully in shallower water. If your vessel usually skates off when the breeze comes up then this won't be a fix, and you are likely to still skate off on the breeze. Every one we talked to who had successfully used this technique had a new generation anchor, but that's not to say it won't work with older styles of anchor. Some who were unsuccessful did also have trouble anchoring in shallower water, and with out being to specific it was usually a combination of problems. These included under sized chain, undersized or old generation anchor or both, poor use of snubber or not using a snubber at all. 

What technique worked for us: Lay out 20 metres of chain and then lay out a length double the depth and don’t forget to use a good elastic nylon springer (minimum of 6 metres long), if its a bit windy or you require a little more security add another 10 - 20 metres of chain. So if anchoring in 20 metres lay out 60-80 metres of chain. If your really worried, let out all your anchor chain from the locker. While this twenty metres and a length double the depth doesn't sound like enough, due to several factors you will find it should be. Keep in mind if your securing the snubber to the mooring cleat at deck level of the bow roller then allow for this, deploy extra chain double the distance from water to the bow roller.

Water Depth Catenary chart

How does it work: In the deeper water the chain is allowed to hang into the depths. There is a lot more weight of chain suspended in water and now the catenary effect is very effective at absorbing the energy created when the boat is moving. Where as in the shallower water it doesn't take much additional wind to make the chain straighten out. When the chain straightens out there is very limited (or no) energy absorption, and this allows any vessel movement to be transferred directly to the anchor and the vessels cleats. This additional load from the increased wind strength and movement of the vessel due to wave movement creates high shock loads which can quickly dislodge the anchor or damage the boat.

You can have the best technique, and be anchored nice and snug in deep water, however if the wind turns and the fetch allows a large swell to roll into the anchorage all this work can come undone. We had this happen on occasions during the monsoon transition months, or a Sumatra winds coming in at O'Dark Thirty, always have a plan B mapped out.

We also anchored in very deep water where it went from the shore to 40 metres in three to four boat lengths, while this sounds crazy we would set up a stern line to shore and then drop the anchor out in 50 plus metres, then back down while bringing in the stern line. We found that even with a steep sloping bottom the anchor would dig in and wouldn't budge. Having the stern line stopped the boat swinging and pulling the anchor out into the deeper water. Even still it did give us an uneasy feeling looking out the back and feeling like we could just step out onto the shore.


Below is an excerpt from Rocna Anchors site, and while I am not advertising them, I believe this to be a good description of the definition of old generation anchors.

Old generation anchors include most types and designs dating before the Bügel (1986) and Delta (1990). Because the Bügel uses what we consider to be some new generation design characteristics whereas the Delta is first and foremost a plow, these two types define a bit of an overlap between the 'old' and 'new' generations which marks the transition from old to new on the timeline.

Below is the remains of our snubber after being caught on a lee shore with three nasty storm fronts coming in unannounced at O'Dark Thirty with the South China Sea as fetch. While we weren't anchored in deep water, I have put it in for reference, and why it's important to use high spec gear in the anchor system, and an example of how a simple Dyneema loop can hold fast.  


This is how well the Dyneema Loop holds on, this thimble was at the anchor chain end and held on until the snubber became so over worked it melted and then parted. 

What remains of a well used snubber, while its not easy to see the snubber worked so hard during the storm the core is fused together from friction. Interesting evenings entertainment, three storm fronts came in at O'Dark Thirty and had us pinned on a lee shore until we were able to pull the anchor up and get out of there. The snubber parting happened shortly before getting underway.

Back end shot of the distorted thimble. We now source heavier duty thimbles for use in our anchoring system. 

I am not promoting these anchors and I don't want to upset people however here is a link to Yachting Monthly with a short list of New Generation Anchors, and there isn't a Plow or Delter to be seen. I have worked in the marine industry for over 20 years and lived aboard for 13 years and have sailed most of my life.  I've had my fair share of old generation anchors. One such incident sticks in my mind when anchored in a bay with good holding, we woke when the wind came up, I was searching for my trousers while Deb was looking out the portlight saying all the boats in the anchorage are all leaving at once.  It took a moment for what she said to make sence, they weren't leaving we were going backward through the anchored boats at speed, quick start the engine!!!.  

Friday 5 May 2023

Power Outlet Sockets

Recently I responded to a forum where members tried to find the cause of cigarette lighter socket and plugs failing. While the replies were varied I don't believe any really addressed the root cause of the problem. In the past I have worked through a variety of problems with these very popular power connectors and have a few ideas of my own I would like to share.

Cigarette Lighter Plug and Socket, the better quality units are good to 20 Amps if wired correctly.

I hope to give you some thing to think about before you quickly write off the cigarette lighter sockets and plugs and advocate to install Anderson style plug in connectors. I don't believe it’s sensible moving away from the cigarette lighter sockets totally considering a wide variety of consumer electronics are made specifically to plug into this type of connection for power. In reality the best option is to have both, but keep in mind both have to be installed properly, if done incorrectly your back to where you started, with ongoing problems.

                                Common cigarette lighter accessories found on most cruising boats

Common USB power outlets for a cigarette lighter socket

Laptop Charger and USB outlet for a lighter socket.

A small inverter, various models are powered from the lighter socket.

An Anderson connector in an easy to install panel mount.

Sockets and plugs

Not all cigarette lighter sockets and plugs are created equal. There are a lot of plugs and sockets for sale in the market place that are just plain junk. Unfortunately these are the cheapest and due to this fact are usually the first to catch our eye. I have noted a lot that are really stretching the truth as far as the ability to carry the rated current (amps) advertised on the box. I have even seen install kits and extension cables with the wire size so small there is no way they could possibly supply the advertised rated current (amps) at a usable voltage. If these cables do eventually supply the advertised rated current, the voltage will be so low it would surely do damage to the equipment connected.

Cigarette Lighter Plugs

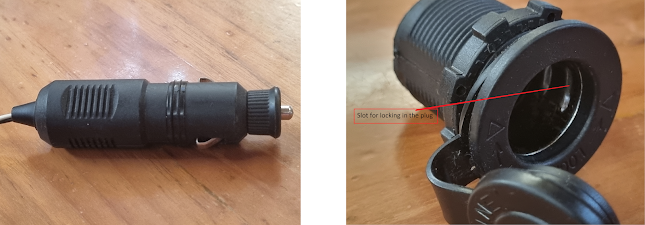
A good quality marine grade plug, this one has side contacts that will lock into slots in the matching socket. There is also a sealing ring to help keep moisture from entering the socket and plug connection in use. 

The good quality marine lock in plugs are listed as being able to carry 10 amps at 12 volts (120 watts) there are also some on the market listed as being able to handle up to 20 amps at 12 volts (240 watts). Not all plugs carry the same ratings and there are some that do not have a current rating on the unit or the packaging, of course that is if they are in packaging. In this case the best course of action is to undo the end cap and check inside the plug for a fuse, then use this fuse size as the rating of the plug. You may find the cheaper brands of plug are only good for as little as two (2) amps. A far cry from the ten to twenty amps that the better quality plugs are capable of. Don’t be tempted to up the size of the fuse, I have on a couple of occasions, and found that the plugs fail while in use, some times spectacularly in a puff of smoke.

Some equipment I have seen capable of drawing 15 amps has been fitted with cigarette lighter plugs, and as long as the socket is wired correctly to carry 15 Amps continuous there should not be a problem. Take a little time and do the detective work to find out if the plugs you have are safe for the purpose you intend them for. Equipment that comes with a cigarette lighter plug fitted should be OK to use as supplied, if a fuse is fitted don't replace it with a larger fuse. Prior to use make sure both the socket and plug are clean and the spring loaded tip has plenty of resistance when pushed back into the case. I have regularly seen the side contacts of the plug can get a rust build up on the contacts and will need to be cleaned before use.

This plug is cheap @ $2.95 however you get what you pay for and it did give problems before being replaced.

While its hard to see the side contacts of this plug are starting to rust and will require cleaning, better still would be to replace the plug with a plug made from better more conductive material. 

The better quality plugs and sockets made for marine use have a lock in place mechanism, simply line up the contacts on the side of the plug with the arrows on the socket and the plug will stay put until it is removed. Some plugs can take a bit of force to remove which is very good sign as the tension is kept on the contacts while in use.

Cigarette Lighter Sockets


Marine grade cigarette lighter socket, lock points shown on the body of the case. 

The good quality marine grade sockets are rated for 15 amps at 12 volts (180 watts) to 20 amps at 12 volts (240 watts), and usually come with a cap to keep out the moisture when not in use. These sockets are usually made from better spec materials and the metal components resist corrosion.

Old style cigarette lighter socket with a metal case and ceramic centre pin, this socket has been in use for over 14 years and works fine. 

Also on the market are sockets with an all metal body and a ceramic disk holding the centre contact, these were the norm when used to heat the cigarette lighter coil. I will say the body will not melt, and I have had one in use regularly on my vessel for over 14 years and haven't had a problem. These units do not have a lock in function so care has to be taken when selecting plugs to fit. Check the Amp (current) rating before purchasing as now days they vary any where from 5 – 10 Amps at 12 Volts.

Then there are the standard plastic sockets rated for 10-15 Amps at 12 volts. I think for safety you should make sure they are from a reputable supplier/manufacturer. I have seen unbranded sockets that in my opinion wont have a hope of being able to run fully loaded, the new contacts while looking nice and shiny brass start to bubble rust once in the humid marine environment.

The other variable here is that we can all be sucked in by the numbers printed on the packaging or sales brochure. What’s irritating is the losses caused by either bad advice or product advertising can be significant.

Power Accessories

What else to look for when using plug in power cables. Most, if not all off the shelf splitters (one plug connected to 2-4 sockets) or extension cables are really made to a price and the size of the wires used are not usually big enough for the advertised voltage/current.


There are similar looking extension cables for sale, most are advertised with specifications way beyond what they can actually achieve. Before purchase investigation into the suitability will need to be done before use. We got stung a couple of times before, and now make our own. The above unit is good to 3 amps at 12 Volts, I have seen similar units advertised at 10 Amps at 12 Volts, so buyers need to be aware.  

Watch out for the voltage drop when in use, I have had experience of these when running at the advertised rated 10 amps, the voltage drop is excessive. For example a spot light will be dim however a motor (bilge/water/air/fuel pump) is very likely to overheat all the while running slower, fridges will not run or become damaged, some electronics will stop working temporally or suffer permanent damage.

I have also noticed plugs advertised as capable of carrying 20 Amps which is all well and good, as long as the socket is also rated and wired to carry the current properly. However if it was me I would not use a cigarette lighter plug & socket at this high current level, I recommend and would use Anderson plugs.

A cigarette lighter and anderson plug mounted into an easily installed housing, great for dash mounts and the Anderson plug can handle up to 50 Amps if wired correctly. 
What we have experienced.

Excessive voltage drop in an extension cable. We inherited a 3 metre extension cable with the boat and it never did work at the amp and voltage specs advertised on the box. We unsuccessfully tried using it for running a fuel transfer pump, during trouble shooting we found low voltage of 7 volts at the socket end of the cable with the pump on. After a little detective work we found the wire size in the extension was 18 AWG (0.83mm2) or close to it. There is no way we could ever get the advertised rated 8 amps at 12 volts from this cable, it would be impossible. To be able get close to the specs on the box the cable size would need to be at least 12 AWG (2.8mm2) which is a significantly larger wire size. So how do we get around this, we make our own cables now, or have installed sockets closer to where we work. We cannot trust the manufactured extension cables to perform to the numbers written on the box.

We have seen so many advertisements of cables that can not possibly work at the listed current and voltage. After a little more detective work we have found that while the advert states 8, 10 or 15 amps, they get around that by stating the wire "amp rating", and the "amp rating" explanation is far beyond the scope of this post. Its all in the wording, obviously the marketing department had their thinking caps on and come up with this one. Why you ask? copper costs money and if they used a wire size capable of performing to the advertised specs they would either need to put up the price or lower the profit margin. Sadly we the unsuspecting consumer get sold a piece of equipment that will not perform.

Melting cigarette lighter plugs. We have had our share of problems with these until we worked out why. I was under the assumption these plugs were a universal 10 amps, or heavy duty model at 15 amps and now there are 20 amp units on sale, truth is stranger than fiction and as it turns out these plugs are rated at any thing from 1 up to 20 amps. Yep 1-20 amps and while they look the same outside its the quality of the components inside where the additional cost is. Prior to purchase always look for a fuse in the plug, this fuse size is a give way on the plug amp rating. This is where I caused myself grief, I would change the fuse to a larger one to run heaver equipment and caused the plug to overheat and sometimes distort badly. How & Why? Resistance in an electrical circuit causes heat, and the lower grade material in the cheaper units caused resistance and the flow on effect is heat. The more current (amps) drawn through the resistance the hotter it it will get, and most times the hotter things get the more resistance is created so its a spiral into failure, some times in a puff of smoke. For trouble free use of equipment get top branded plugs and sockets, yes I know the plugs for $2.95 look attractive when compared to the $15.00 plugs. The real question you need to ask your self is what is the failure of either the plug or the connected equipment going to cost you in the long run.


While these fuse ends look ok the fuse on the left has solder on the ends holding on the fuse wire, for whatever reason this causes enough resistance creating high temperatures at higher current.  

I mentioned fuses in the plugs, and this is also important, the fuse used has to be good quality. We had a batch of fuses with soldered ends and these caused all manner of problems due to poor contact inside the plugs. The same can happen with fuse holders either in the line of an extension cable or power supplied to the socket, the slightest resistance in the fuse holders contact with the fuse, can at higher currents cause the fuse/fuse holder to melt with out the fuse actually blowing. On these installs where the socket will be subjected to current over 10 amps we use a bolt in fuse, the holders don't cost much more than a standard style and have far better method of securing the wires or fuse.


Fuses hot enough to melt the housing and fuse holder, all with out blowing the fuses, most likely cause was a resistance and at high load created enough heat to melt the fuse and holder..

Bolt in fuses are certainly a better option to ensure better contact and less chance of failure due to bad connections. 
Failures of sockets

With out doubt one of the biggest problems is sockets wired in with undersized wire for the length of the run, this will cause large voltage drop for the connected equipment. I have also seen poor joins or improperly crimped connectors used on either end of the cable run causing poor contact. Also when doing an install buy good quality tinned/silver coated copper terminals or push on connectors, there are some on the market made from mixed metal and do not conduct as well as copper. The other flow on effect of these mixed alloy terminals is they can corrode quickly when in the marine environment.

As explained earlier regarding resistance in an electrical circuit causing heat, if the plugs used in the socket cannot maintain a good connection then there will be resistance and in effect heating, if enough current is drawn eventually the connection will heat up and if enough heat is generated the socket, plug or both can melt and become distorted. Again better quality sockets are built from better more electrically conductive material the flow on effect is a socket less prone to failure from contact problems. The better quality marine sockets also come with a built in locking mechanism and when used with the matching plug help maintain good contact with the plug.

Keep the sockets clean, we have found the green scourers can do a good job of removing any surface corrosion on either the socket or the plug contacts. We don't have to scourer for very long and the contacts come up like new. A quick blow out with canned air or use the vacuum cleaner to clean up after the job.

Summary

Be aware of what is for sale if your out looking to buy new equipment, it is truly a mine field. The sockets have to be wired correctly in your vessel. If your doing the job yourself get an idea of the wire length required before you do the size calculation to get the right current carrying capability. Remember while the socket may only be a metre from the power distribution bus bar you may require double or triple that length to do the job correctly by keeping the wire in the cable run or trays.   

While the better quality plugs and sockets are more expensive, the convenience of reliable connections is well worth the initial out lay. 


Here is a simple wire size calculator, and it can be compared as a secondary check with a chart I have used for several years. Keep in mind the calculator uses one way distance the chart uses wire length in the circuit which is double the one way distance.


https://www.omnicalculator.com/physics/dc-wire-size

DC_wire_selection_chartlg.jpg (3189×1574) (bluesea.com)