Showing posts with label Wire. Show all posts

Monday, 9 January 2023

Fuse Problem

While this problem isn't seen as much as it used to be its still worth while knowing about. The out come is the possibility of permanently damaged or intermittently malfunctioning equipment. 

We had trouble with glass fuses in those inline fuse holders, the ones we had trouble with are the glass body fuse with chrome end caps that has the fuse wire material soldered in place. The solder on the end caps of the fuse when used in some inline fuse holders that also use a soldered area or spring for connection can cause high resistance between the contacts very quickly. The lead/tin in solder appears to oxidize reasonably quickly. The flow on problem is that it can cause the failure of the attached equipment due to it not being supplied with the correct voltage and current.

Glass body fuse, the one on the left has the fuse material soldered in place, the fuse carrier on the right is preferred

To check, open the fuse holder, if it does not grip the fuse around the end cap but relies on pressure on the ends, be aware to make sure the fuse holder contact area does not have soldered ends, the ends should be smooth and shiny, preferably with the fuse size stamped on.

Another problem we have experienced is that the small contact area and lack of spring pressure of some fuse holders can cause excessive heat and failure of the fuse holder. A lot of the cigarette lighter type appliance plugs are being made to a price and while they are stamped as being capable of sustaining 10 amp however they come with a 2 amp fuse. In all our experiences using the plug at higher current (>2 Amps) by replacing the fuse with a larger fuse will ultimately see the quick failure of the plug due to internal contact failure, poor contact gives rise to resistance and under load this resistance causes excessive heat, the higher the load the more heat generated, the body of the plug then starts to melt and before you know it, you smell smoke at about the same time the appliance connected via the plug fails. Unfortunately the only real way around this is to purchase the high end, brand name plugs.

In the photo the end cap that is not soldered can be identified by the fuse size stamp on the cap end.

Saturday, 21 July 2018

Broken Throttle Cable Fix

After a run into an anchorage and before shutting the engine down I was clearing the water from the exhaust system with a couple of bursts of high engine revs. Then as I went to do the final burst the throttle leaver didn’t have any resistance, and the motor didn’t increase in revs. After shutting down the motor I discovered what the problem was.  The end had broken off the throttle cable at the swage connecting the threaded rod end to the internal cable.  Unfortunately the broken end was in the steering pedestal and adding the wire rope grips wasn’t going to work in the cramped location. I end for ended the cable and removed the stainless steel tube from the fitting head.  After adjusting the position of the end cable clamp and lining it up, I attached the wire rope grips. While the wire rope grips are not designed for this purpose they worked well. A final adjustment of the throttle cable to get the idle revs right was all that was needed. A simple and effective fix until we were able to source a new cable..


Broken Morse cable was jury rigged by removing stainless tube from head and using wire rope grips to hold end on

Why give the motor a couple of quick bursts to clear out the exhaust? In our case it will leave the exhaust system drier, if we have been at idle for a while it will stop a build-up of water running back down the exhaust pipe and flooding the engine. This really depends on the boat design, unlike most of the new builds, older vessels like ours (and others I know) have the motor below the water line so any exhaust water has to be lifted up and out higher than the motor.  If left to idle for several minutes it’s possible to partially fill the water lock and then once the motor is switched off, it doesn’t take much for a little water to run back down the exhaust pipe to push a little water up the exhaust into the motor. This is not a failure of the water mixing/injection elbow while this is a problem, sometimes this problem is misdiagnosed and a new elbow is fitted after clearing the motor of water.

Friday, 13 May 2016

Wire Rope Grips

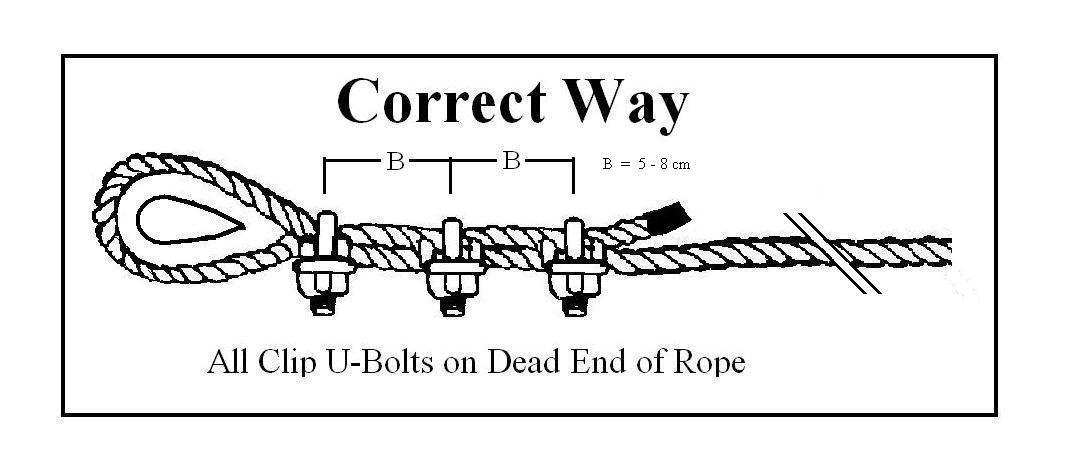
Part of our spares kit contains cable and wire rope grips to jury rig standing rig cables or replace our steering cable.  To jury rig, the theory is to use the clamps to put eyes in the broken wire rope then use bottle screws, lashings, a short length of chain or D-shackles to connect the two ends of the wire. While we may have all seen wire rope grips in use, there is only one correct way of assembly. This way is to have the clips (u bolts) on the dead end side of the rope. Using the clamps this way ensures strength of 85-90% of the wire rope is maintained. If the clamps are around the other way, clamp block on the dead end (wrong way) strength is reduced to about 75 % of the wire rope.

The wire rope grips are used in groups of three with the first being placed close to the eye the others are evenly spaced 5-8 centimeters from each other clamp. Previously I didn’t have any idea of the correct way of using these wire rope clips and remember having seen them incorrectly illustrated in books.  Now days I pay more attention when looking around others boats and have seen a few ends terminated incorrectly, and sometimes these had been done by people who should have known the correct way.

Facts I found along the way are to make sure you match the wire rope clip to the rope diameter for example, use a 9 mm wire rope clip with a 9 mm wire rope. Never connect two ends of wire rope with wire rope clips and never shock or impact load the rope. That’s right wire rope clips are not made for joining wire rope together but are used for forming an eye, eyes can then be joined as mentioned earlier.


When working with coated cable you need to match wire rope clip size to uncoated cable diameter and strip the coating off the cable where wire rope clips will be attached. Install wire rope clips correctly, wire rope clips are made for use with wire rope only so never use wire rope clips on pipe, rod, chain, fiber rope, etc.  Inspect and maintain wire rope clips regularly and replace any that are worn, distorted, or damaged, and depending on the use inspect wire rope clip nuts regularly and re-torque as needed.