Over a few drinks at sundown I was talking with a few fellow cruisers about conserving power. However before we go much further I think I better clarify that last sentence, I guess it wasn’t conserving power as this would in most cases mean rationing or doing without. The reality was I was more concerned how they reduced their power usage so they could enjoy what they were doing while maximising the usage of the power store they have. On a vessel this is not always easy to do, reduce power usage while still running the assortment of electronic gadgets that we now take for granted. Its things like our TV, stereo, e-reader, phone, laptop and tablet, we are not going to leave them behind just because we are out on the water.
Preliminary checking
First of all you will need to take control of you’re on board power and manage the usage. To manage a resource properly will require some way to monitor the usage. Power monitors are available to do the job for you. In the past you would need a good quality volt meter and amp meter to keep track of what was happening. Reading the voltage at any given time could give you a rough idea of the percentage of power left in the battery bank. Unfortunately the bank could not be undergoing charging at the time or the reading would not be valid. The modern battery monitor with a simple microprocessor control can quickly keep track of the amount of power coming and going (sometimes both at the same time) and give you a fairly accurate window into the amount of available power in the battery bank. This is important with today’s systems where power to charge the batteries can be available day or night.
 |
| While this power monitor is old school it does a great job keeping track of our house and start battery |
One of the best things you can do for your self is to check for unaccounted power usage, and leakage current problems. To start the test will require you to disconnect all your charging sources. In most cases this would be the shore power battery charger, solar panels and the wind generator. For the purpose of this test don’t run the motor, I am assuming it has an alternator. What you are looking for is a zero current in or out on the amp meter/power monitor. Unfortunately the power monitor will consume some power but it should be minute. So after turning off the all the charging sources and power switches wait for everything to settle. After an hour with nothing turned on your amp meter should read the minuscule amount of power needed to run the monitor. It is important on a vessel to know when the power is turned off there isn’t any stray leakage firstly drawing current from the batteries, but secondly doesn’t have the potential of causing problems with the metal fittings on the boat. While doing the test remember that most boats have a maintained supply that may bypass the main circuit board. This maintained supply powers things like your electric bilge pumps, gas monitor and power to the memory in your stereo so when you turn it on next it knows what the programed stations are. If you have a high current draw when doing this test look at the maintained supply and you may need to disconnect it for a short time. But really the maintained supply shouldn’t be the source of heavy current draw, it should be milliamps unless something is running.
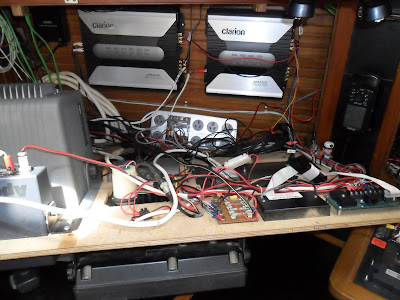
We also went through the boat and tidied up the connections and re-run wires correctly. Connections on bus bars and terminal strips were opened cleaned then re-tightened, then after a very light coating of synthetic grease was applied to keep out moist air. Its better to do the connections up dry and then coat over the top to keep the the connection dry. All this work took a while and only a small section was done at a time, as its very time consuming. This was especially true when we had to rework sections that the previous owner had paid professionals to fix or do installs and upgrades (degrades would be more like it).
 |
| Our electrical cabinet after we purchased the vessel, vomiting a techno colour of wire, yes that's an AC circuit breaker that had been placed in the middle of the all this DC. |
 |
Believe it or not some of this work was done by supposedly skilled but certainly well paid professionals.
|
 |
| After a tidy up, connections cleaned and the wires re routed and tied up to stop vibration fatigue. |
|
|
 |
| After a tidy up the cabinet is looking in much better condition now. |
Charging the Batteries
There are several options and we have found that it is best to have a balanced charging scheme. Fit a high current aftermarket alternator controlled by an external smart regulator to your engine. A high current output will supply more of a charge in the short time most sail boats run the engine for. Solar panels are very good and the more of these you can fit sensibly the better. To finish off the solar installation, pair the panels up to a MPPT regulator to get the most out of the panels. Then to add some redundancy top it off with a wind generator, there are several models to choose from, but a wind generator that starts producing power at low wind speeds is good. From experience we have found a balanced system works, don’t put all your eggs in the one basket so to speak. There will be days where the sun doesn’t shine and days where the wind doesn’t blow. But it’s rare to have both missing. We have also found the wind generator is great when motoring along on those doldrums days, if the wind generator kicks in and produces power there is enough wind to sail.
 |
| Four solar panels almost half a kilowatt |
 |
| Wind generator gives great power output even here in Asia |
 |
| High output aftermarket alternator with serpentine belt kit to stop belt slippage and wear |
Reducing power consumption
Lighting
Replacing your incandescent bulbs with LEDs is without doubt one of the most significant power saving projects you can embark on. As an example we can run five light fixtures with LED globes for less power consumption than one incandescent bulb. We didn’t just stop at the internal lights we also replaced navigation and anchor light fixtures with LED units. Now we don’t need to worry about the current draw of the navigation lights any more. With all the LED bulb types coming on the market now changing the bulbs in a standard fitting over is not the specialist job it was once. Take a sample of Bulbs to your local supplier to get the right pin and globe size. I have noticed the prices for LED globes and fittings have really come down so do your homework identify your globe type and shop around. While fluorescent lights do a fantastic job of reducing power usage they have been known to output RFI (radio frequency interference). Why is this a problem? The interference has the tendency of causing sensitive electronics, like navigation instruments to malfunction. When using the VHF or HF radio the interference can be picked up in the radio and garble the transmitted signal, the receiving stations will then have trouble understanding what you are saying. Or cause interference in the receive circuits of the radio and you may not understand what is being said. Possibly the worst I have seen is a fluorescent light that would stop the TV receiving any stations, it took a fair bit of hair pulling to sort that one out.
 |
| Led Bulbs for house and navigation lights |
Communication & IT
You no longer need an inverter to run a Laptop/USB/phone charger. First up USB chargers, auto stores and most chandlers carry various USB chargers that can be mounted in the same size hole as the old cigarette lighter socket. There are also small units that plug in to a car cigarette lighter socket. You will need to know the output current so you can match it to what you want to charge. Shop around, a heavy duty dual USB charger socket with an output of 5 Volt / 2.5 Amp has an output capability of 2.5 Amp (12.5 Watts) from one socket. This is the correct output required to charge your iPad/ Android Tablet/eReader at the full, normal rate, or 2 iPhones/Android Phones /iPods/MP3 players simultaneously. Yes our USB outlet can even charge up our Samsung phone, a lot of standard USB chargers wont. The good thing is that DC-DC convertors can be very efficient and I have seen specifications stating some are 95% efficient, meaning the loss of conversion can be as low as 5%, not bad if compared to the losses incurred by an inverter (DC-AC converter) that can be as high as a 50% loss using low power devices.

 |
| Fitted USB charger 10.5 watt output top, cig lighter sockets below for laptop chargers |
 |
| AC USB charger on the left, 5 Volt 1 Amp output, On the right USB Charger with an equivalent output, only requires 12 Volt DC. | |
 |
| Laptop chargers; on the right is an AC unit, middle is a DELL 12-19V 90 watt, and far right is a 90 watt Energy Knight. the DC units step the voltage from 12v DC up to 19 volts to run and charge a range of laptops |
 |
| AC USB chargers left, middle fitted type 12v to 5v USB charger, right plug in type USB chargers. We have seen plug in USB chargers with a 3.1 A (15.5W) output |
Due to the fact there is a lot of wasted power while running an inverter, for this reason on our vessel we use a DC-DC Laptop charger instead of an inverter once away from the dock. Looking at the drawing (Fig 1) you will see the extra steps necessary when using an inverter to arrive at the correct voltage to charge or run an appliance. So what is a DC-DC Laptop charger; these are usually marketed as Airplane and Auto laptop/notebook adaptors. These DC-DC units convert the ships twelve volts DC to what’s necessary either lower or higher voltage DC with a small loss, a lot simpler safer and cost efficient. Depending on the type most DC-DC converters are universal and can be used for a wide variety of charging and powering applications. For running your laptop DC-DC power adaptors are available in different sizes and are manually configurable for the correct output. All you need to do is to read the settings on the back of your AC adapter and purchase the corresponding DC-DC converter. As an example a 19 volt 65 watt AC adaptor can easily be replaced with a 90 watt DC-DC adaptor with a configurable 19 Volt output. For the net books/notebook a 50 watt in car mini notebook power supply would be good.

If you have a DELL laptop the best DC-DC adaptor to get is the one they supply because the laptop talks to the charger and if an aftermarket charger/adaptor is used then some will not recharge the battery. One thing to keep in mind is that laptops, tablets and net-books have new models coming on the market with lower power consumption all the time. A friend recently replaced their old laptop with a newer model and was pleasantly surprised to find it consumed half the power the old one did while processing at twice the speed. Getting on to the internet is not the problem it used to be. Mobile Wi-Fi modems can be charged via a USB power outlet, or the use of mobile phones personal hot spot option has really removed the need for AC power on board to run Wi-Fi routers and switches. In the past we had to run the inverter when we wanted to use our laptops external disk drives but with the change in technology this is also a thing of the past. High capacity disk drives that are totally powered from the USB port on the computer make power saving easy.
Where do you get a 12 volt laptop charger?
To charge our laptop we use a Targus APD046AU-62 Laptop Car Charger + with
USB Fast Charge via Cigarette Lighter socket, we purchased ours on Ebay from a local company, Harvey Normal also have them.
The following are available from Jaycar,
https://www.jaycar.com.au/90w-automatic-mini-car-laptop-power-supply/p/MP3334
https://www.jaycar.com.au/150w-car-laptop-power-supply/p/MP3472
Be warned if you do go and shop for a laptop power supply or adapter (same same different terminology). You have to make sure the sales person understands it a 12 volt mobile unit, not for mains power. I sent off a friend to buy two for his laptops and thinking he had a handle on the situation he came back with two that needed mains power, view the power connections before paying. If after a quick conversation with the sales person you don't think he is understanding the situation ask for some on else or leave the store.
Recreation & Entertainment
An important end of the day past time for me is settling in to watch the TV, well not necessarily television stations but a favourite movie or show. There are a lot of television sets out now that only require twelve volts DC, but some of the time you need to sniff them out. Checking the specs on line can be a quick way of short listing the likely suspects before you head out to the shops. When we were in a store looking to buy a new TV, instead of looking at the specifications on the front I would be looking around the back of the unit checking what the voltage of the power supply was. We did get a LED HD television that only used 36 watts, and really the picture quality is fantastic. Just remember the bigger the screen surface area the more power is required to power it. A benefit of shopping around is that like us you may be able to get a HD TV with built in DVD player. Not a big deal these days with a lot of movies being available in file format. But still worthwhile when some of your favourites are still on DVD disks. Power saving is what we are really concerned about and we know our TV playing a DVD movie consumes less power than if we were to run the same movie on a laptop. If you have a TV that can take a USB device to play movies, view photos, and play music. Instead of using a disk drive use a USB memory stick because they draw less power than a disk drive but best of all these sticks can store a dozen or more movies.
 |
| These nice power amplifiers can really suck some power, we removed them during our electrical system remodel |
An important part of the on-board entertainment is a stereo system. A lot of people don’t realise that with stereo sound systems the clarity and quality of a sound system depends more on the efficiency of the speakers than that of the electronics, look for high quality speakers. If you've ever checked the sensitivity rating on a speaker you will usually find that it is in the 90 decibel range. This means that at a distance of one meter from the speaker, the speaker will output 90 decibels of sound with only one watt of power. You may not realize it but that is pretty loud. For a non-occupational setting this is the recommended maximum level you can listen to safely for one hour in a twenty four hour day. Combine that with the additive effect of multiple speakers and you easily reach a 100 decibel level (enough to cause pain and or damage). Three or four watts will supply enough power for comfortable listening at a distance. Keep in mind that acoustic power operates on a logarithmic scale. This means that past a certain point you're only going to get a small increase in the sound level even though you're increasing the power output enormously. Power consumption can be significantly reduced by having a high quality low wattage sound system. So those 100 or 200 watt sound systems are not really necessary and are more than likely just going to suck up power, a good quality low wattage system is better value in the long run. If you want to roughly check the creative measurement of output wattage figures claimed by stereo system manufactures advertising, check out the fuse size a 120 Watt system will have at a minimum a 10 Amp fuse.
House Keeping
A vacuum cleaner is great for picking up things a dust pan and broom can struggle with. The vacuum cleaner we ended up with has a 12 volt cable so it can run from a car cigarette lighter socket independent from the internal battery. The unit was supplied with an AC – DC power adaptor to charge the battery. The output of the AC adaptor was 19 Volts DC the same as our laptop needs to charge. I chopped off the ac adaptor and installed a power socket on the vacuum cleaner charge lead that is compatible with our lap top charger. We can now charge the vacuum cleaners battery in half the time we could have done it with the low current AC adapter, and the best thing is we don’t need to turn on the inverter to do the job.
 |
| 12 Volt rechargeable vacuum cleaner, we cut off the AC adapter and use a laptop charger to charge the batterys |
 |
| Added a socket to the input to the charger, the old AC adapter output was 19V and was the same as the output of the laptop charger. |
Comfort
Other things we have found that can extend your battery power reserves. We use good quality twelve volt fans, the current draw is possibly the best we have seen for a fan that moves a lot of air quietly. While they are expensive to purchase they have more than paid for themselves. Being in the tropics we have the fans on a lot, and it’s not uncommon for the fans in our cabin to be on all night.
 |
| Quiet low current draw fans are not cheap but are worth it in the long run. |
House
I have left possibly the biggest power consumer on most people’s boats till last. Refrigeration is a consistent source of problems on most vessels. Reading the manuals and sale brochures make it sound easy, however you need to check into the actual figures they are giving you the specifications for. I don’t think many vessels work in these temperatures or want the goods in their fridge to be this warm. So to get better temperatures inside the box will require the thermostat turned down and this will then increase the overall power usage. The power consumption figures of the specifications quoted can go up significantly. One word fixes most refrigeration problems and that is insulation, and the more you have the better the refrigeration on your vessel will be. What is best when it comes to refrigeration, I think the best thing to do is to keep it simple and only run a fridge. A freezer does consume a lot more power and if it hasn’t got at least one hundred millimetres of insulation then you will have long run times pulling the internal temperature down to freezing. Even with one hundred millimetres of not insulation you are really on the edge of not having an efficient system. One thing I wouldn’t do is to have the fridge compressor attached to the engine. I know guys who do and really they cannot go anywhere, or explore further afield because they have to be back on board to run the engine twice a day to cool the fridge. The other side of the equation is all this daily running of the engine with not much of a load isn’t doing it any good and has been known to cause premature failure. So eutectic cold plate or evaporator plate, well it’s up to you each has its merits, and to get the best out of the systems requires the fridge to be kept full for better hold over of the cold. A modern system with good quality compressor controller and thermostat is the best thing to do without ripping cabinets apart to add insulation. Keep in mind there are twelve volt electric eutectic cold plate systems, I know that it can be confusing. Eutectic cold plate systems can be run by either an engine powered compressor or a twelve volt condenser unit. I have met numerous people that believe only motor driven systems can use a Eutectic cold plate.
Keeping up
When you start the motor plug in every device in need of charging, don’t put it off, top up as often as you can.


